How to Set Up Raspberry Pi Remote Access via KaaIoT
- Raspberry Pi Remote Access via KaaIoT
- What you’ll end up with
- Prerequisites
- Step 1 — Create a VPN Client in KaaIoT
- Step 2 — Download the VPN config and install it on the Pi
- Step 3 — Enable VNC on the Pi
- Step 4 — Set up the Python web server
- Step 5 — Generate an ephemeral SSH key for KaaIoT
- Step 6 — Verify SSH credentials in KaaIoT
- Step 7 — Add an HTTP proxy for the web server
- Step 8 — Add a VNC tunnel
- Step 9 — Verify everything on boot
- Troubleshooting
Raspberry Pi Remote Access via KaaIoT
Connect your Raspberry Pi to the KaaIoT platform so you can reach it from anywhere — VPN tunnel, browser-based VNC desktop, and HTTP web server proxy — without any port forwarding.
Stack: Raspberry Pi OS Bookworm (Wayland desktop) · KaaIoT · OpenVPN · wayvnc · Python HTTP server
What you’ll end up with
| Access method | How it works |
|---|---|
| SSH | Via VPN IP assigned by KaaIoT (e.g. 10.176.1.18) |
| VNC desktop | Via KaaIoT VNC tunnel → vnc-proxy-<id>.vpn-service.kaaiot.com |
| Web server | Via KaaIoT HTTP proxy → proxy-<id>.vpn-service.kaaiot.com |
Prerequisites
- Raspberry Pi running Raspberry Pi OS Bookworm (Desktop) with desktop autologin enabled
- Local SSH access:
ssh root@raspberrypi4.local - A KaaIoT account at next.kaaiot.com
- Windows machine with OpenSSH installed (for
scp/sshcommands)
Step 1 — Create a VPN Client in KaaIoT
This gives your Pi a permanent VPN identity and IP address.
Open KaaIoT → Device management → Remote access.
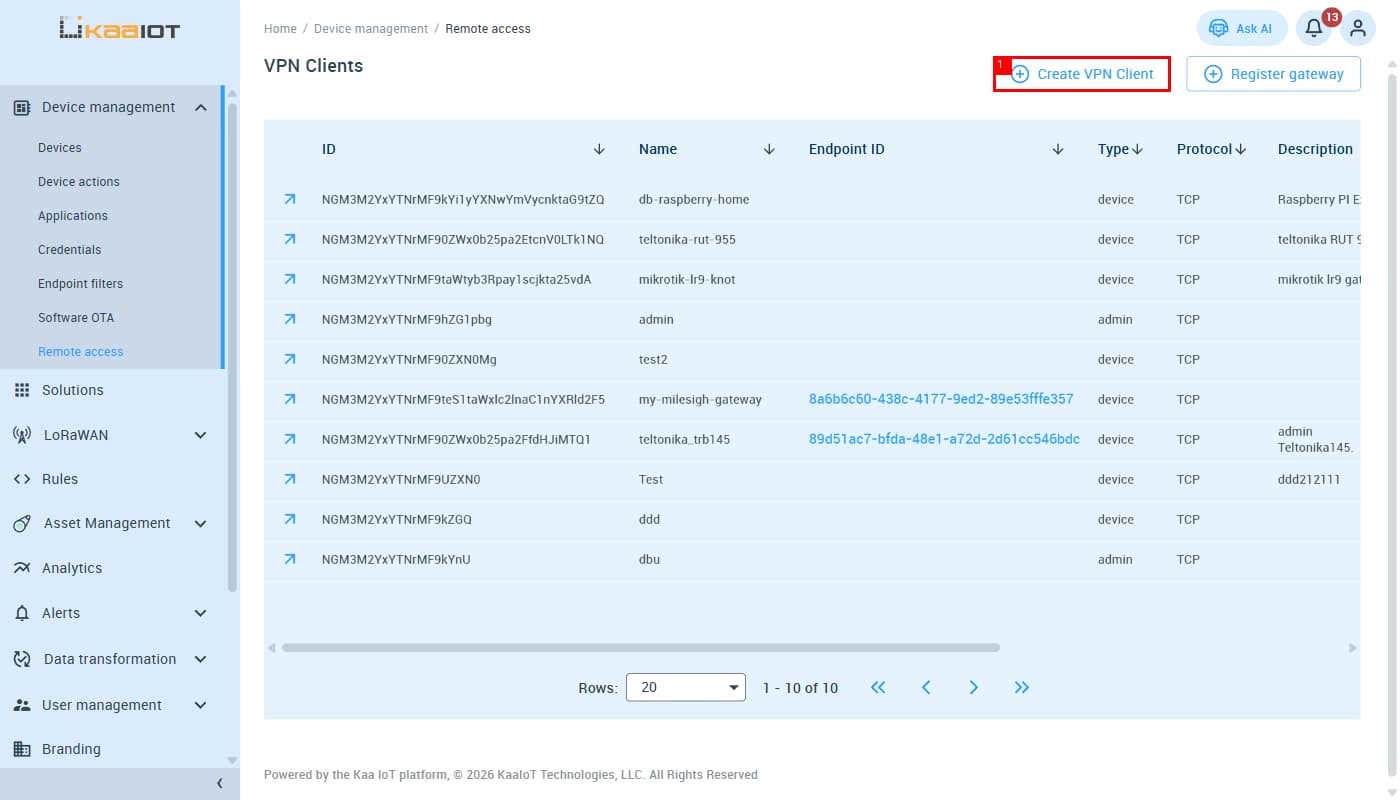
Click + Create VPN Client (top right). The creation form opens.
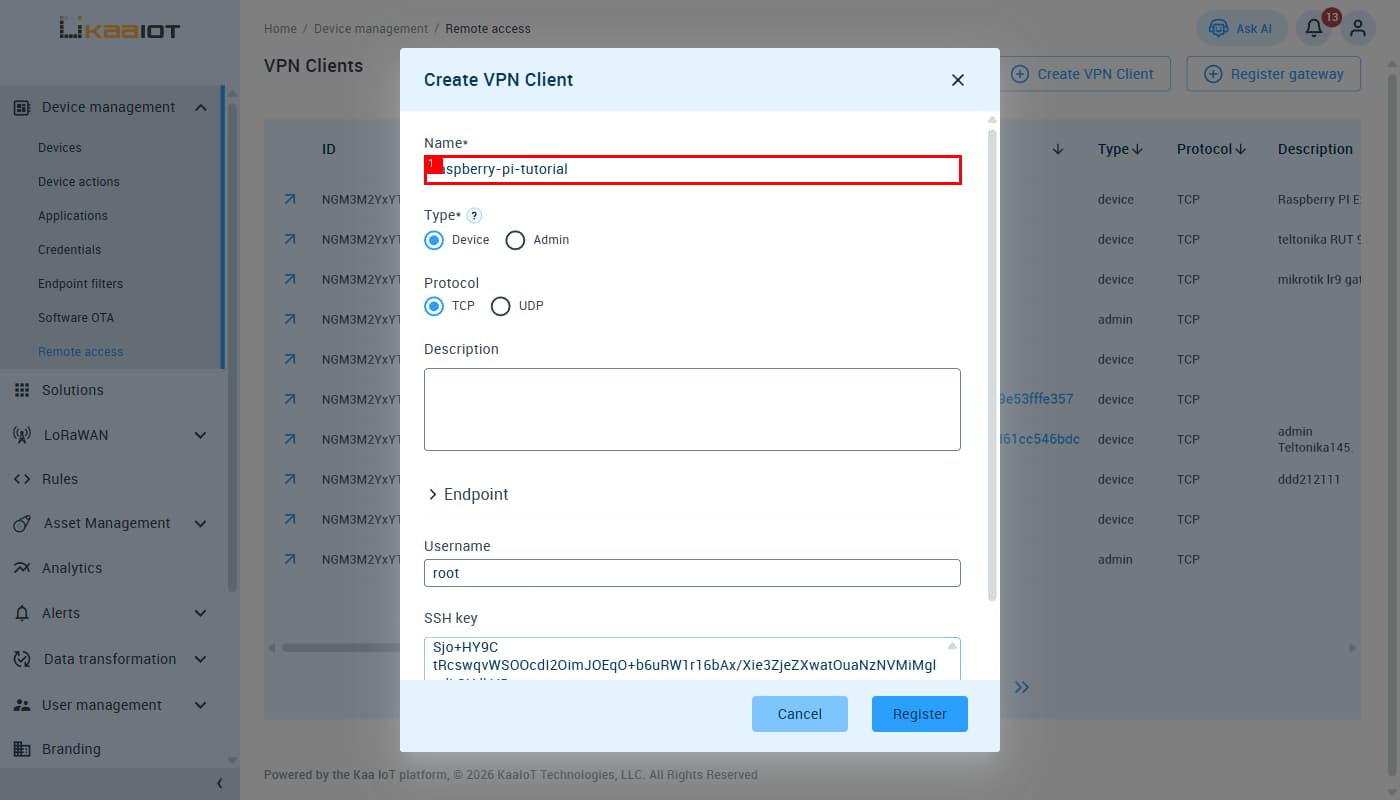
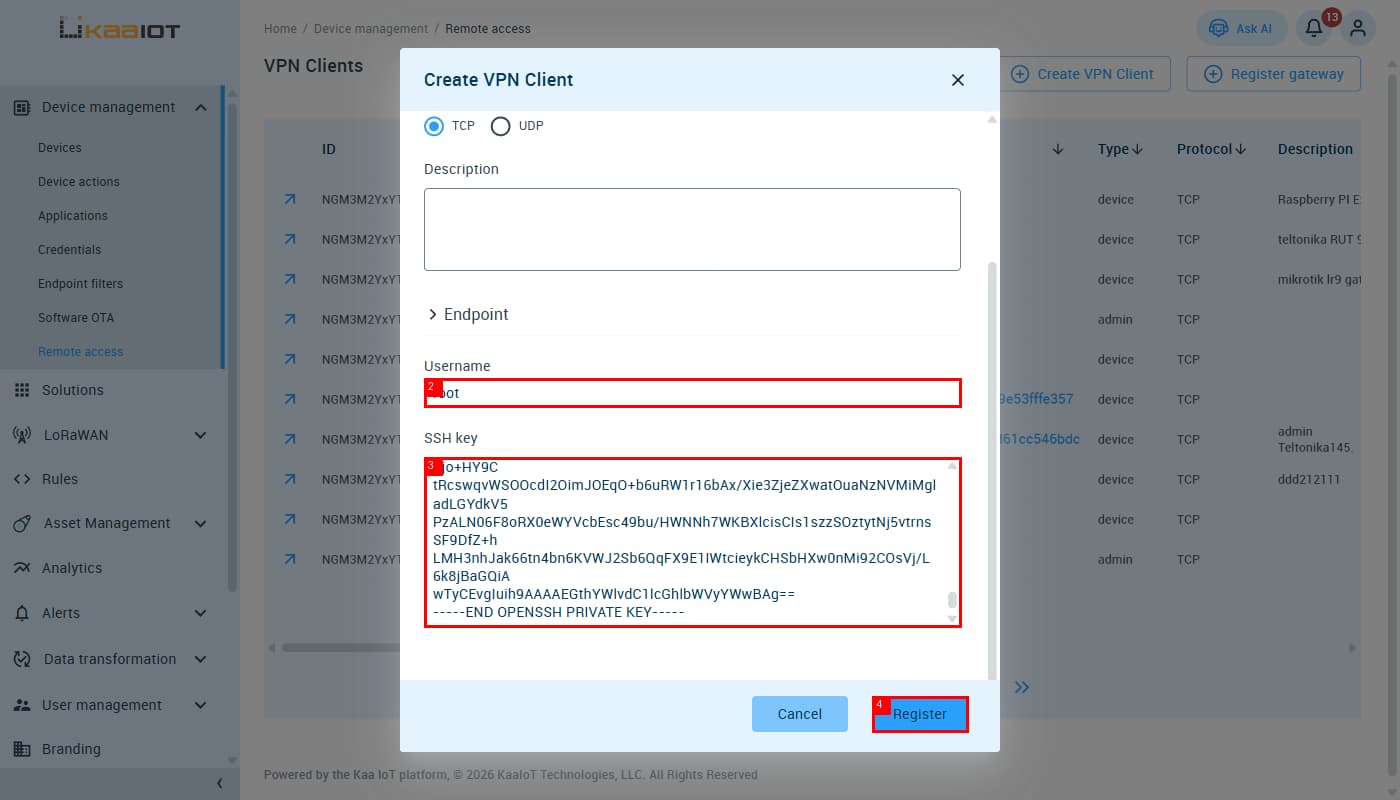
Fill in the Name field (①), then scroll down to fill in Username (②), paste the SSH private key (③), and click Register (④):
| Field | Value |
|---|---|
| Name | raspberry-pi-tutorial (or any name) |
| Username | root |
| SSH key | Paste the full contents of kaaiot_ephemeral (the private key) |
Click Register. KaaIoT creates the client and assigns it a VPN IP (e.g. 10.176.1.18).
Step 2 — Download the VPN config and install it on the Pi
On the client detail page, click ↓ Download config to get the .ovpn file.
Copy the file to the Pi from your Windows machine:
scp "C:\path\to\your-config.ovpn" root@raspberrypi4.local:~/
SSH into the Pi and install OpenVPN:
ssh root@raspberrypi4.local
sudo apt update && sudo apt install -y openvpn
Place the config where the systemd unit expects it:
sudo mkdir -p /etc/openvpn/client
sudo mv ~/your-config.ovpn /etc/openvpn/client/client.conf
Caveat: The
openvpn-client@.servicetemplate looks forclient.confinside/etc/openvpn/client/. Placing the file at/etc/openvpn/client.conf(one level up) causes “Error opening configuration file”.
Enable and start OpenVPN:
sudo systemctl enable --now openvpn-client@client
sudo systemctl status openvpn-client@client
ip a show tun0   # should show the VPN IP, e.g. 10.176.1.18
Replacing the config later — when you get a new .ovpn file:
scp "C:\path\to\new-config.ovpn" root@raspberrypi4.local:~/
ssh root@raspberrypi4.local
sudo mv ~/new-config.ovpn /etc/openvpn/client/client.conf
sudo systemctl restart openvpn-client@client
Step 3 — Enable VNC on the Pi
Raspberry Pi OS Bookworm uses a Wayland desktop (labwc), not X11. The VNC server is wayvnc, not the old vncserver-x11-serviced.
Enable VNC via raspi-config:
sudo raspi-config nonint do_vnc 0
sudo reboot
After reboot, verify wayvnc is listening:
sudo ss -tlnp | grep 5900
# Expected: wayvnc on 0.0.0.0:5900
Disable auth so KaaIoT’s noVNC can connect. wayvnc enables TLS by default, which plain noVNC can’t handle. Create the system-wide config:
sudo mkdir -p /etc/wayvnc
sudo nano /etc/wayvnc/config
Add this content — include the trailing newline or wayvnc silently ignores the file:
enable_auth=false
Restart wayvnc:
pkill wayvnc
# wayvnc restarts automatically via the desktop session autostart
Caveats:
- Use
/etc/wayvnc/config, not~/.config/wayvnc/config— the system-wide path is what gets read when wayvnc is launched by the desktop session.vncserver-x11-serviced(RealVNC’s X11 daemon) conflicts with wayvnc on port 5900 and will fail with “Cannot find a running X server on vt7” on Wayland. Keep it disabled:sudo systemctl disable --now vncserver-x11-serviced- wayvnc requires desktop autologin. Without it, no Wayland session starts and wayvnc never runs.
Step 4 — Set up the Python web server
Create the server script and site directory on the Pi:
mkdir -p ~/site
~/dummy_server.py:
#!/usr/bin/env python3
import functools, os
from http.server import SimpleHTTPRequestHandler, HTTPServer

HOST = "0.0.0.0"
PORT = 8000
SITE_DIR = os.path.join(os.path.dirname(os.path.abspath(__file__)), "site")

Handler = functools.partial(SimpleHTTPRequestHandler, directory=SITE_DIR)

if __name__ == "__main__":
    server = HTTPServer((HOST, PORT), Handler)
    print(f"Serving {SITE_DIR} on http://{HOST}:{PORT}")
    try:
        server.serve_forever()
    except KeyboardInterrupt:
        server.shutdown()
Put your index.html in ~/site/. Run as a systemd service so it starts on boot:
sudo tee /etc/systemd/system/raspberry-site.service > /dev/null <<'EOF'
[Unit]
Description=Raspberry Pi web server
After=network.target

[Service]
ExecStart=/usr/bin/python3 /root/dummy_server.py
WorkingDirectory=/root
User=root
Restart=on-failure

[Install]
WantedBy=multi-user.target
EOF

sudo systemctl daemon-reload
sudo systemctl enable --now raspberry-site.service
Verify:
curl http://localhost:8000
Step 5 — Generate an ephemeral SSH key for KaaIoT
KaaIoT needs to SSH into the Pi to set up the VNC tunnel and proxy. Generate a dedicated key pair for this — ephemeral, revocable, separate from your personal keys:
Run this on your Windows machine (or any machine with OpenSSH):
ssh-keygen -t rsa -b 4096 -C "kaaiot-ephemeral" -f kaaiot_ephemeral -N ""
This produces kaaiot_ephemeral (private key) and kaaiot_ephemeral.pub (public key).
Add the public key to the Pi’s authorized_keys:
type kaaiot_ephemeral.pub | ssh root@raspberrypi4.local "cat >> ~/.ssh/authorized_keys"
Or from the Pi directly:
echo "ssh-rsa AAAA... kaaiot-ephemeral" >> ~/.ssh/authorized_keys
Allow legacy RSA signatures on the Pi’s SSH server. KaaIoT’s SSH client uses the legacy ssh-rsa algorithm. OpenSSH 10.x on Bookworm disables it by default — re-enable it:
sudo nano /etc/ssh/sshd_config
Add:
PubkeyAcceptedAlgorithms +ssh-rsa
Restart SSH:
sudo systemctl restart ssh
Verify:
sudo sshd -T | grep -i pubkeyaccepted
# Should include ssh-rsa
Caveat: Do not add
-o PubkeyAcceptedKeyTypes=ssh-rsawhen you SSH into the Pi yourself — OpenSSH 10.x advertises onlyrsa-sha2-256/rsa-sha2-512, so forcingssh-rsacauses a “no mutual signature algorithm” error. ThePubkeyAcceptedAlgorithms +ssh-rsaline insshd_configis for incoming connections from KaaIoT, not your own client.
Step 6 — Verify SSH credentials in KaaIoT
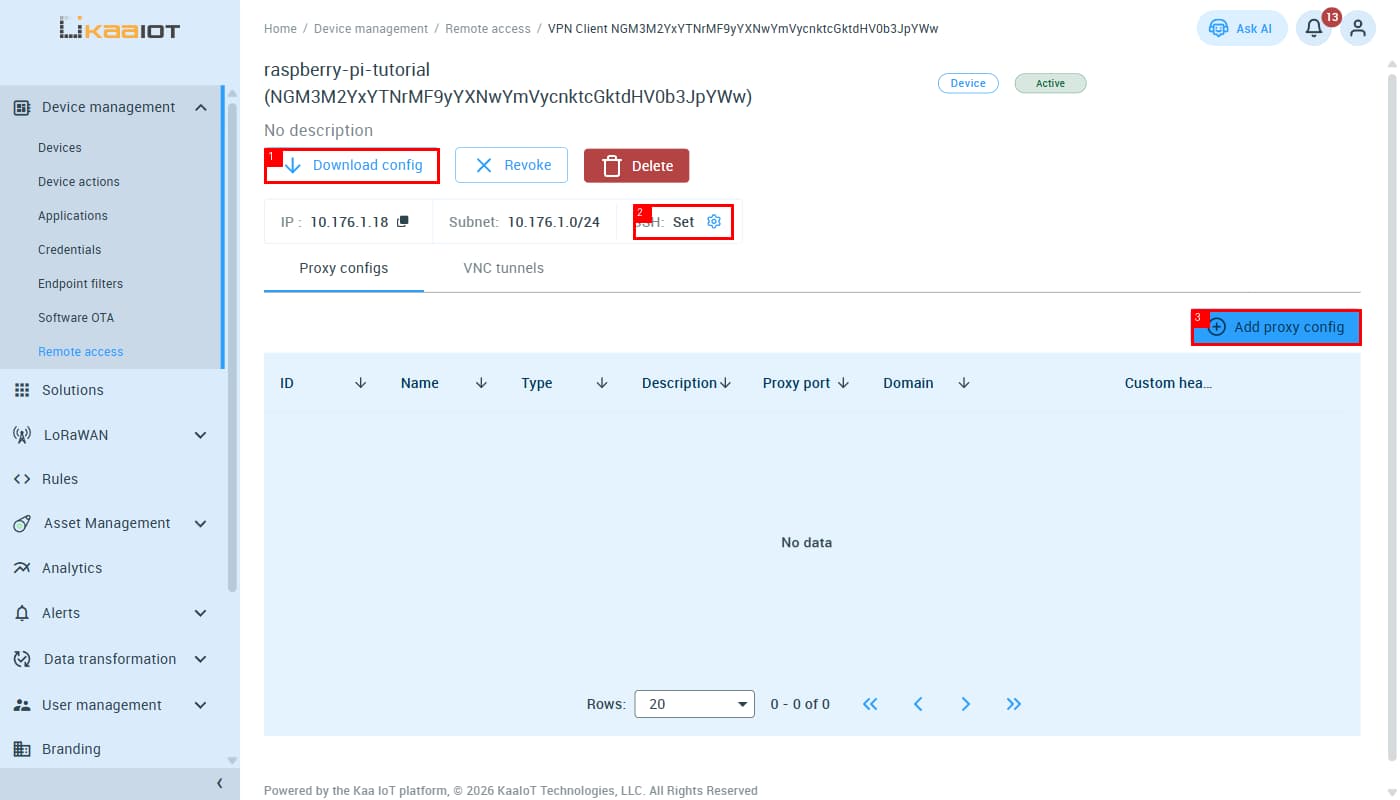
You already filled in the SSH username and private key when creating the VPN client in Step 1. On the detail page you should see SSH: Set next to the IP address.
① Download config — downloads the .ovpn file for the Pi
② SSH: Set (⚙ gear) — click to update credentials later if needed
③ Add proxy config — used in Step 7
If SSH still shows Unset, click the ⚙ gear icon and fill in
rootas Username and paste thekaaiot_ephemeralprivate key, then click Save.
The private key goes to KaaIoT (so it can authenticate to the Pi). The public key goes to the Pi’s
authorized_keys(so the Pi accepts that key). Both must be in place for the tunnel to work.
Step 7 — Add an HTTP proxy for the web server
On the Proxy configs tab, click + Add proxy config.
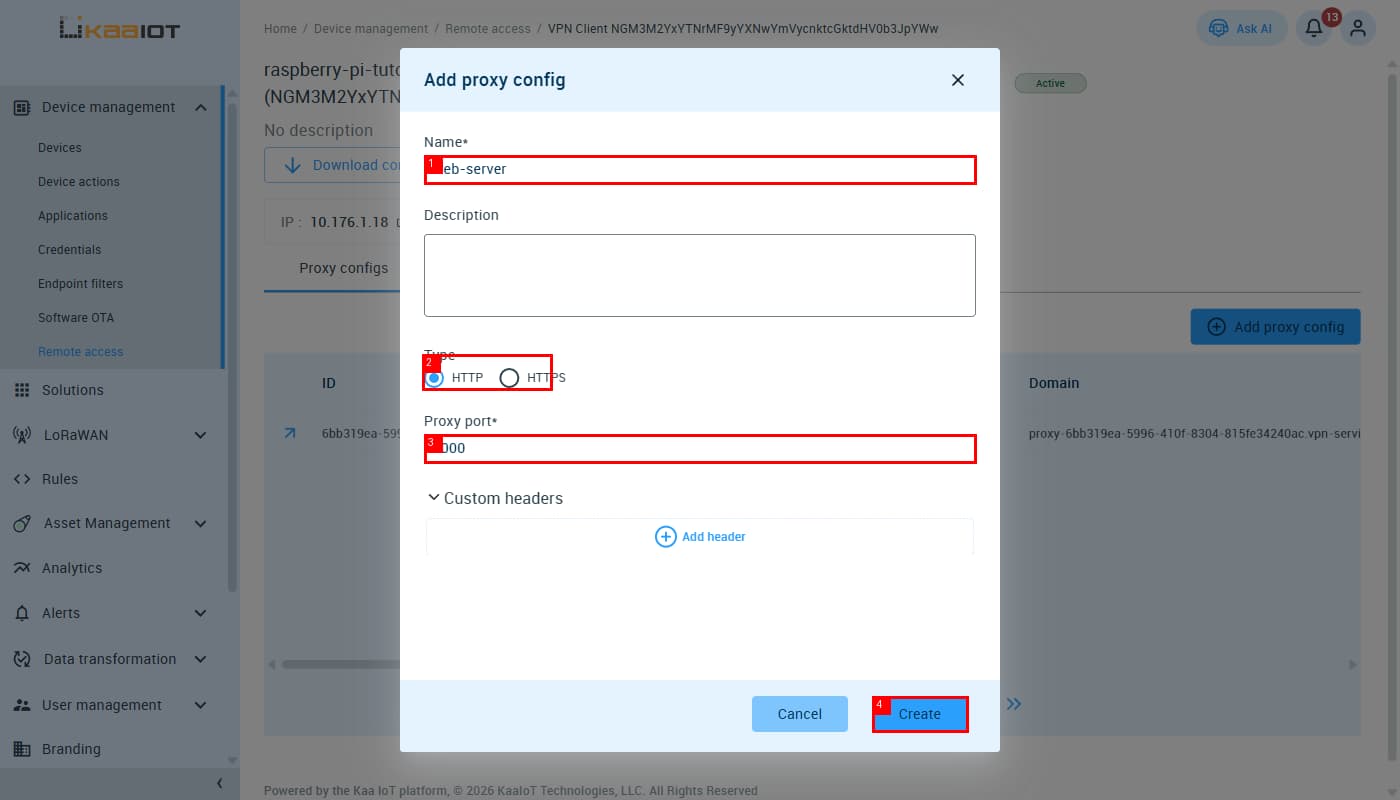
Fill in:
| Field | Value |
|---|---|
| Name ① | web-server |
| Type ② | HTTP |
| Proxy port ③ | 8000 |
Click Create ④. The entry appears in the list with a generated public URL:
proxy-<id>.vpn-service.kaaiot.com
Opening that URL in a browser will show your Pi’s web server — as long as the Pi is connected to the VPN.
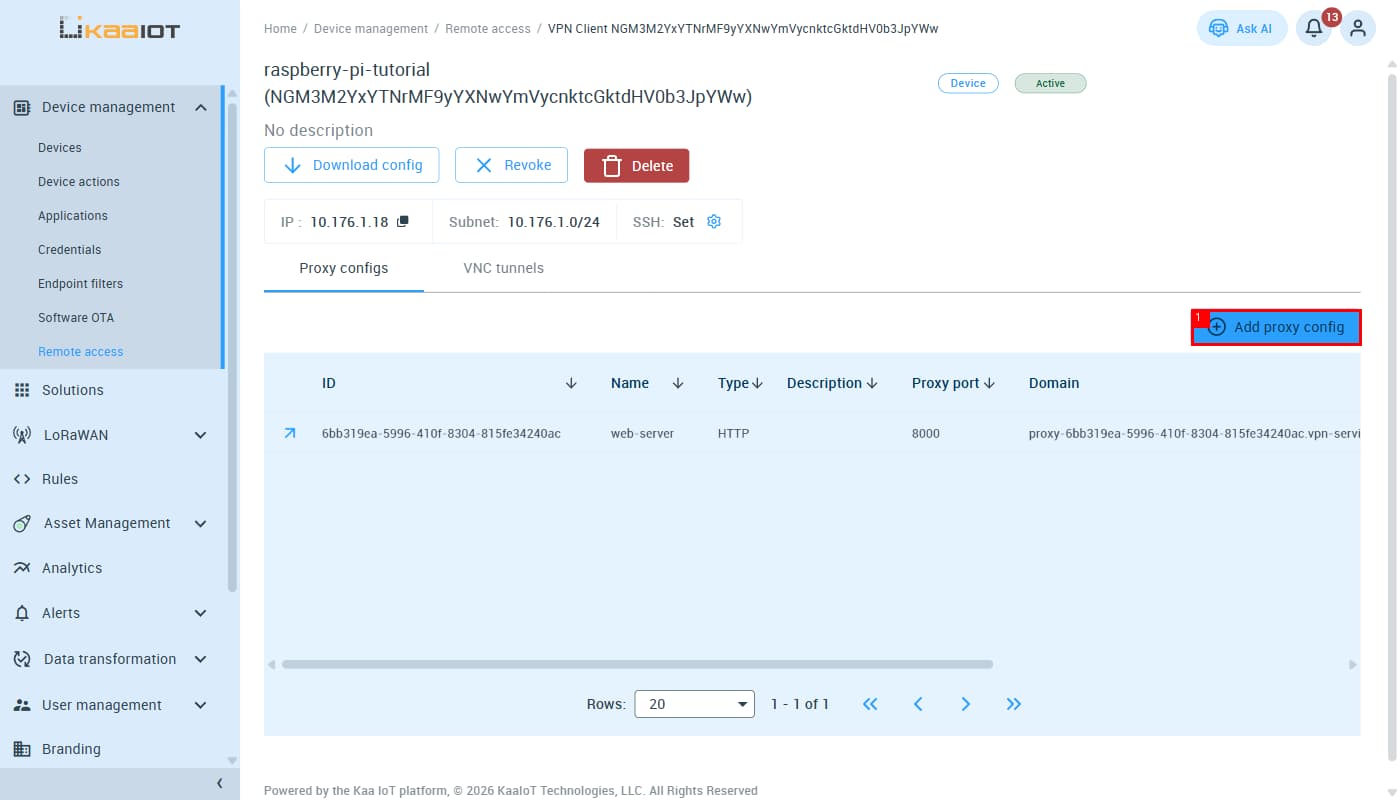
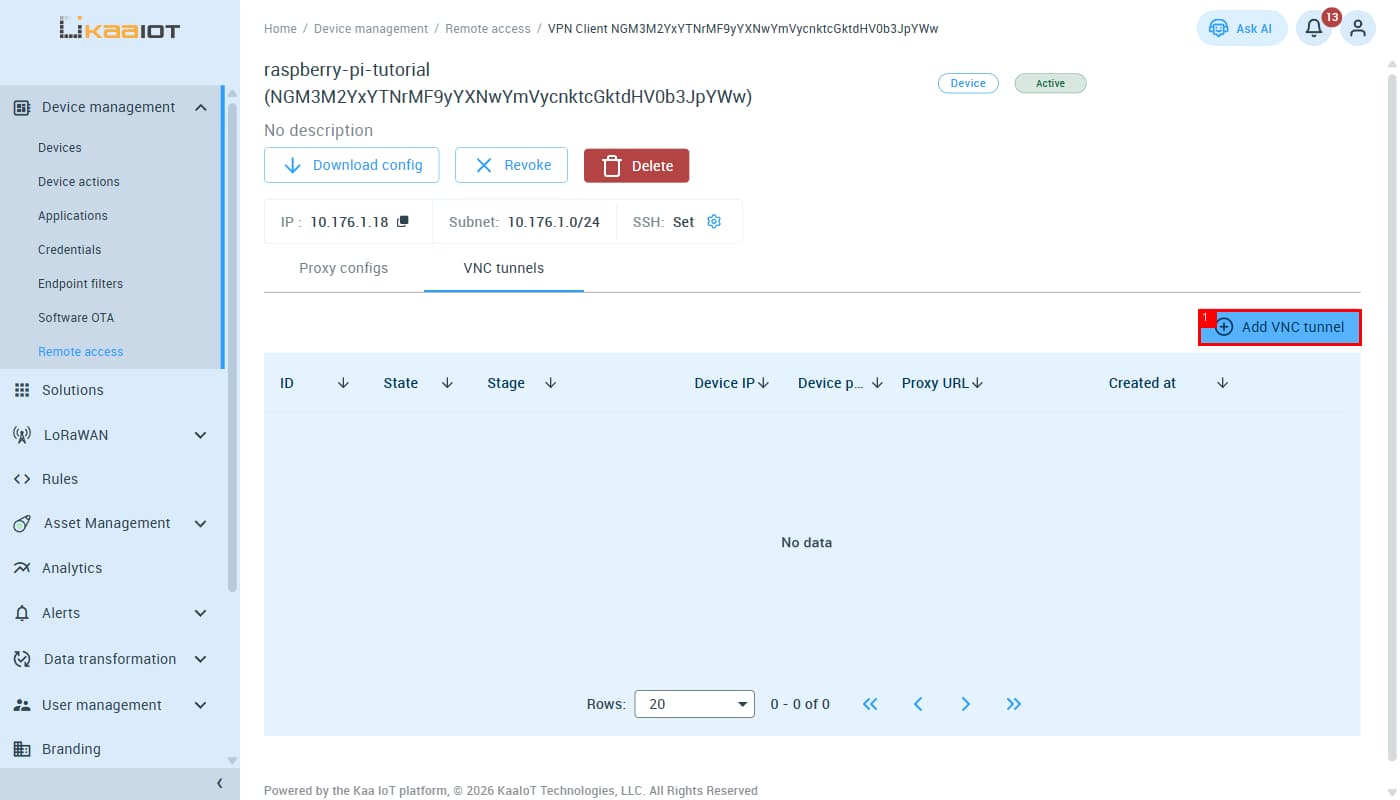
Step 8 — Add a VNC tunnel
Switch to the VNC tunnels tab and click + Add VNC tunnel ①:
Fill in the modal:
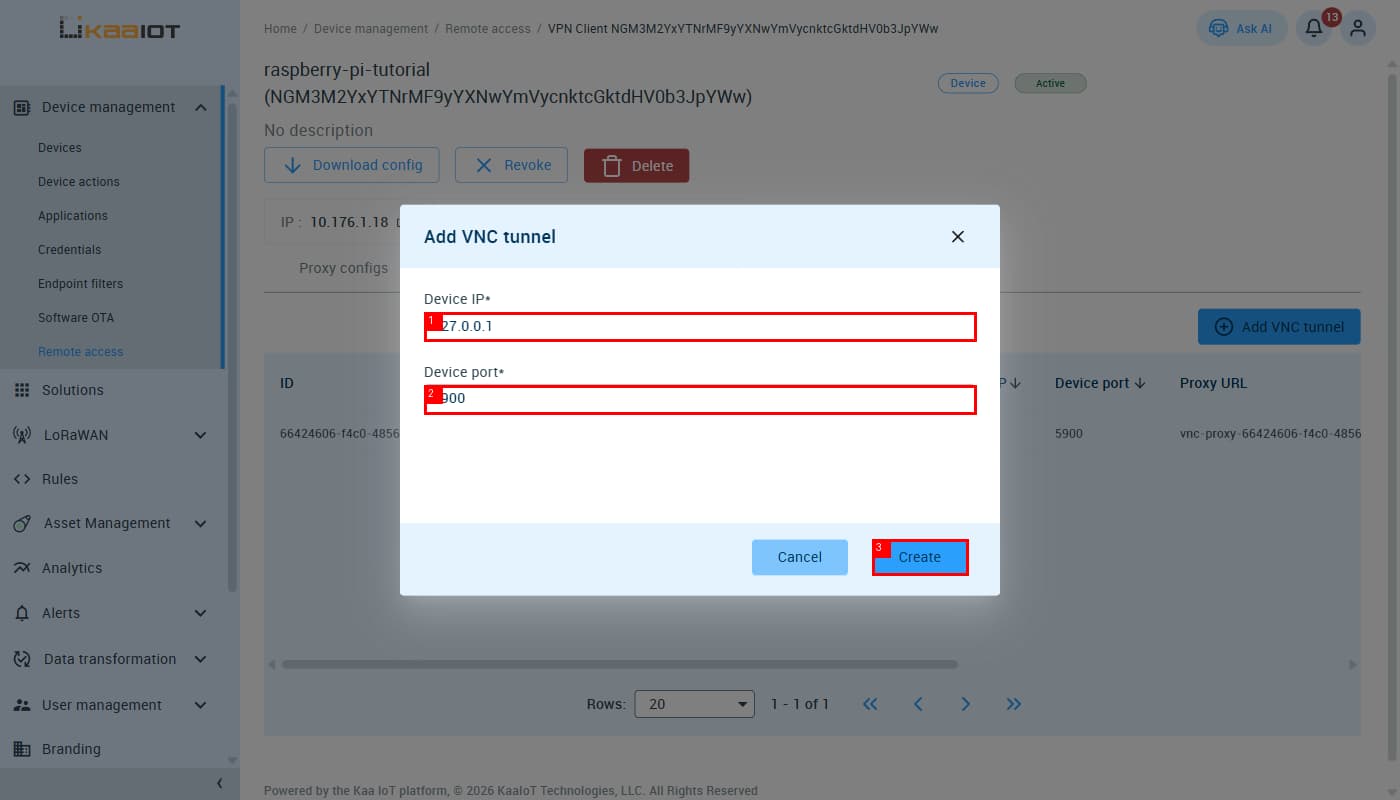
| Field | Value |
|---|---|
| Device IP ① | 127.0.0.1 |
| Device port ② | 5900 |
Use 127.0.0.1 (loopback), not the Pi’s LAN or VPN IP — wayvnc binds to localhost and KaaIoT SSHes into the Pi to reach it.
Click Create ③. The tunnel appears immediately in state Pending → SSH_TUNNEL_CREATING → Running:
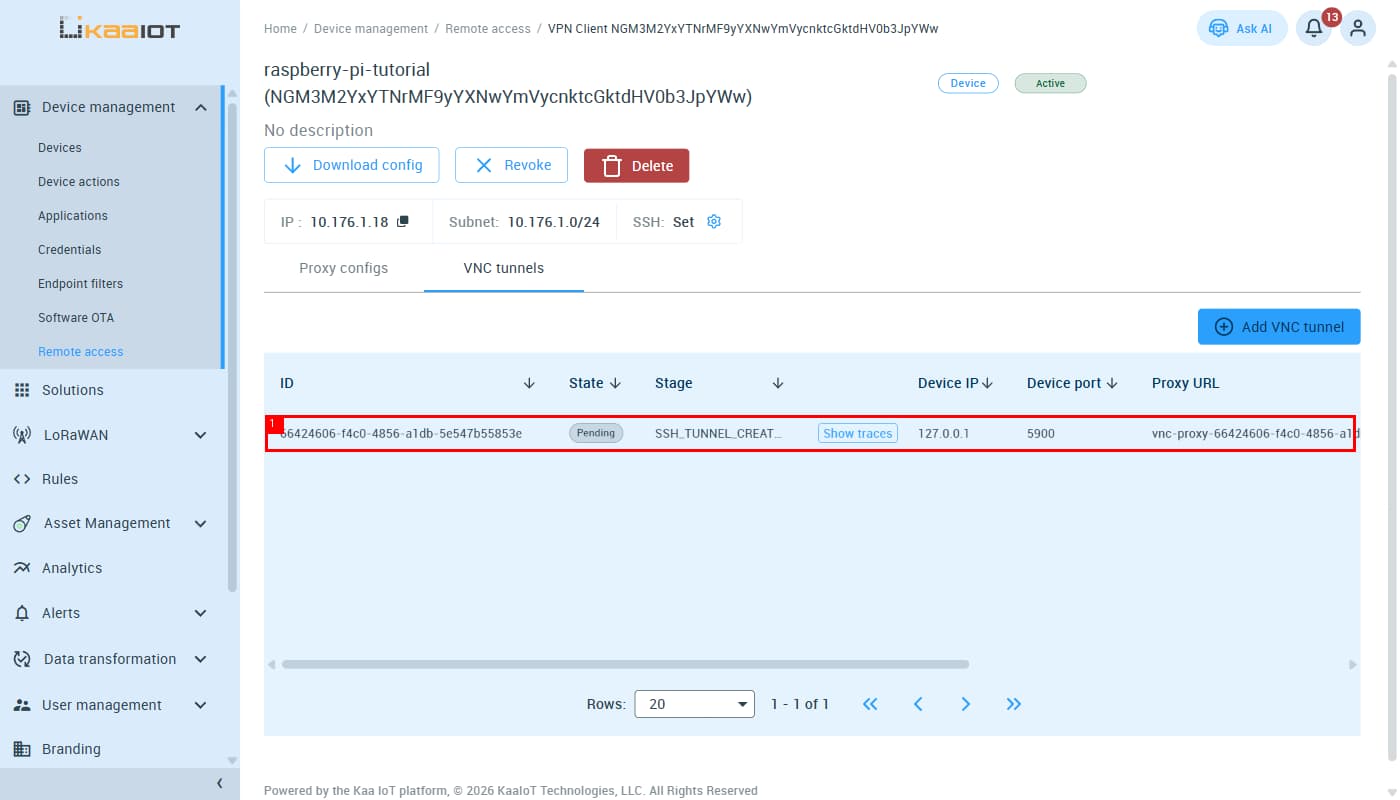
Once state is Running, the Proxy URL column shows your noVNC link:
vnc-proxy-<id>.vpn-service.kaaiot.com
Open that in a browser to get a noVNC session directly to your Pi’s desktop.
Step 9 — Verify everything on boot
After a reboot, all services should come up automatically:
| Service | Auto-start mechanism | Check command |
|---|---|---|
| OpenVPN | systemctl enable openvpn-client@client |
systemctl status openvpn-client@client |
| wayvnc | Desktop session autostart (requires autologin) | sudo ss -tlnp \| grep 5900 |
| Web server | systemctl enable raspberry-site |
systemctl status raspberry-site |
Quick post-reboot verification:
systemctl status openvpn-client@client   # active (running)
systemctl status raspberry-site.service  # active (running)
sudo ss -tlnp | grep 5900               # wayvnc listening
ip a show tun0                           # VPN IP assigned
curl http://localhost:8000               # web server responds
Troubleshooting
OpenVPN: “Error opening configuration file”
The systemd unit looks for /etc/openvpn/client/client.conf (inside the client/ subdirectory). Make sure the file is there, not at /etc/openvpn/client.conf.
wayvnc not starting
Desktop autologin must be enabled. Check: raspi-config → System Options → Boot / Auto Login → Desktop Autologin. Without a running Wayland session, wayvnc never starts.
noVNC auth failure / black screen
Check /etc/wayvnc/config has enable_auth=false with a trailing newline. User-level ~/.config/wayvnc/config is ignored — only the system-wide path is read.
KaaIoT VNC tunnel stays Pending
Most likely the public key isn’t in ~/.ssh/authorized_keys yet, or PubkeyAcceptedAlgorithms +ssh-rsa isn’t set in sshd_config. Both must be done before the tunnel can complete the SSH handshake.
SSH “no mutual signature algorithm”
You added -o PubkeyAcceptedKeyTypes=ssh-rsa to your own SSH command. Remove it — that flag is only for services that require the legacy algorithm. OpenSSH 10.x on the Pi uses rsa-sha2-256/rsa-sha2-512, not ssh-rsa.
Monitor SSH login attempts
sudo journalctl -u ssh -f                          # live
sudo journalctl -u ssh | grep -i "failed\|invalid" # past failures
w                                                   # active sessions