Kaa User Management Resource Groups (Pools)
- User Hierarchy with Resource Groups
- Admin
- Manager Account
- Developer Account
- Customer Account
- Summing Up
User Hierarchy with Resource Groups
This tutorial provides a practical example of how to use Resource Groups to build a structured user hierarchy in Kaa.
It’s recommended that you have some familiarity with policies before proceeding.
If you’re new to policies, start with the definition here, then follow this tutorial on policies. After that, come back here to continue.
Why Use Resource Groups
Most of what we do here can be achieved with just policies.
However, resource groups offer these advantages:
- They let you group resources and refer to them collectively.
- They help keep your policies shorter.
- They give you better control over resource access across accounts.
- You can build a hierarchy of resource groups to delegate access.
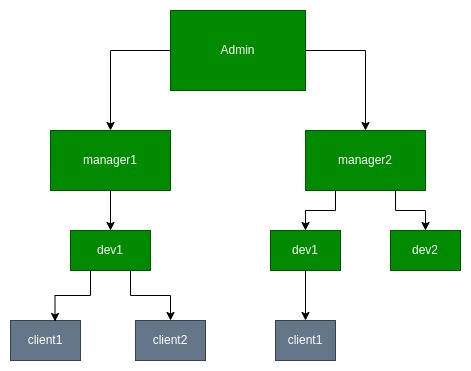
User Infrastructure Example
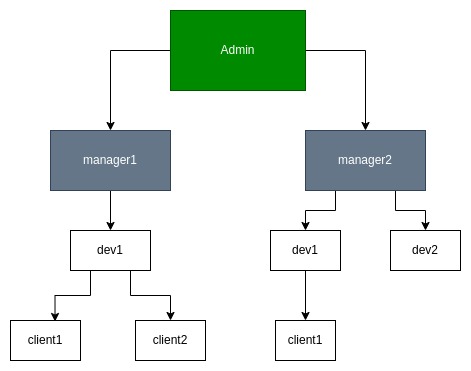
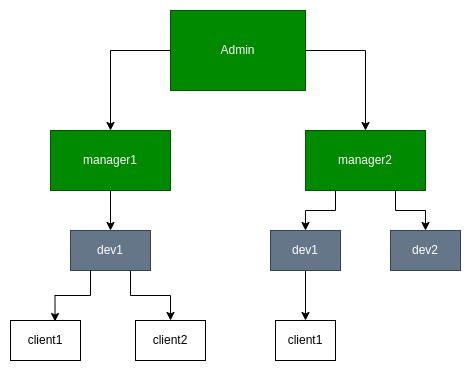
We’ll set up a role-based access model like the one shown below:

- Admin – Full access across the entire infrastructure.
- Manager – Can manage resources and users within their own scope.
- Developer – Can work with resources assigned by the manager and assign them to clients.
- Client – Has read-only access to assigned resources.
Admin
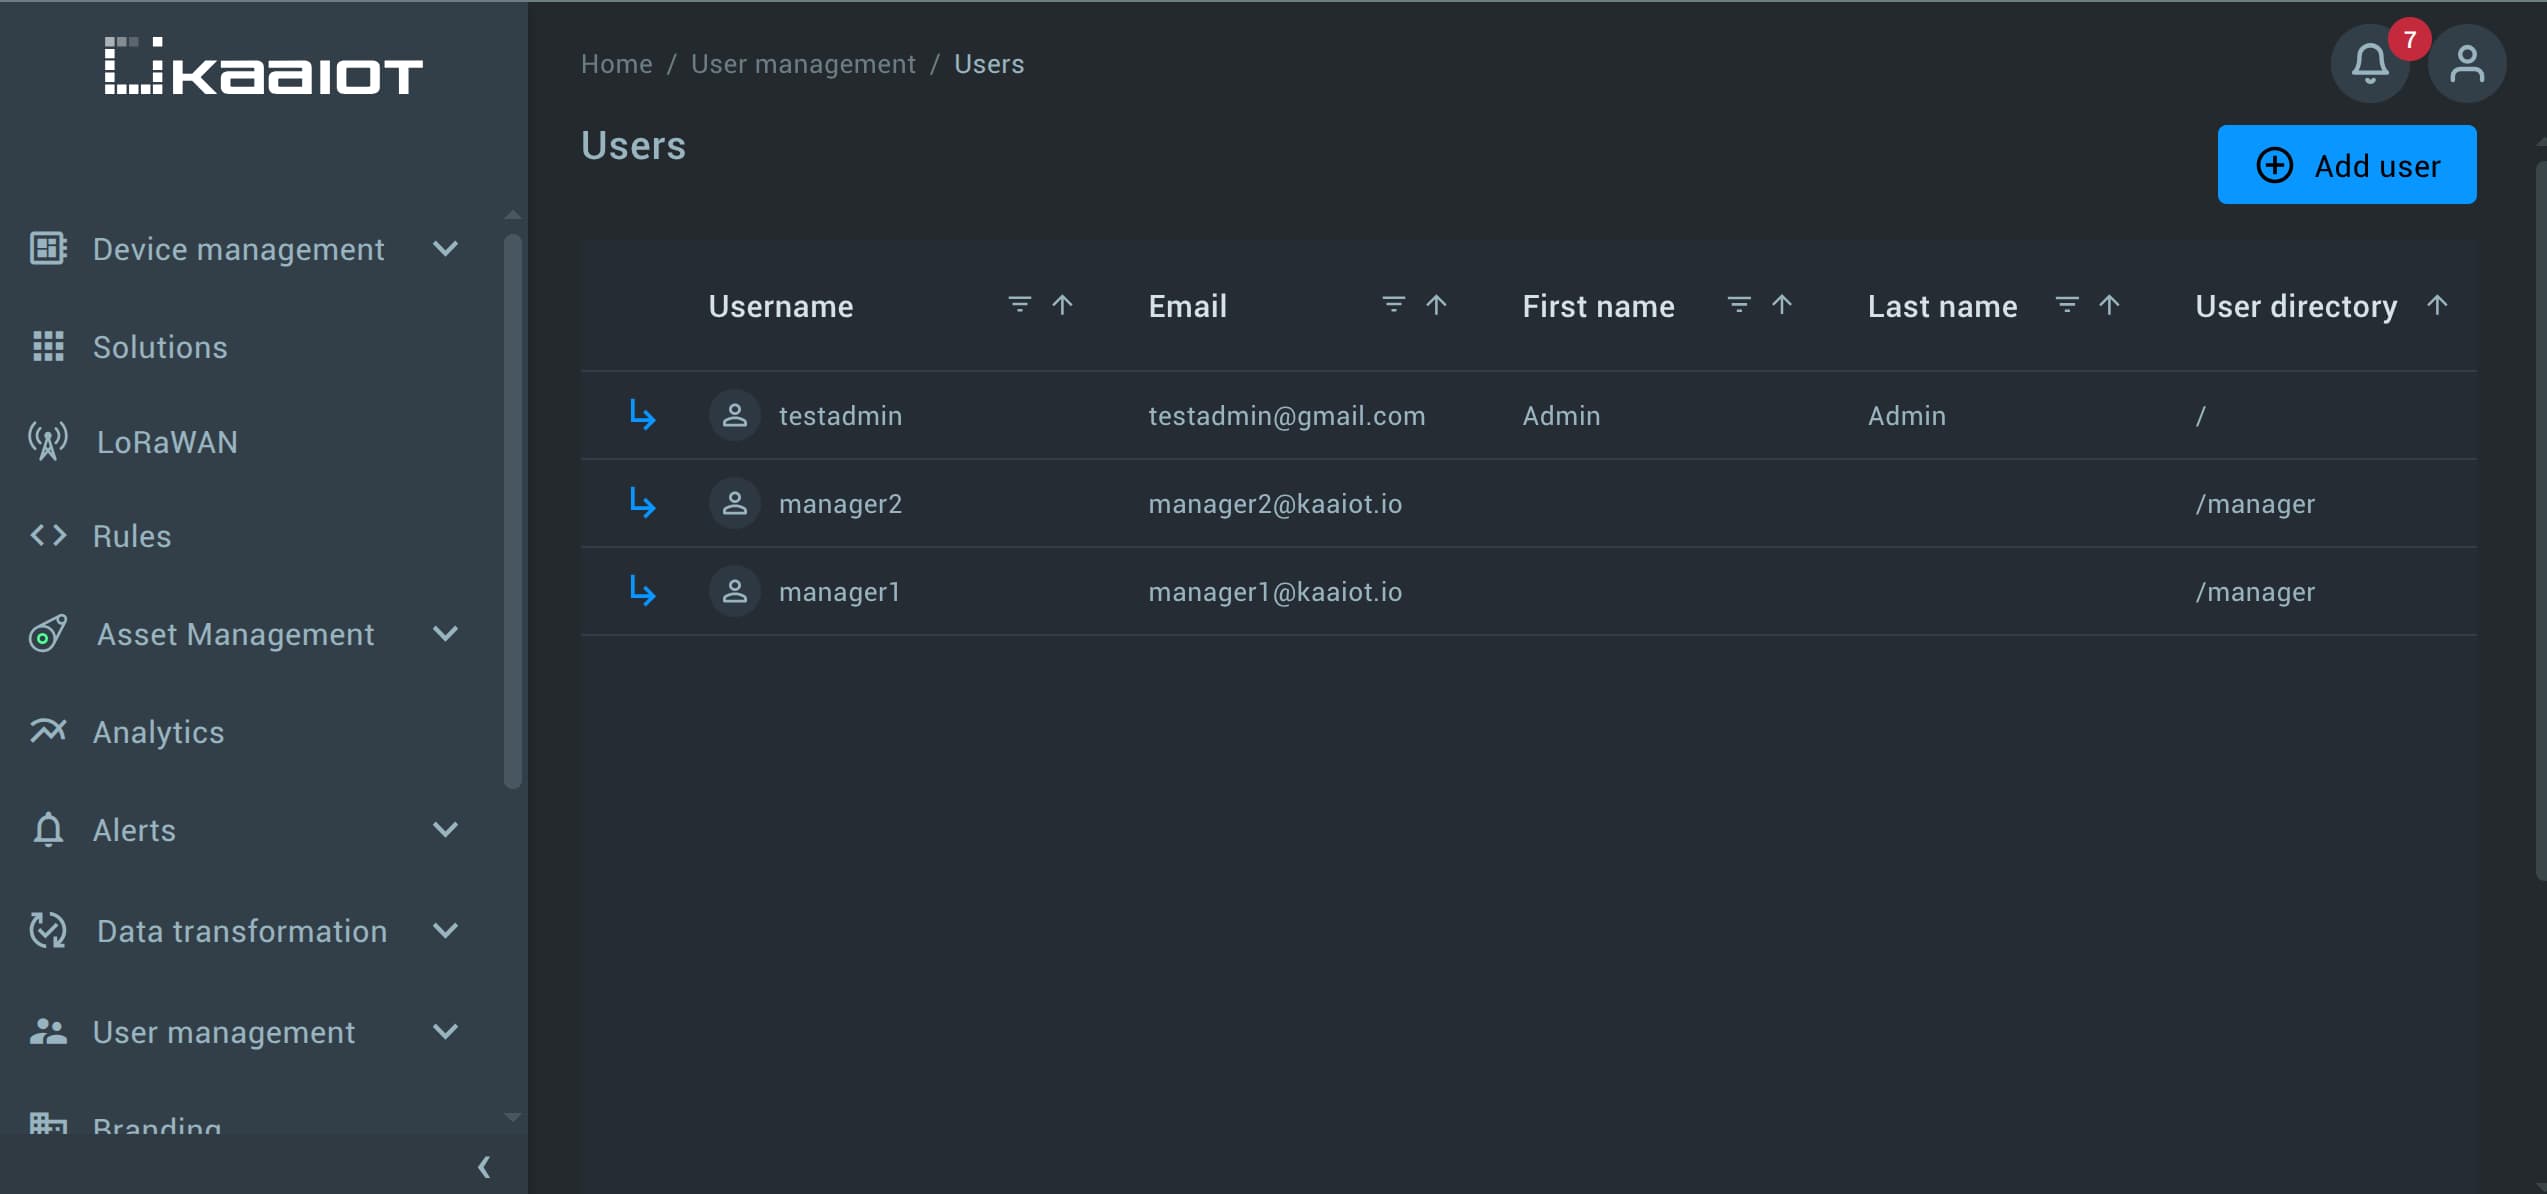
Starting with Admin, log into your Kaa account and go to User Management -> User.
You’ll see one default user account. That’s your Admin account (e.g., testadmin). From here we’ll start distributing access.

Manager Account
Managers need permissions to create resources, manage users, and assign policies within their own scope.
To create manager:
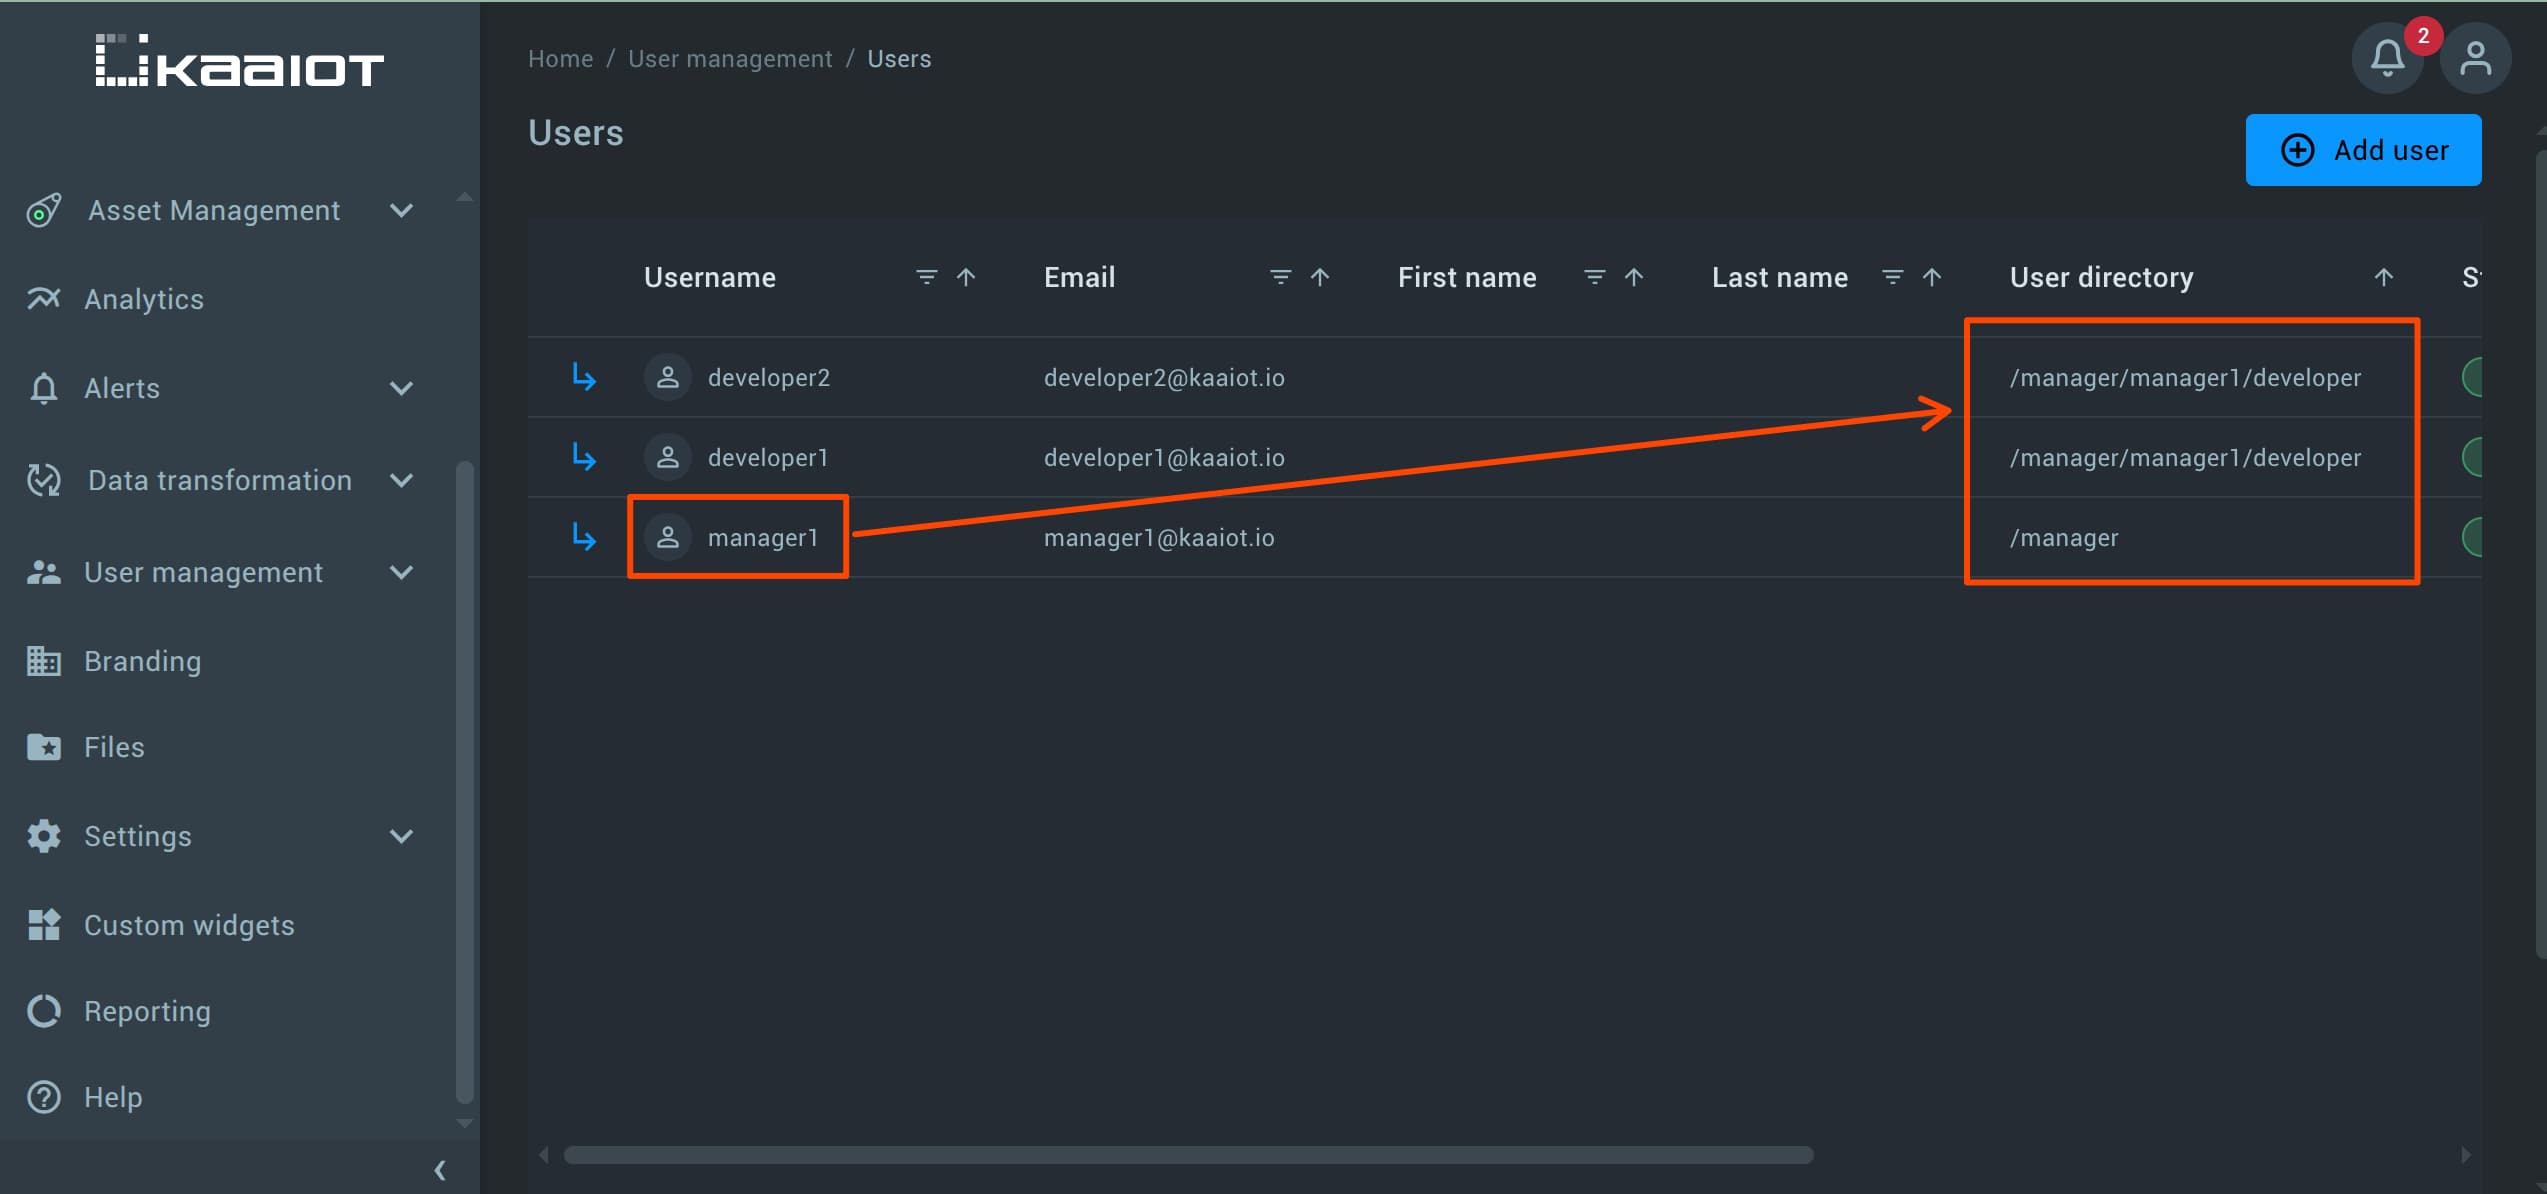
- While logged in as Admin, create a manager user (for example, manager1).
- Set the manager user directory to /manager.
First Resource Groups
We create resource groups first, before writing any policies. To create manager’s resource group:
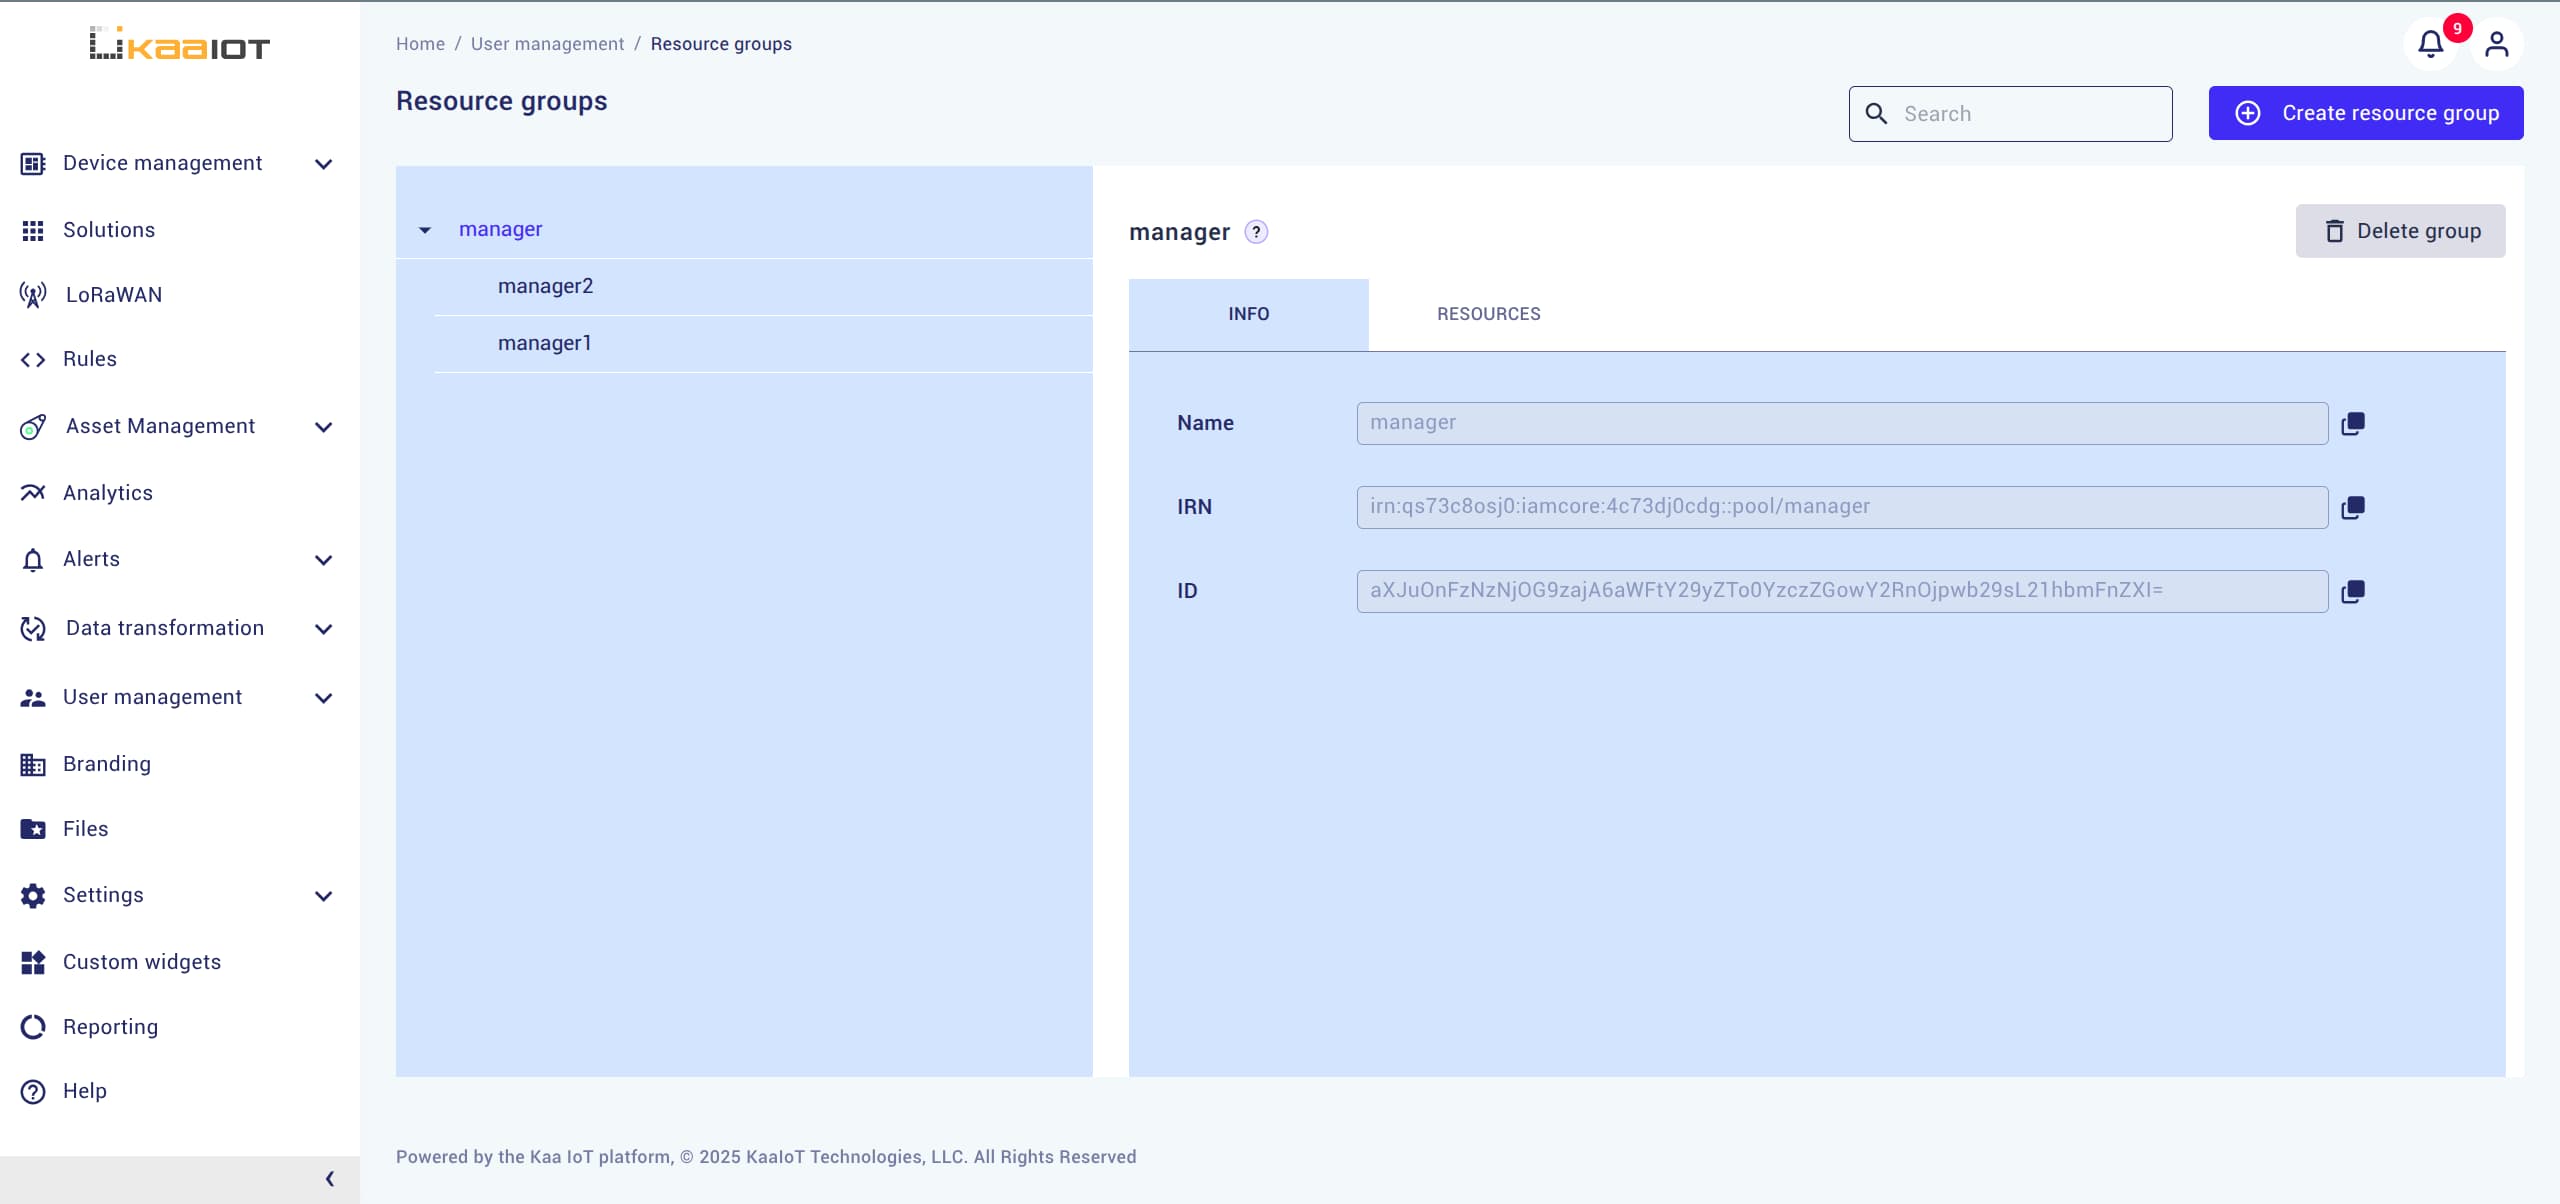
- Go to User Management -> Resource Groups.
- Click Create resource group and create the top-level manager group.
- Create one more resource group per manager account.
- Set their parent to be the Manager group.
Manager’s Policies
-
Basic Policy for all Managers:
This policy will define the general access for all managers.
Navigate to User Management -> Policies and click Add Policy.
Name the policymanager-basic-access.
Add a Statement, and click the JSON view tab and paste the JSON below, replacing<tenant-id>with your actual tenant ID.{ "statements": [ { "effect": "allow", "description": "UI access", "resources": [ "irn:qs73c8osj0:kaa:<tenant-d>:*" ], "actions": [ "ui:*" ] }, { "effect": "allow", "description": "Permission to create endpoints", "resources": [ "irn:qs73c8osj0:kaa:<tenant-d>::endpoint/*" ], "actions": [ "endpoint:create" ] }, { "effect": "allow", "description": "Permission to create and manage policies", "resources": [ "irn:qs73c8osj0:iamcore:<tenant-d>::policy/*" ], "actions": [ "iamcore:policy:create", "iamcore:policy:user:*", "iamcore:policy:group:*" ] }, { "effect": "allow", "description": "Permission to create applications", "resources": [ "irn:qs73c8osj0:kaa:<tenant-d>::application/*", "irn:qs73c8osj0:kaa:<tenant-d>::tenant/system", "irn:qs73c8osj0:kaa:<tenant-d>::tenant-system/tenant-system" ], "actions": [ "application:create", "tenant:application:create" ] } ] }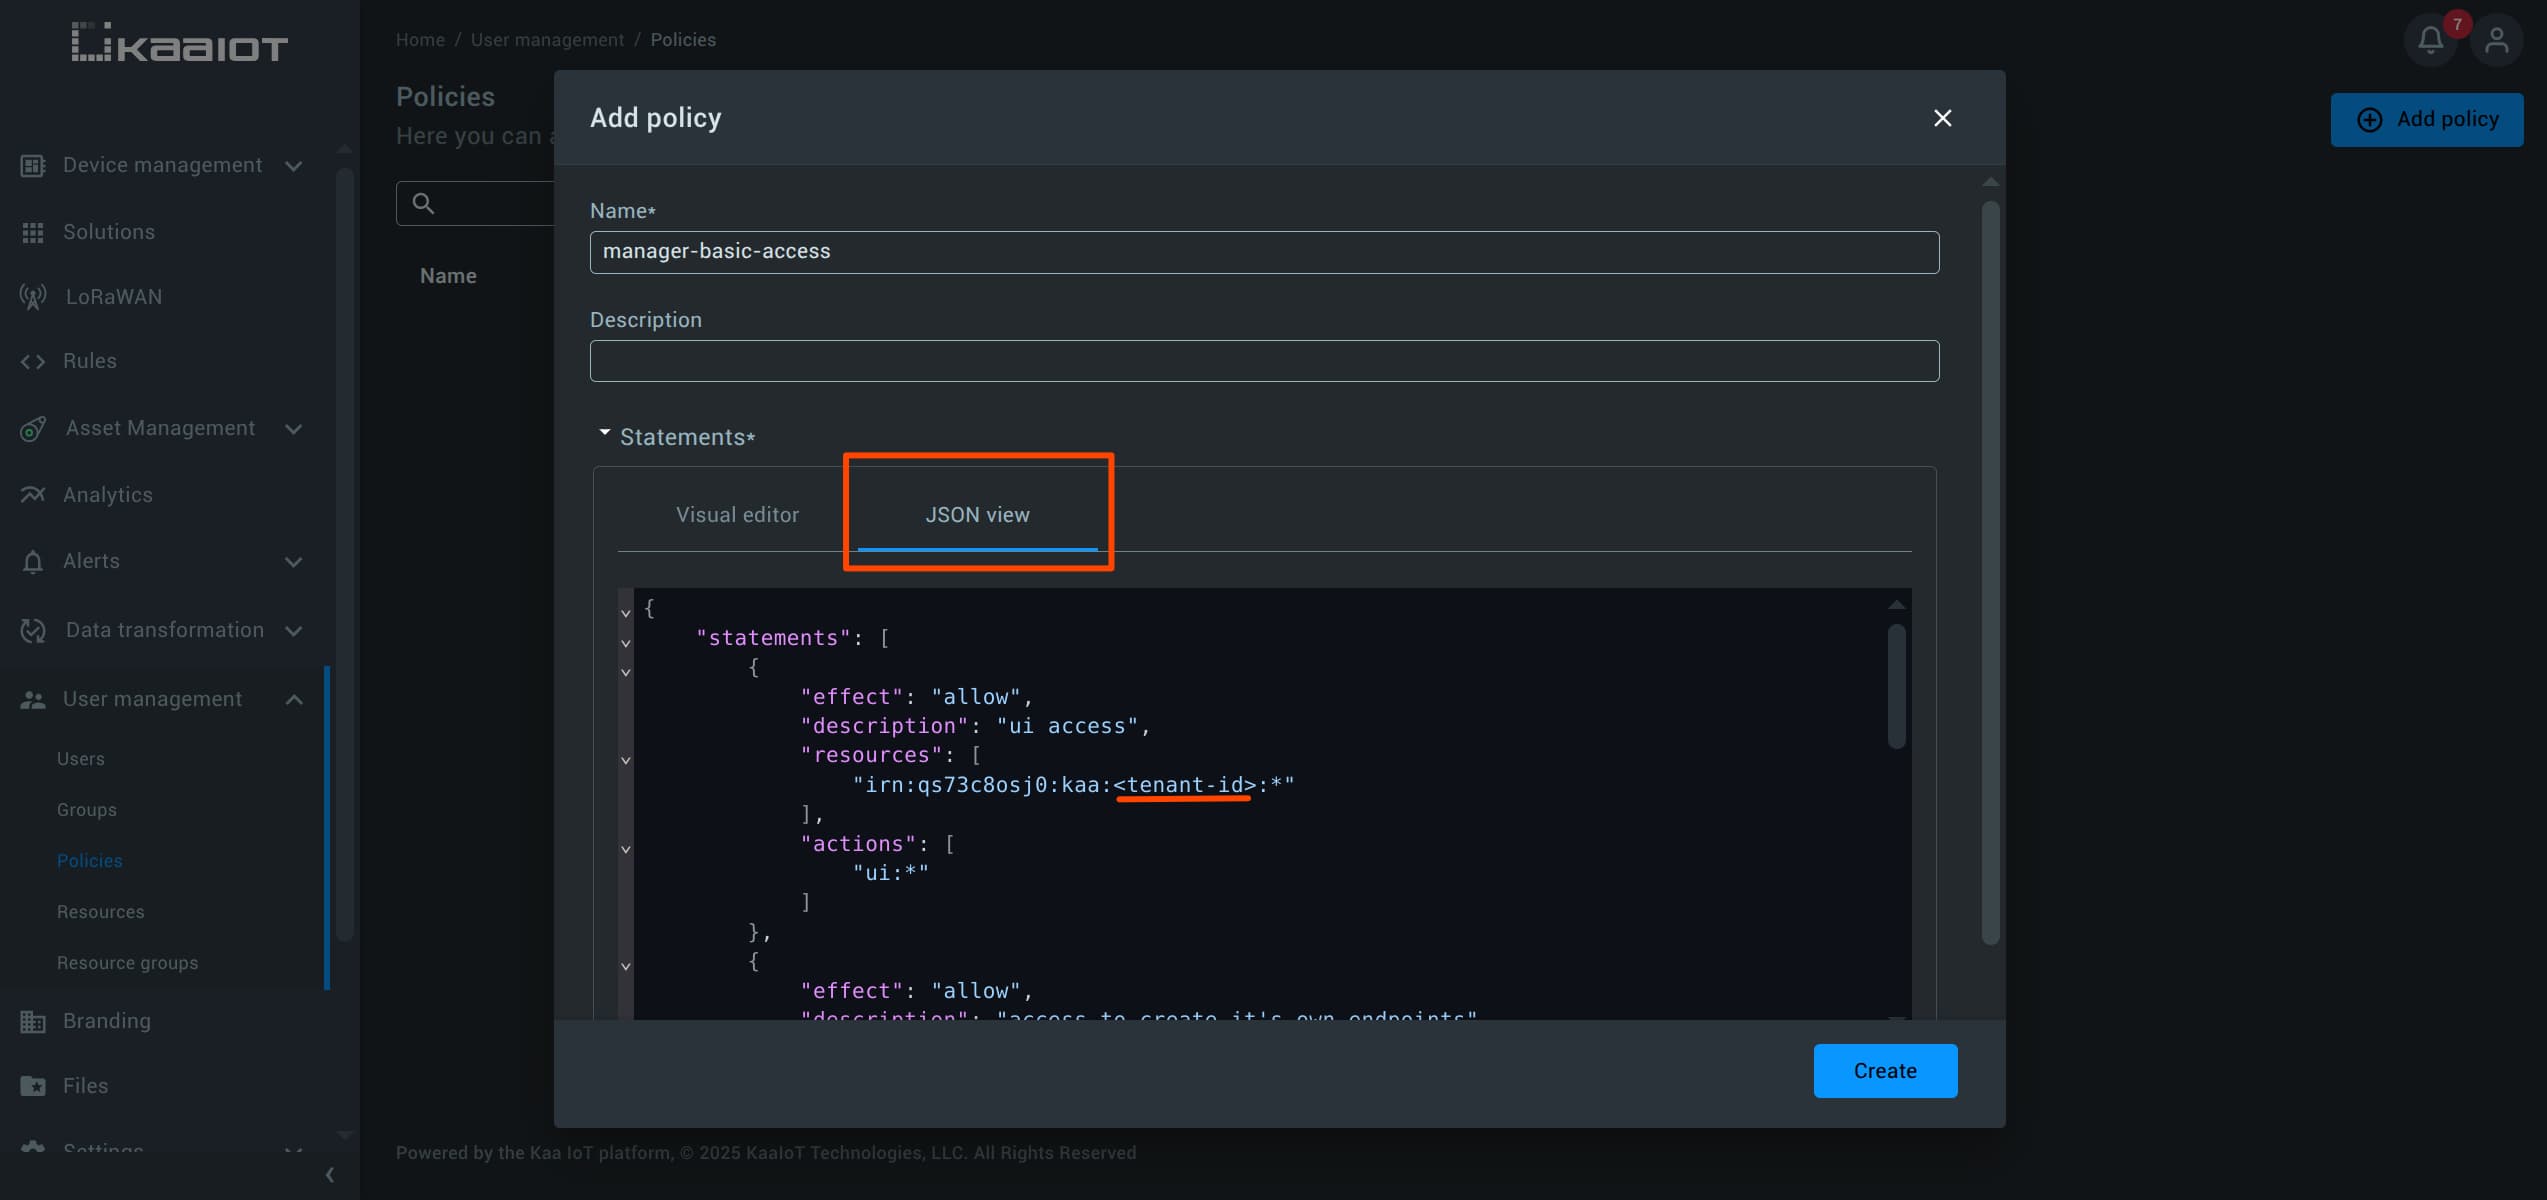
-
Policy for a Specific Manager
Create a unique policy for each manager to keep their access isolated.- Name the policy something like
manager1-resources. - As in step one (Basic Policy for all Managers), paste the JSON below, replace
<tenant-id>.
{ "statements": [ { "effect": "allow", "description": "Grants full access to users within manager1 hierarchy", "resources": [ "irn:qs73c8osj0:iamcore:<tenant-d>::user/manager/manager1", "irn:qs73c8osj0:iamcore:<tenant-d>::user/manager/manager1/*" ], "actions": [ "iamcore:user:*" ] }, { "effect": "allow", "description": "Grants full access to a specific resource group", "resources": [ "irn:qs73c8osj0:iamcore:<tenant-d>::pool/manager/manager1", "irn:qs73c8osj0:iamcore:<tenant-d>::pool/manager/manager1/*" ], "actions": [ "*" ] } ] } - Name the policy something like
-
Verify Policy After creating the policy, assign it to
manager1. Then, log in to themanager1account and verify that you can create applications and endpoints.
Note: If your manager account cannot create applications or endpoints, the policy may not be set correctly. Check in the
manager1-resourcespolicy. Make sure the user directory path matches your manager’s user directory. Also, verify that the manager’s resource group IRN matches the one specified in the policy.
Note: Each policy uses actions. You can check what those actions mean in this documentation.
Manager’s Resources
In manager1-resources, we specified full access to the user group we created earlier.
Since we have complete access to this resource group, we also gain full access to any resources added to it.
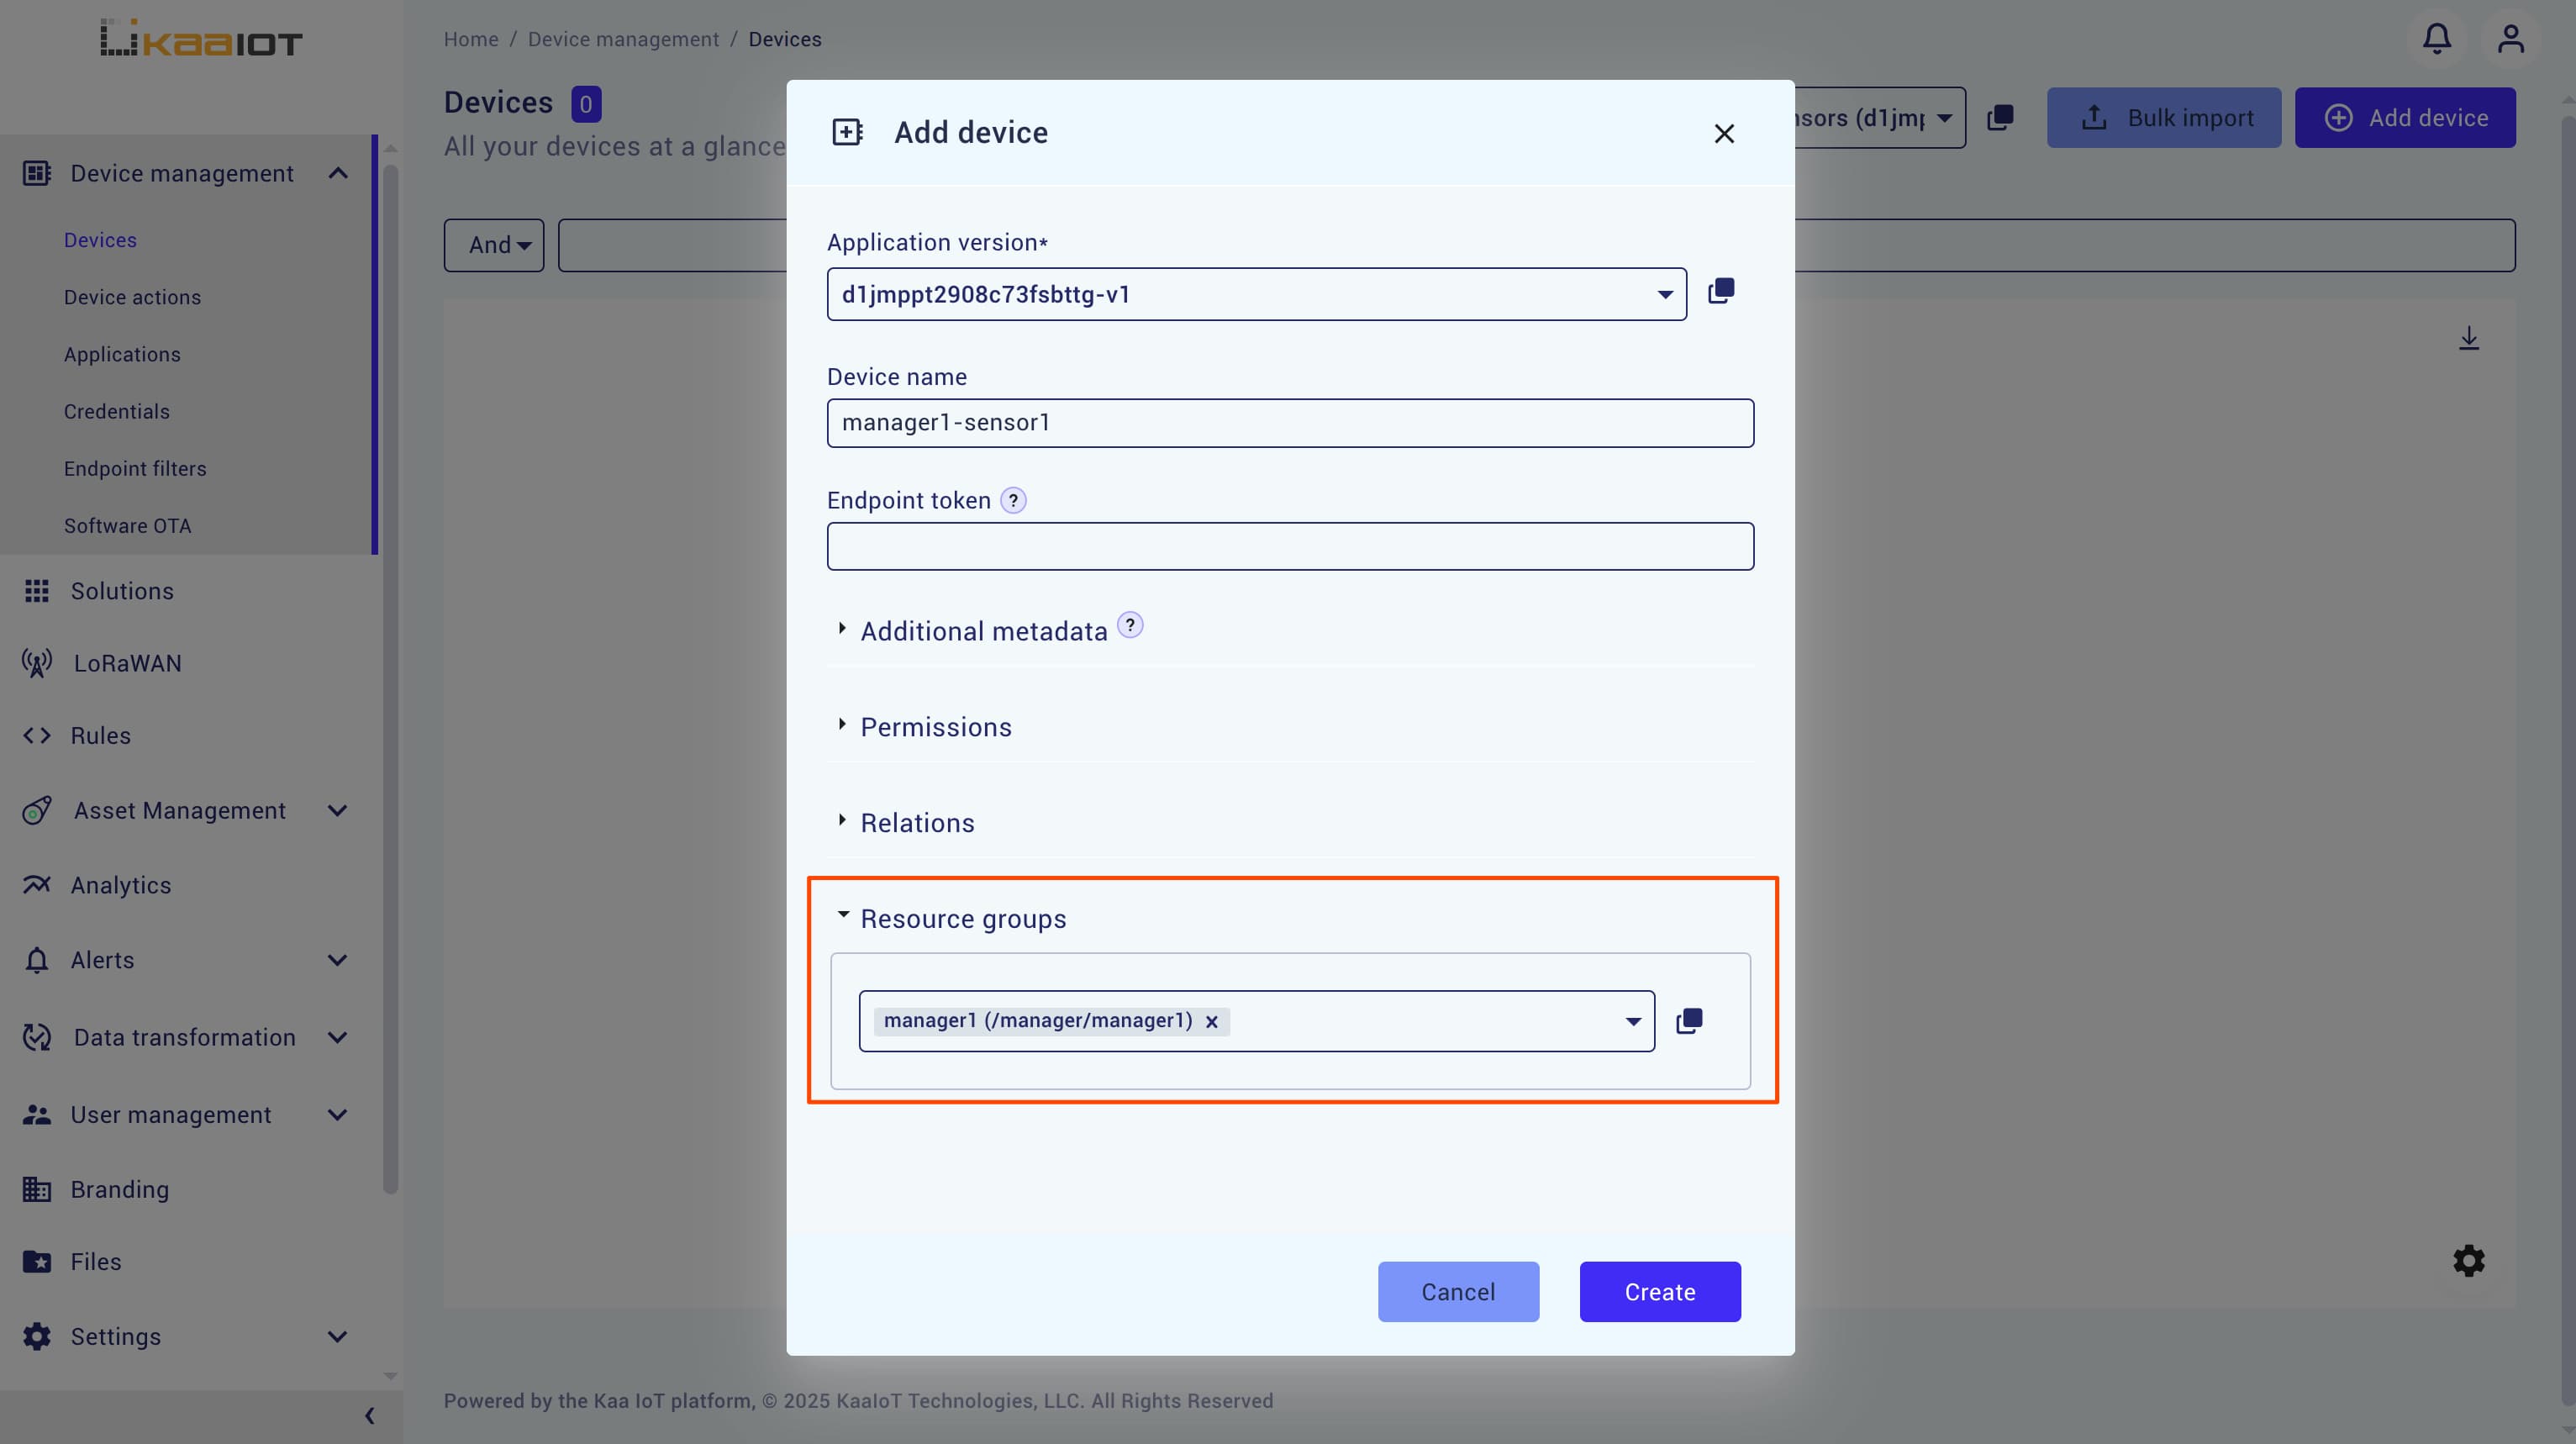
When creating a new resource (such as an endpoint, policy, or asset), make sure to fill in the “Resource Group” field and select your resource group.
Developer Account
Developers can create and manage Kaa endpoints. To create developer’s account:
- While logged in as Manager, create a developer user (for example, developer1).
- Set the developer’s user directory to
/manager/<managers_username>/developer/developer1.
Note: If the user directory is incorrect, account creation will fail due to permission restrictions. The
manager1-resourcespolicy only allows access to the/manager/manager1directory. Check themanager1-resourcespolicy if you’re unable to create a developer user.
Developer’s Resources
As manager, start by creating a resource group for the developer:
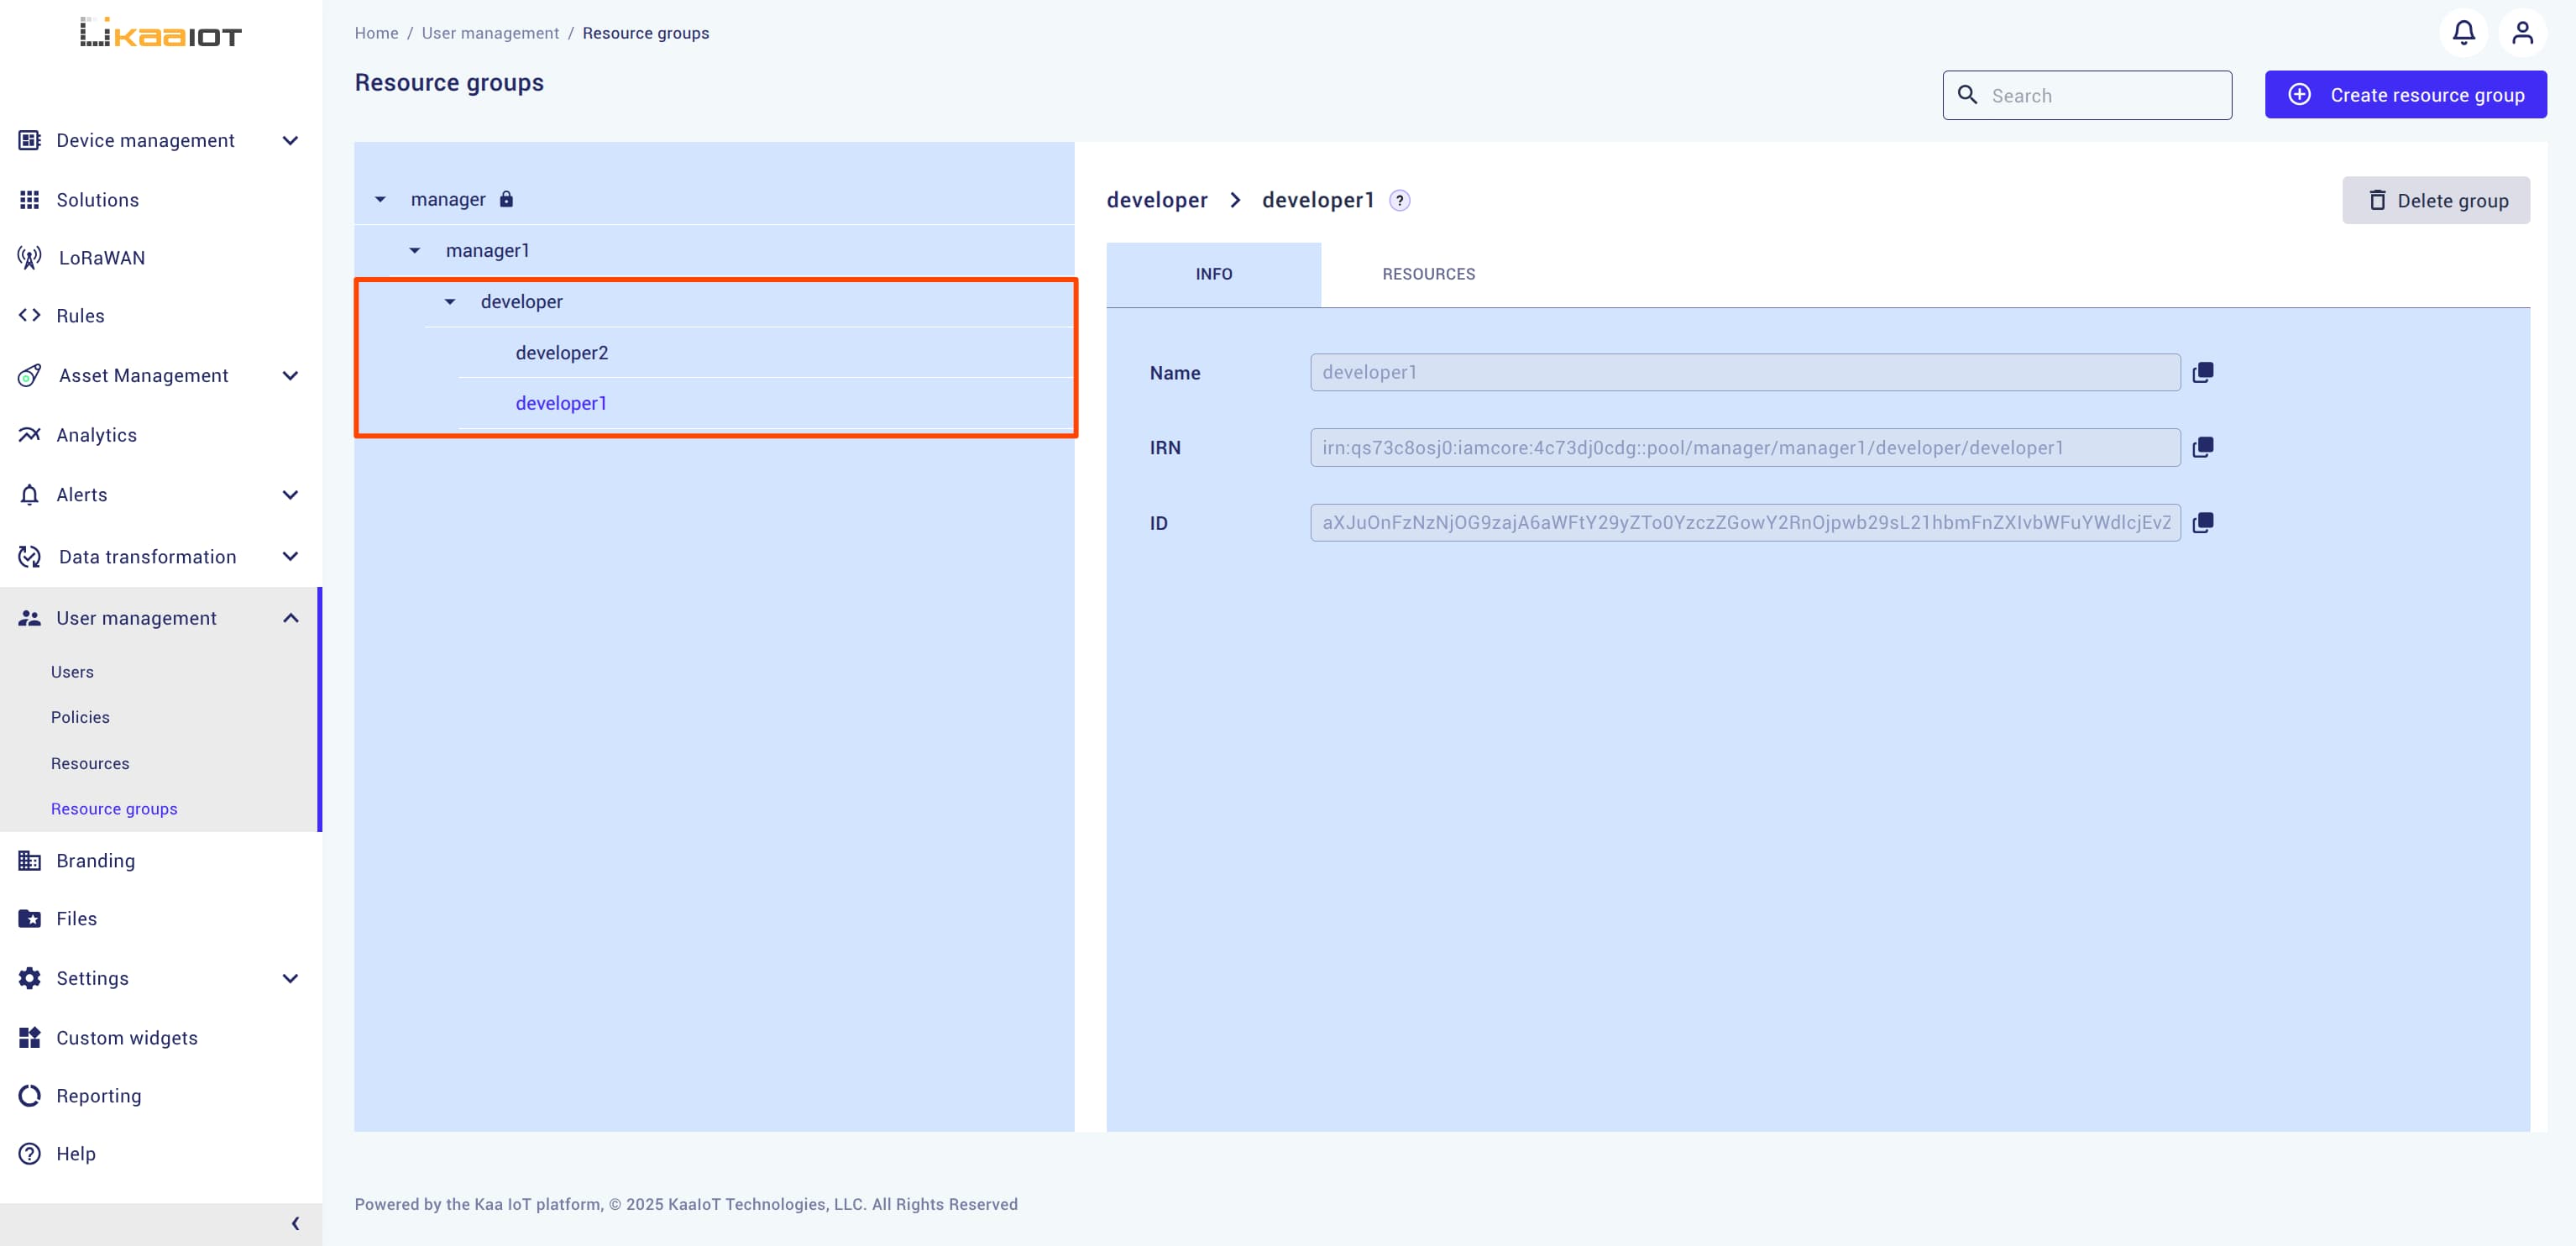
- Go to User Management -> Resource Groups.
- Create a new resource group named
developerand set its parent to themanager1group. - Create another resource group named
developer1and set its parent to thedevelopergroup. - Assign the application to the
developer1resource group. Without this, thedeveloperwon’t be able to create endpoints.
Next, switch to Device Management:
- In Device Management -> Applications create an application.
- Add a few endpoints to it. These will be used for testing and sharing with the developer.
- Assign all endpoints to the
developer1resource group so the developer can access them.
Note: If you’re not familiar with applications and endpoints, check out the Getting Started Guide.
Developer’s Policies
-
Base Policy for Developer
While logged in as the manager, go to User Management -> Policies -> Add Policy.
In JSON view, paste the base policy code:{ "statements": [ { "effect": "allow", "description": "Full access to UI", "resources": [ "irn:qs73c8osj0:kaa:4c73dj0cdg:*" ], "actions": [ "ui:*" ] }, { "effect": "allow", "description": "Permission to create endpoints", "resources": [ "irn:qs73c8osj0:kaa:4c73dj0cdg::endpoint/*" ], "actions": [ "endpoint:create" ] }, { "effect": "allow", "description": "Permission to create policies", "resources": [ "irn:qs73c8osj0:iamcore:4c73dj0cdg::policy/*" ], "actions": [ "iamcore:policy:create", "iamcore:policy:user:*", "iamcore:policy:group:*" ] } ] } -
Developer-Specific Policy
In JSON view, paste the following and make sure to:- Replace
<tenant-id> - Ensure
userDirectorymatches your developer path (/manager/manager1/developer/developer1) - Make sure that resource group IRN matches with resource group mentioned in policy.
{ "statements": [ { "effect": "allow", "description": "Full access to users within developer1 directory", "resources": [ "irn:qs73c8osj0:iamcore:4c73dj0cdg::user/manager/manager1/developer/developer1", "irn:qs73c8osj0:iamcore:4c73dj0cdg::user/manager/manager1/developer/developer1/*" ], "actions": [ "iamcore:user:*" ] }, { "effect": "allow", "description": "Full access to the developer's resource group", "resources": [ "irn:qs73c8osj0:iamcore:4c73dj0cdg::pool/manager/manager1/developer/developer1", "irn:qs73c8osj0:iamcore:4c73dj0cdg::pool/manager/manager1/developer/developer1/*" ], "actions": [ "*" ] } ] } - Replace
-
Verify Assign both policies to the
developer1user and log in with that account. Verify thatdeveloper1user has access to application and can create endpoints.
Customer Account
Customers will have read-only access to resources assigned by the developer.
Log in to the developer1 account, then go to User Management -> Users and create couple customer accounts.
Make sure their user directory matches with the one we gave permission to developer1.

Customer’s Resources
As developer, create a resource group for the customer:
- Go to User Management -> Resource Groups.
- Create a new resource group named
customerand set its parent to thedeveloper1group. - Create another resource group named
customer1and set its parent to thecustomergroup. - Add an application and a few endpoints to the
customer1resource group.
If there are no available resources, create a new application using themanageraccount and new endpoints using thedeveloperaccount.

Customer’s Policies
Customer policies are simple and involve resources that were shared though customer1 resource group.
-
Basic Policy for all Customers:
This policy provide basic UI access to all customers. In JSON view, paste the base policy code:{ "statements": [ { "effect": "allow", "description": "UI access to device management and dashboards", "resources": [ "irn:qs73c8osj0:kaa:<tenant-id>:*" ], "actions": [ "ui:dashboard:manage", "ui:device:manage" ] } ] } -
Policy for a Specific Customer
This policy defines whatcustomer1can do with the assigned resource group. They can view the provided application and endpoints, but nothing else. In JSON view, paste the following and make sure to:- Replace
<tenant-id> - Make sure that resource group IRN matches with resource group mentioned in policy.
{ "statements": [ { "effect": "allow", "resources": [ "irn:qs73c8osj0:iamcore:<tenant-id>::pool/manager/manager1/developer/developer1/customer/customer1" ], "actions": [ "application:endpoints-metadata-keys:read", "application:read", "endpoint:read" ] } ] } - Replace
-
Verify Policy After creating the policy, assign it to
customer1. Then, log in to thecustomer1account and verify that you can view provided applications and endpoints.
Summing Up
You’ve now set up a complete User Management architecture using resource groups.
While everything here could be done with policies alone, using resource groups is recommended to avoid unnecessary policy edits and access mismatches.
Use the provided JSON examples to manage how resources are shared or restricted across users.