Connecting Teltonika Router to Kaa
- Connecting Teltonika Routers to the KaaIoT Platform via OpenVPN
- Supported Teltonika Models
- Prerequisites
- Step 1: Create a VPN Client in KaaIoT
- Step 2: Upload the OpenVPN Config to the Teltonika Router
- Step 3: Configure Firewall Zones on the Router
- Step 4: Add a Proxy Config in KaaIoT
- Verification
- Troubleshooting
- References
Connecting Teltonika Routers to the KaaIoT Platform via OpenVPN
This guide explains how to connect a Teltonika router to the KaaIoT platform via OpenVPN and set up remote access to the device. The steps apply to all supported models listed below.
Supported Teltonika Models
The following Teltonika devices support OpenVPN and can be connected to KaaIoT. All models run RutOS and have the same VPN configuration interface.
RUT Series — Cellular Routers
| Model | Connectivity | Features |
|---|---|---|
| RUT140 | Ethernet | Industrial Ethernet router |
| RUT142 | Ethernet + RS232 | Serial communication gateway |
| RUT200 | 4G LTE Cat 4 | Compact industrial router, Wi-Fi |
| RUT241 | 4G LTE Cat 4 + eSIM | Industrial router, Wi-Fi, eSIM support |
| RUT260 | 4G LTE Cat 6 | High-speed industrial router |
| RUT271 | 4G LTE Cat 4 + GNSS | Router with GPS tracking |
| RUT301 | Ethernet | 5x Gigabit Ethernet ports |
| RUT361 | 4G LTE Cat 6 | Compact, high-speed cellular router |
| RUT901 | Ethernet | Advanced Ethernet router |
| RUT951 | 4G LTE Cat 4 | Dual SIM, Wi-Fi, 4x Ethernet |
| RUT956 | 4G LTE Cat 6 | Dual SIM, Wi-Fi, RS232/RS485, GNSS |
| RUT976 | 5G NR | 5G industrial router, dual SIM |
RUTX Series — Advanced Routers
| Model | Connectivity | Features |
|---|---|---|
| RUTX08 | Ethernet | 4x Gigabit Ethernet, advanced VPN |
| RUTX09 | 4G LTE Cat 6 | Gigabit Ethernet, dual SIM |
| RUTX10 | Ethernet + Wi-Fi | Gigabit Ethernet, dual-band Wi-Fi, Bluetooth |
| RUTX11 | 4G LTE Cat 6 + Wi-Fi | Dual SIM, dual-band Wi-Fi, Bluetooth, GNSS |
| RUTX12 | 4G LTE Cat 6 dual modem | Two LTE modems for load balancing |
| RUTX14 | 4G LTE Cat 12 | High-speed LTE, dual-band Wi-Fi |
| RUTX50 | 5G NR + Wi-Fi | 5G, dual SIM, dual-band Wi-Fi, Bluetooth |
| RUTXR1 | 4G LTE Cat 6 | Rackmount industrial router |
TRB Series — IoT Gateways
| Model | Connectivity | Features |
|---|---|---|
| TRB140 | 4G LTE Cat 4 | Ethernet gateway, industrial DIN rail |
| TRB141 | 4G LTE Cat 1 | Low-power IoT gateway |
| TRB142 | 4G LTE Cat 1 + RS232 | Serial communication gateway |
| TRB143 | 4G LTE Cat 4 + M-Bus | Smart metering gateway |
| TRB145 | 4G LTE Cat 1 + RS485 | Industrial serial gateway |
| TRB245 | 4G LTE Cat 4 + RS232/RS485 | Dual serial interface gateway |
| TRB246 | 4G LTE Cat 4 + RS232/RS485 | Dual serial, dual SIM gateway |
| TRB255 | 4G LTE Cat M1/NB-IoT | Low-power wide-area IoT gateway |
| TRB500 | 5G NR | 5G industrial gateway |
Note: All models listed above run RutOS with built-in OpenVPN support. The configuration steps in this guide are the same for all models — only the admin panel URL and hardware features may differ.
Prerequisites
- Access to the KaaIoT platform (next.kaaiot.com)
- Access to the Teltonika router admin panel
- An internet connection on the Teltonika device (cellular or Ethernet)
- OpenVPN configuration file (.ovpn) — will be downloaded from KaaIoT
Step 1: Create a VPN Client in KaaIoT
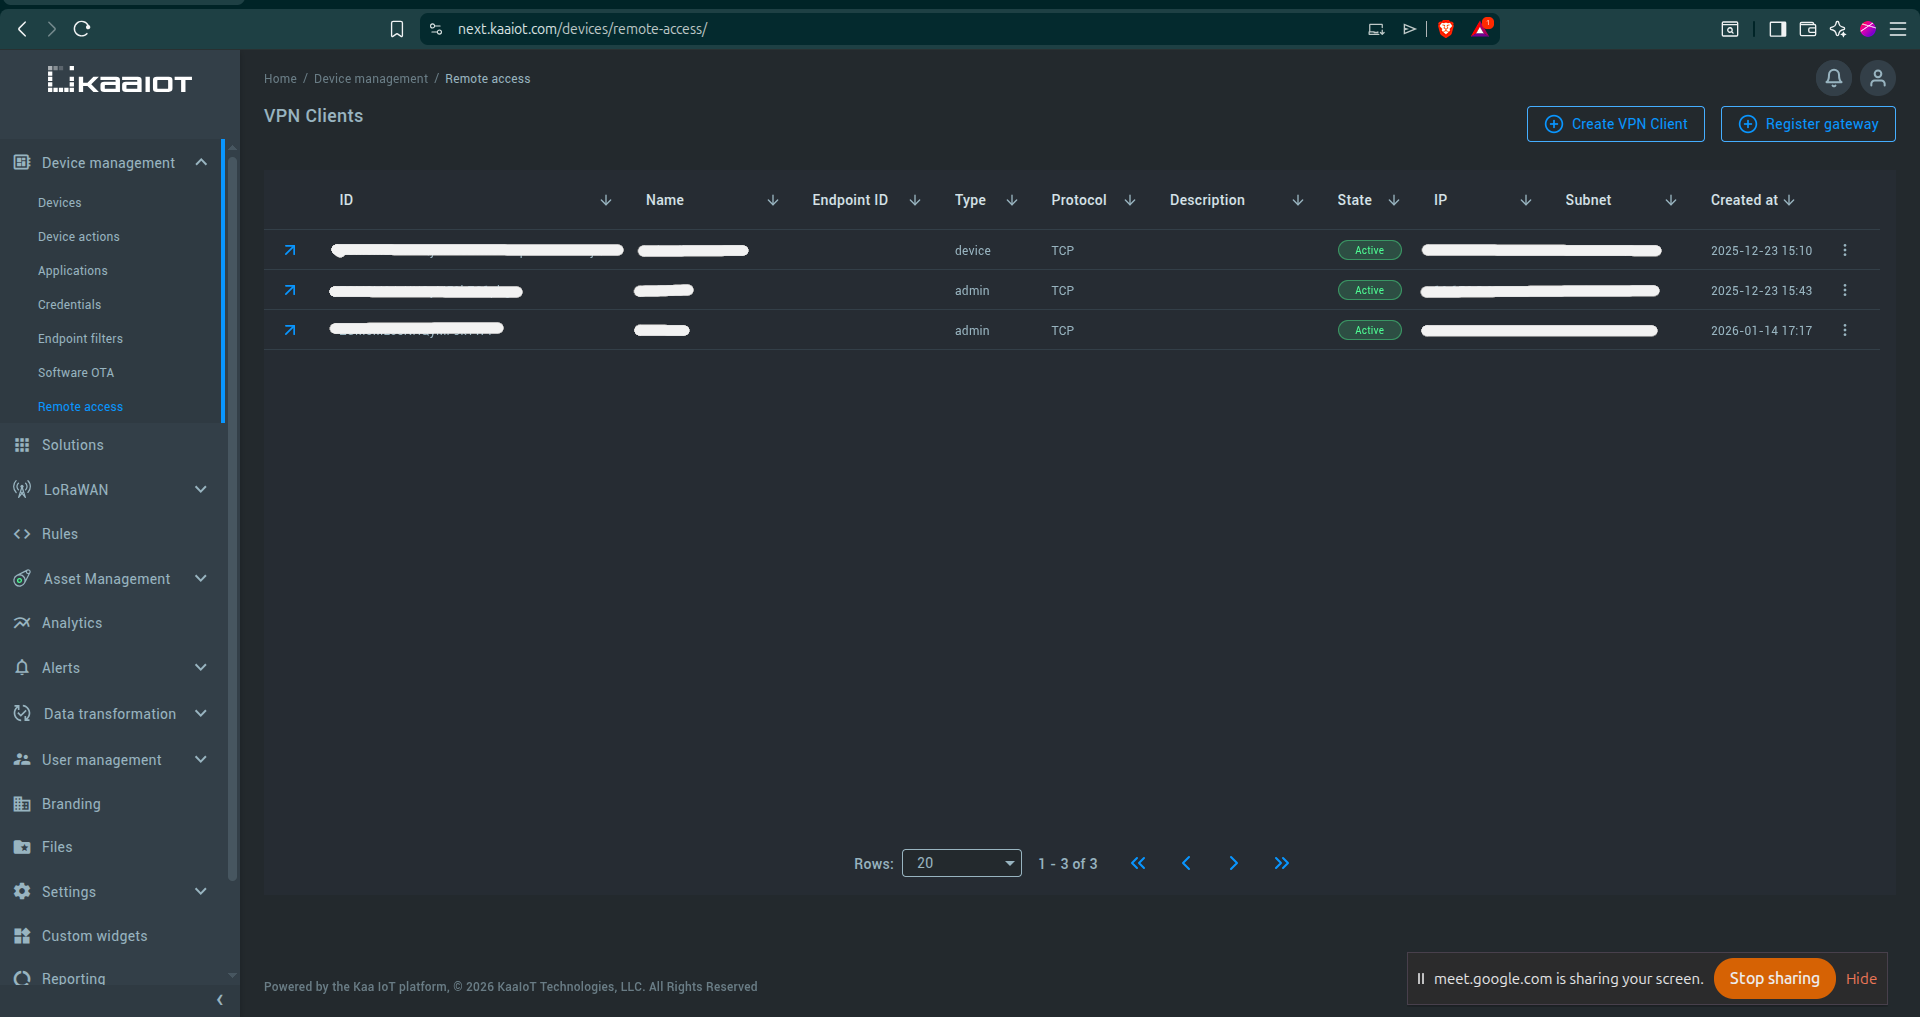
- Open the KaaIoT platform and go to Device management -> Remote access.
- Click the “Create VPN Client” button in the top-right corner.
- In the dialog that opens, fill in the fields as described below.
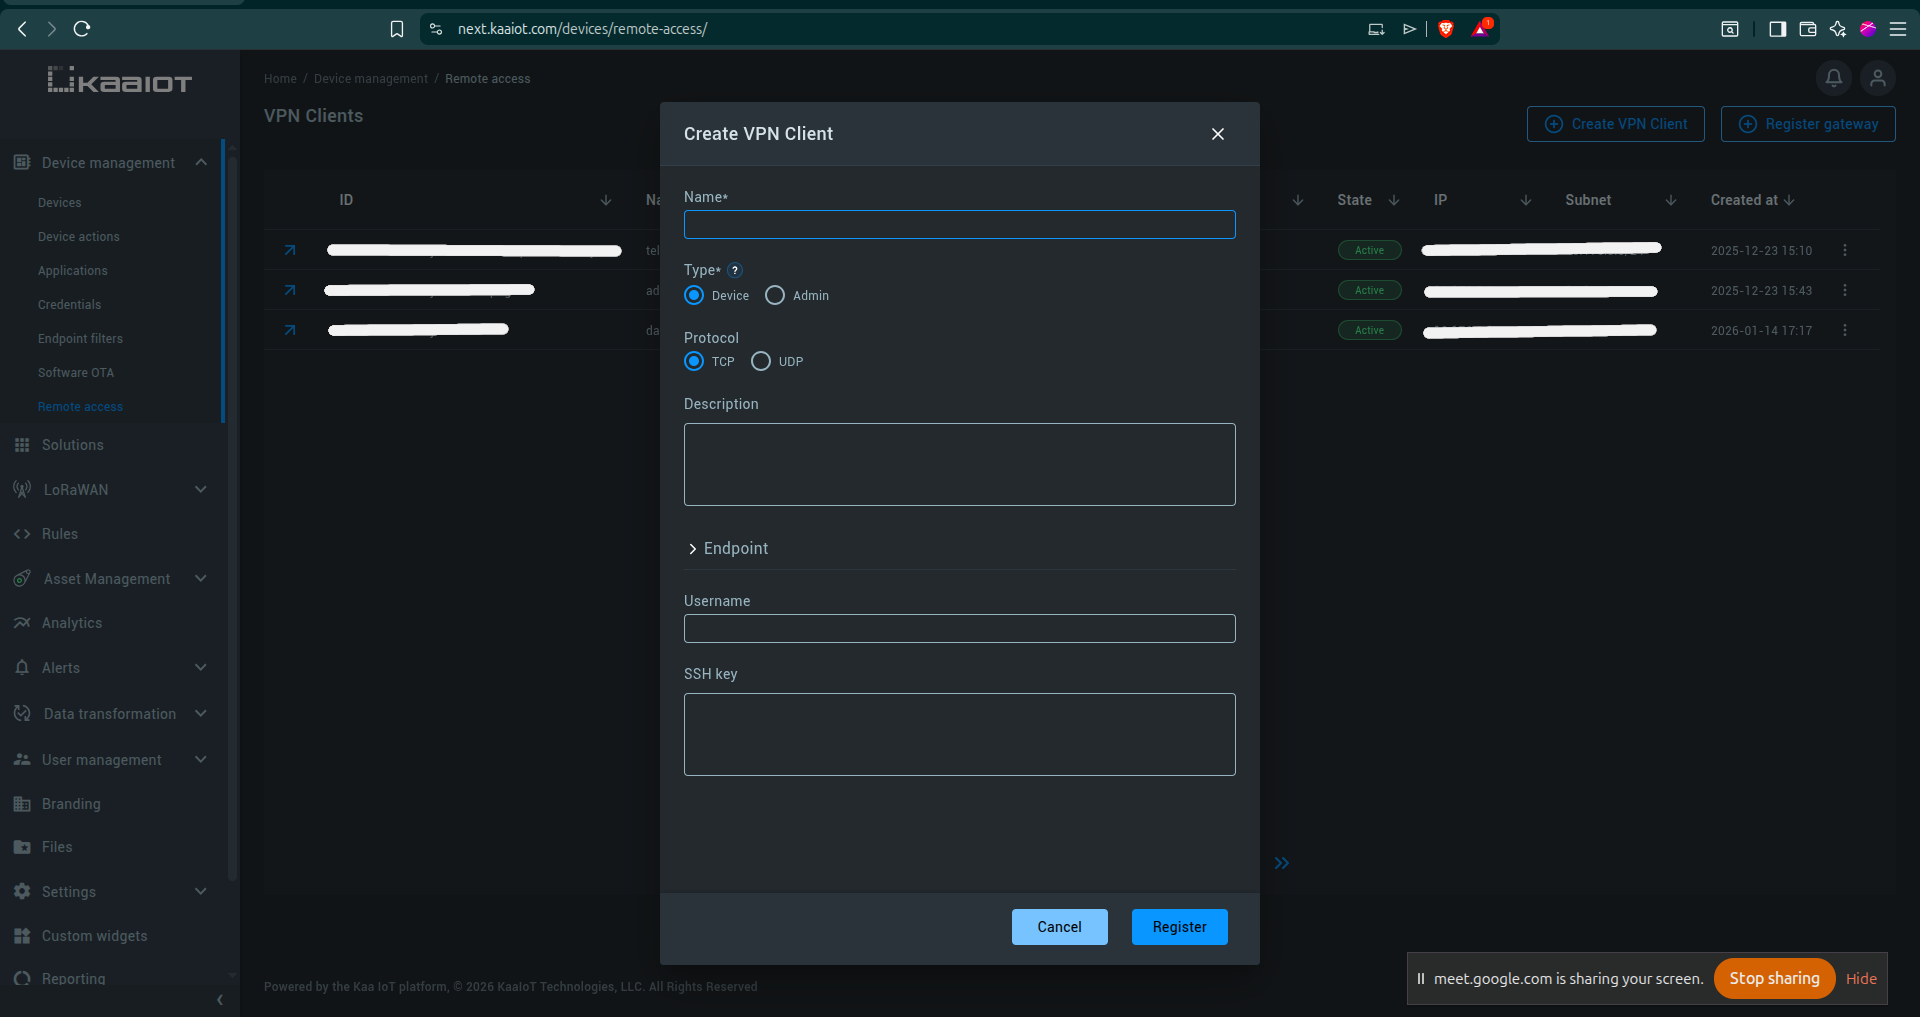
- Click “Register”.
- After creation, download the OpenVPN configuration file (.ovpn). Save it — you will need to upload it to the router in the next step.
Create VPN Client fields
| Field | What to enter |
|---|---|
| Name | Device name, e.g.: my-router |
| Type | Select “Device” |
| Protocol | Select “TCP” |
| Username | Username for SSH (Used only for VNC) |
| SSH key | Can be left empty (Used only for VNC) |
The .ovpn file contains all the necessary certificates, keys, and server connection details. Do not modify this file.
Once registered, the client will appear in the list with an Active status, an assigned IP address, and a subnet.
Step 2: Upload the OpenVPN Config to the Teltonika Router
- Log in to the Teltonika router admin panel.
- Go to Services -> VPN -> OpenVPN.
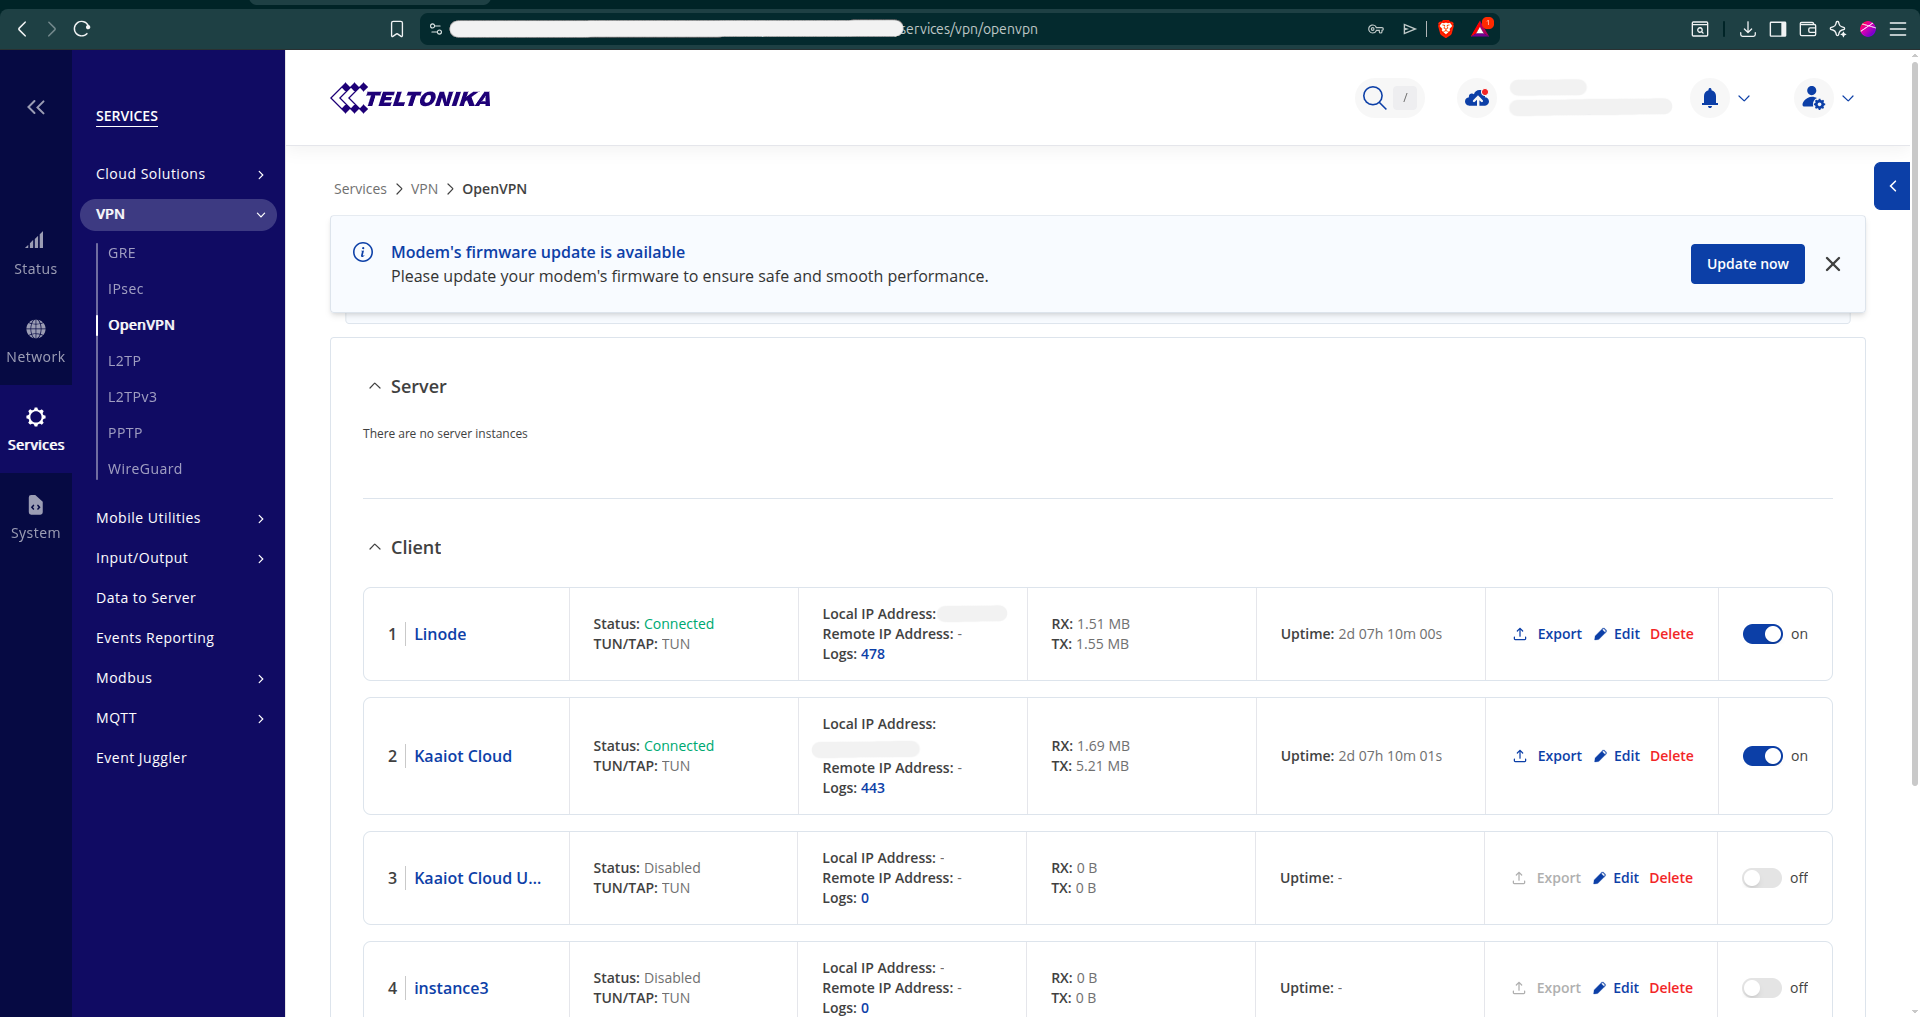
- In the Client section at the bottom, click “Add” to create a new OpenVPN client instance.
- Click “Edit” on the newly created instance to open its configuration.
- Configure the settings as described below.
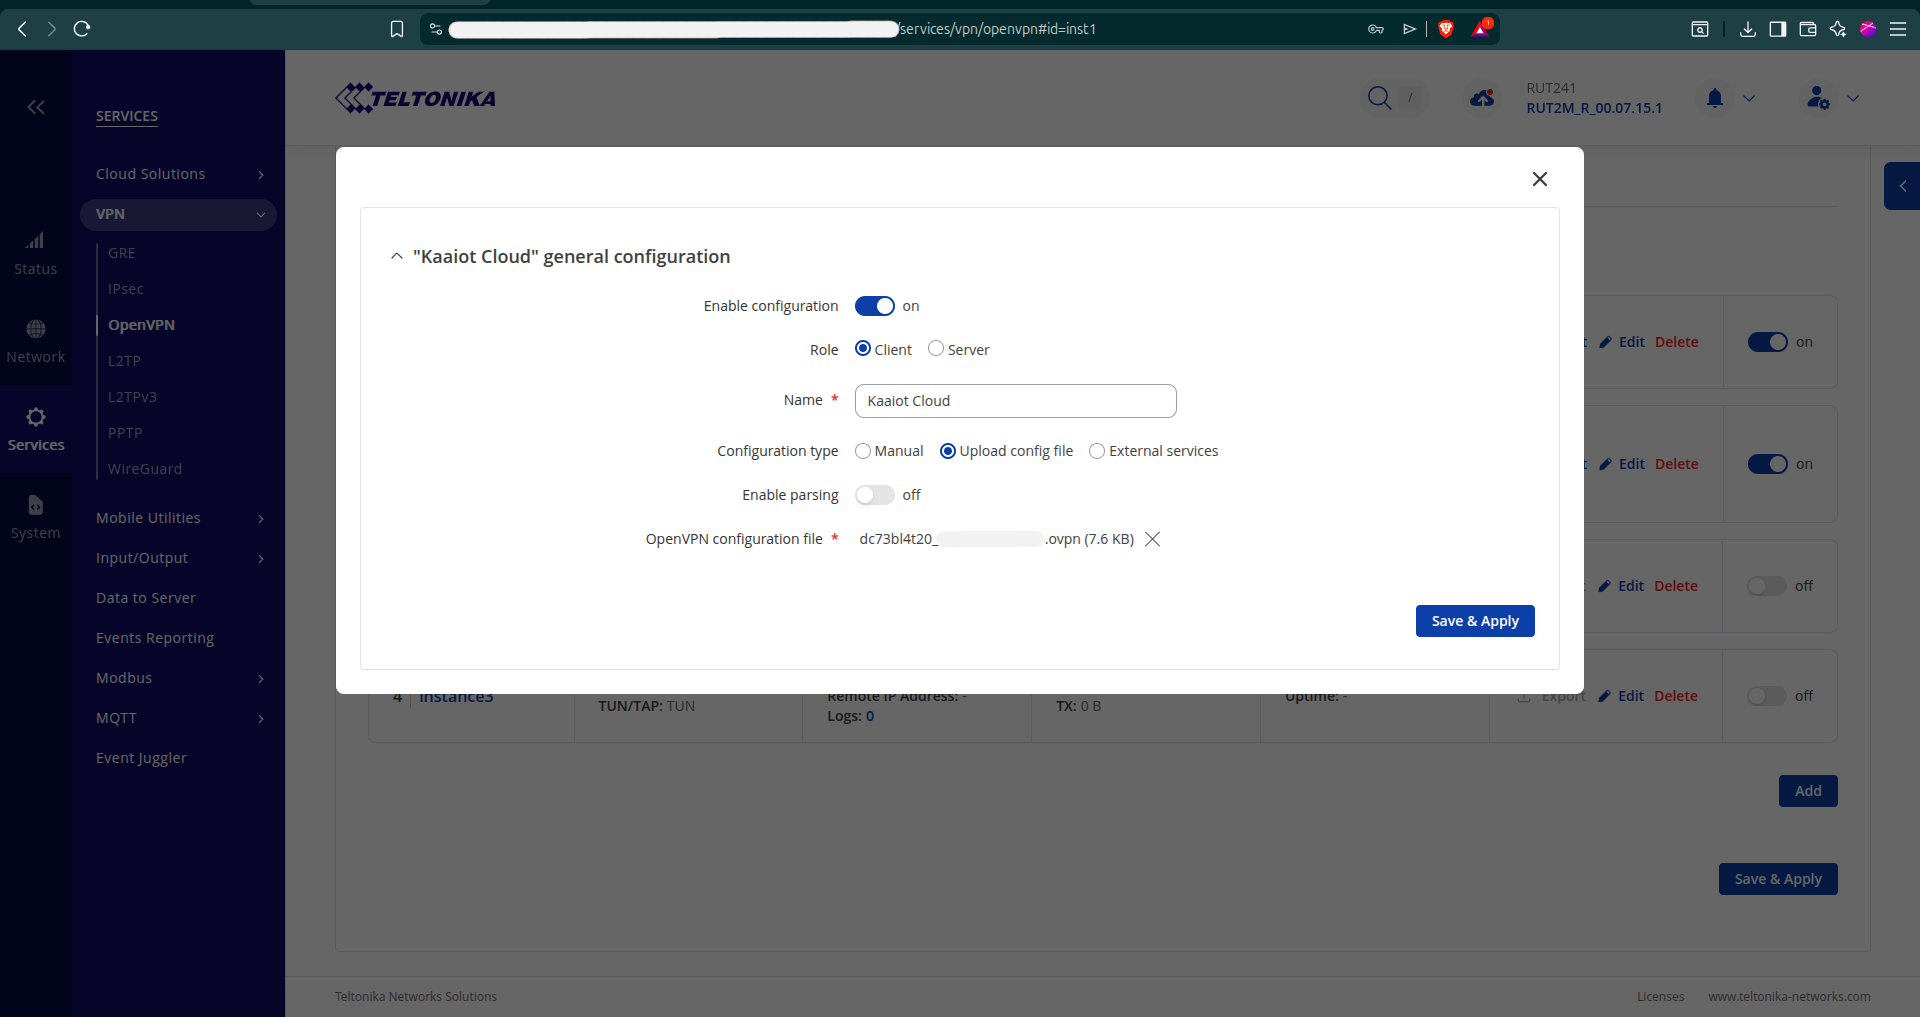
- Click “Save & Apply”.
- Wait a few seconds and verify that the status changes to “Connected” and a local IP address is assigned (matching the IP from KaaIoT).
OpenVPN client settings
| Setting | Value |
|---|---|
| Enable configuration | Toggle ON |
| Role | Client |
| Name | Kaaiot Cloud (or any descriptive name) |
| Configuration type | Upload config file |
| OpenVPN configuration file | Upload the .ovpn file downloaded from KaaIoT |
If using manual configuration instead of uploading an .ovpn file, you will need to set: Authentication = TLS, Protocol = TCP, Port = 11194, Remote host = vpn-service.kaaiot.com, and upload the CA certificate, client certificate, and client key separately.
Step 3: Configure Firewall Zones on the Router
For the KaaIoT platform to reach the router and devices behind it through the VPN tunnel, the firewall zones must be configured to allow traffic between the OpenVPN interface and the local network.
- In the Teltonika admin panel, go to Network -> Firewall -> Zones.
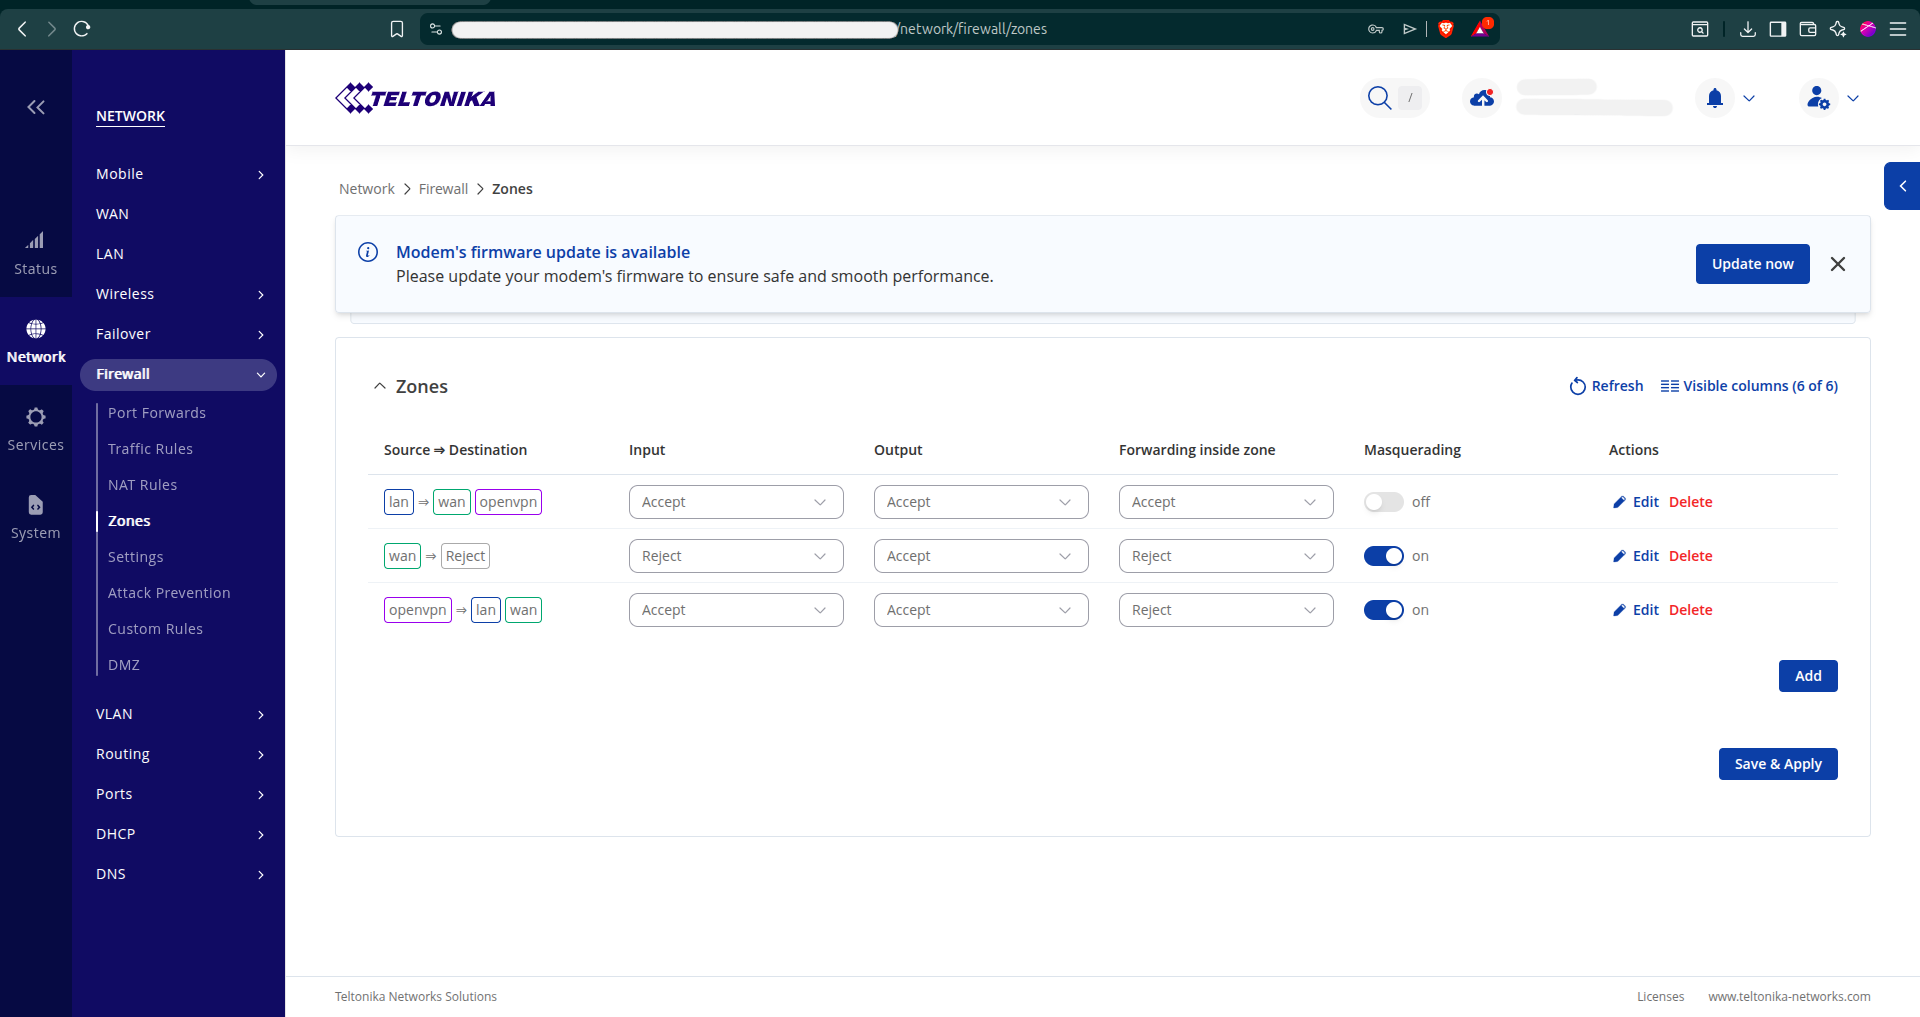
- Make sure the three zones (LAN, WAN, OpenVPN) are configured as described below.
- Click “Save & Apply”.
LAN Zone
| Setting | Value |
|---|---|
| Source -> Destination | lan -> wan, openvpn |
| Input | Accept |
| Output | Accept |
| Forwarding inside zone | Accept |
| Masquerading | Off |
WAN Zone
| Setting | Value |
|---|---|
| Source -> Destination | wan -> Reject |
| Input | Reject |
| Output | Accept |
| Forwarding inside zone | Reject |
| Masquerading | On |
OpenVPN Zone
| Setting | Value |
|---|---|
| Source -> Destination | openvpn -> lan, wan |
| Input | Accept |
| Output | Accept |
| Forwarding inside zone | Reject |
| Masquerading | On |
Important: The key settings are: (1) the LAN zone must forward to both wan AND openvpn, (2) the OpenVPN zone must forward to lan and wan, and (3) Masquerading must be ON for both wan and openvpn zones. Without these settings, remote access through the VPN will not work.
Step 4: Add a Proxy Config in KaaIoT
Once the VPN connection is active, you can access the router’s web interface remotely through the KaaIoT platform without needing a direct VPN client on your computer.
- In KaaIoT, go to Device management -> Remote access.
- Click on your VPN client name (e.g.,
my-router) to open its details. - Open the “Proxy configs” tab.
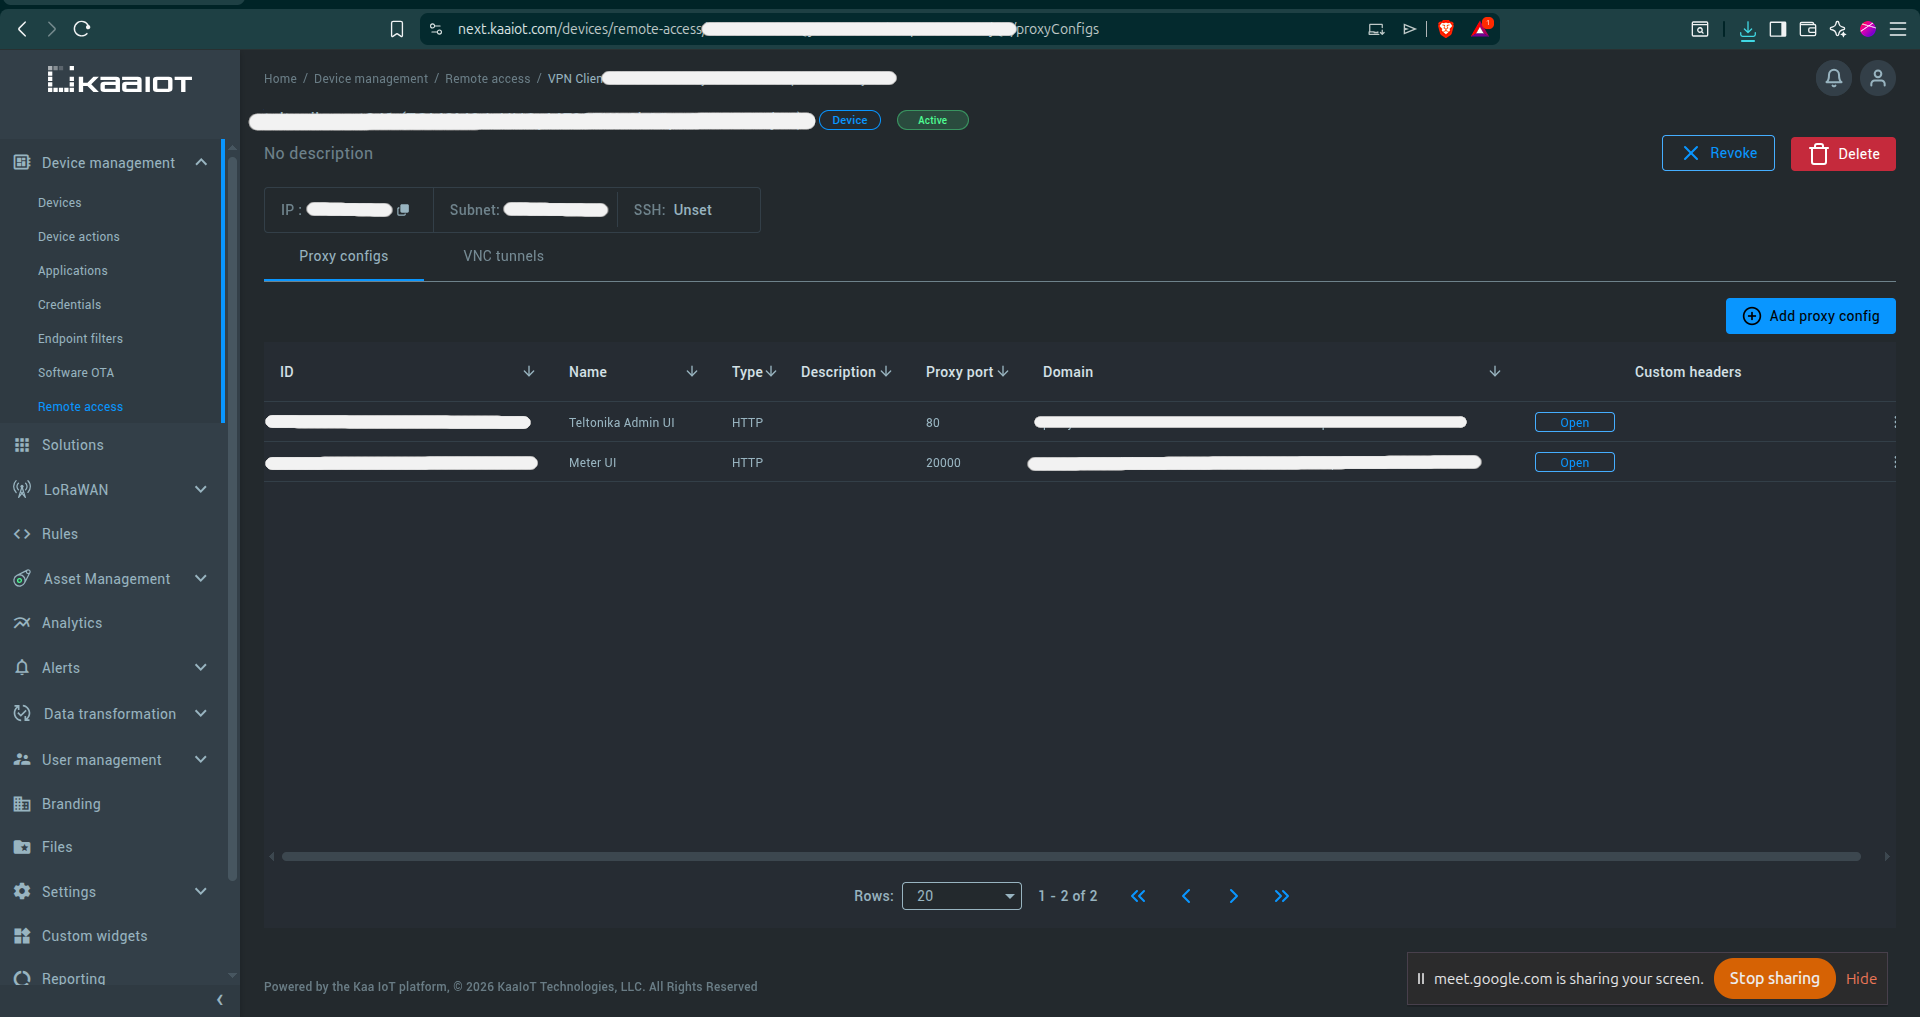
- Click “Add proxy config” in the top-right corner.
- Fill in the fields as described below.
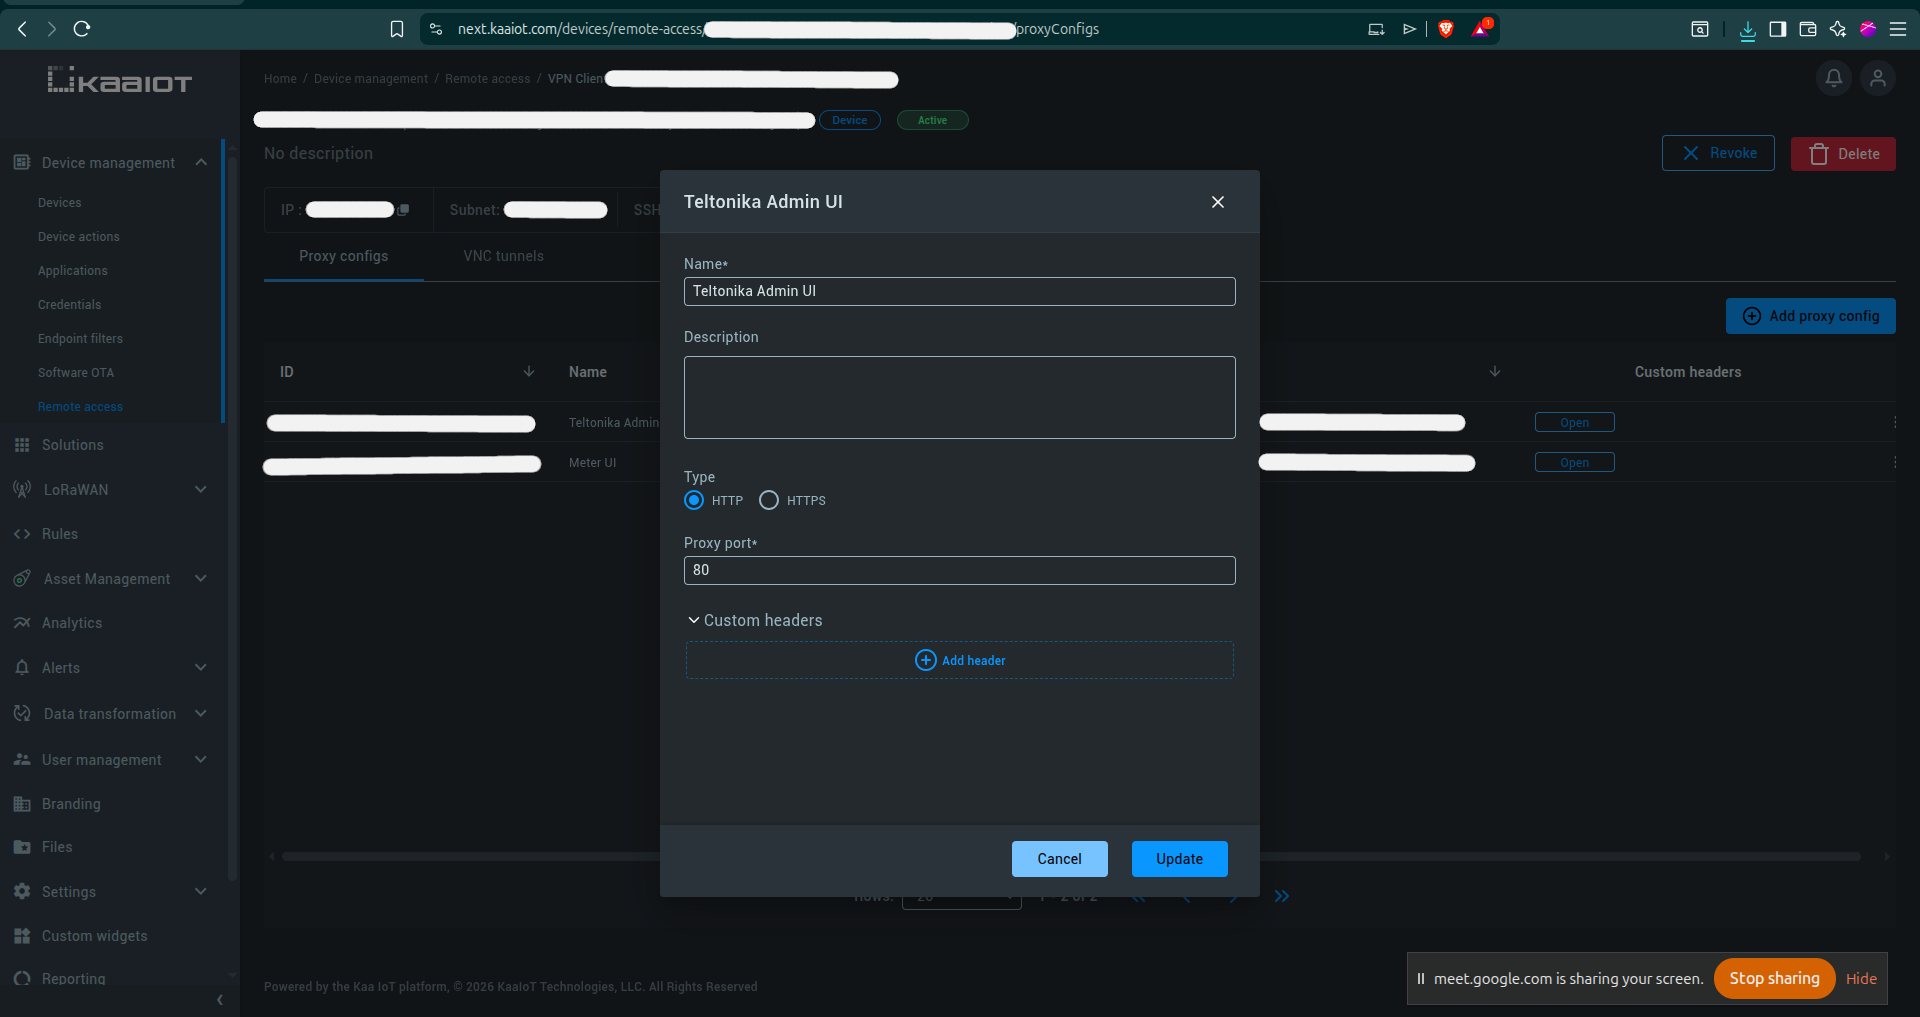
- Click “Create” to save the proxy configuration.
Proxy config fields
| Field | What to enter |
|---|---|
| Name | Teltonika Admin UI (or any descriptive name) |
| Type | HTTP |
| Proxy port | 80 (the port of the web service on the device) |
| Custom headers | Can be left empty |
A unique domain will be automatically generated (e.g., proxy-<id>.vpn-service.kaaiot.com). Click the “Open” button to access the Teltonika admin panel in your browser.
Tip: You can create multiple proxy configs to access different services behind the router. For example, if an energy meter web interface runs on port
20000, add another proxy config with Proxy port =20000and name it “Meter UI”.
Verification
After completing all steps, verify the setup:
- In KaaIoT (Remote access): The VPN client status is Active
- On Teltonika (Services -> VPN -> OpenVPN): The client status is Connected with an assigned IP address
- In KaaIoT (Proxy configs): Clicking “Open” successfully opens the router’s admin panel
- You can log in to the Teltonika admin panel through the proxy link
Troubleshooting
| Problem | Solution |
|---|---|
| VPN client shows inactive in KaaIoT | Verify the .ovpn file is uploaded on the Teltonika, the OpenVPN client is toggled ON, and the router has internet access. |
| OpenVPN status is “Disconnected” on Teltonika | Click the Logs link next to the client to check error details. Common causes: incorrect .ovpn file, no internet, firewall blocking port 11194/TCP. |
| “Open” button in proxy config shows a blank or error page | Check that firewall zones are configured correctly (openvpn zone must forward to lan). Verify the proxy port matches the actual service port (e.g., 80 for web UI). |
| Cannot reach devices connected behind the router | Make sure Masquerading is ON for the openvpn zone and that the LAN zone forwards to openvpn. The device behind the router should use the router as its default gateway. |
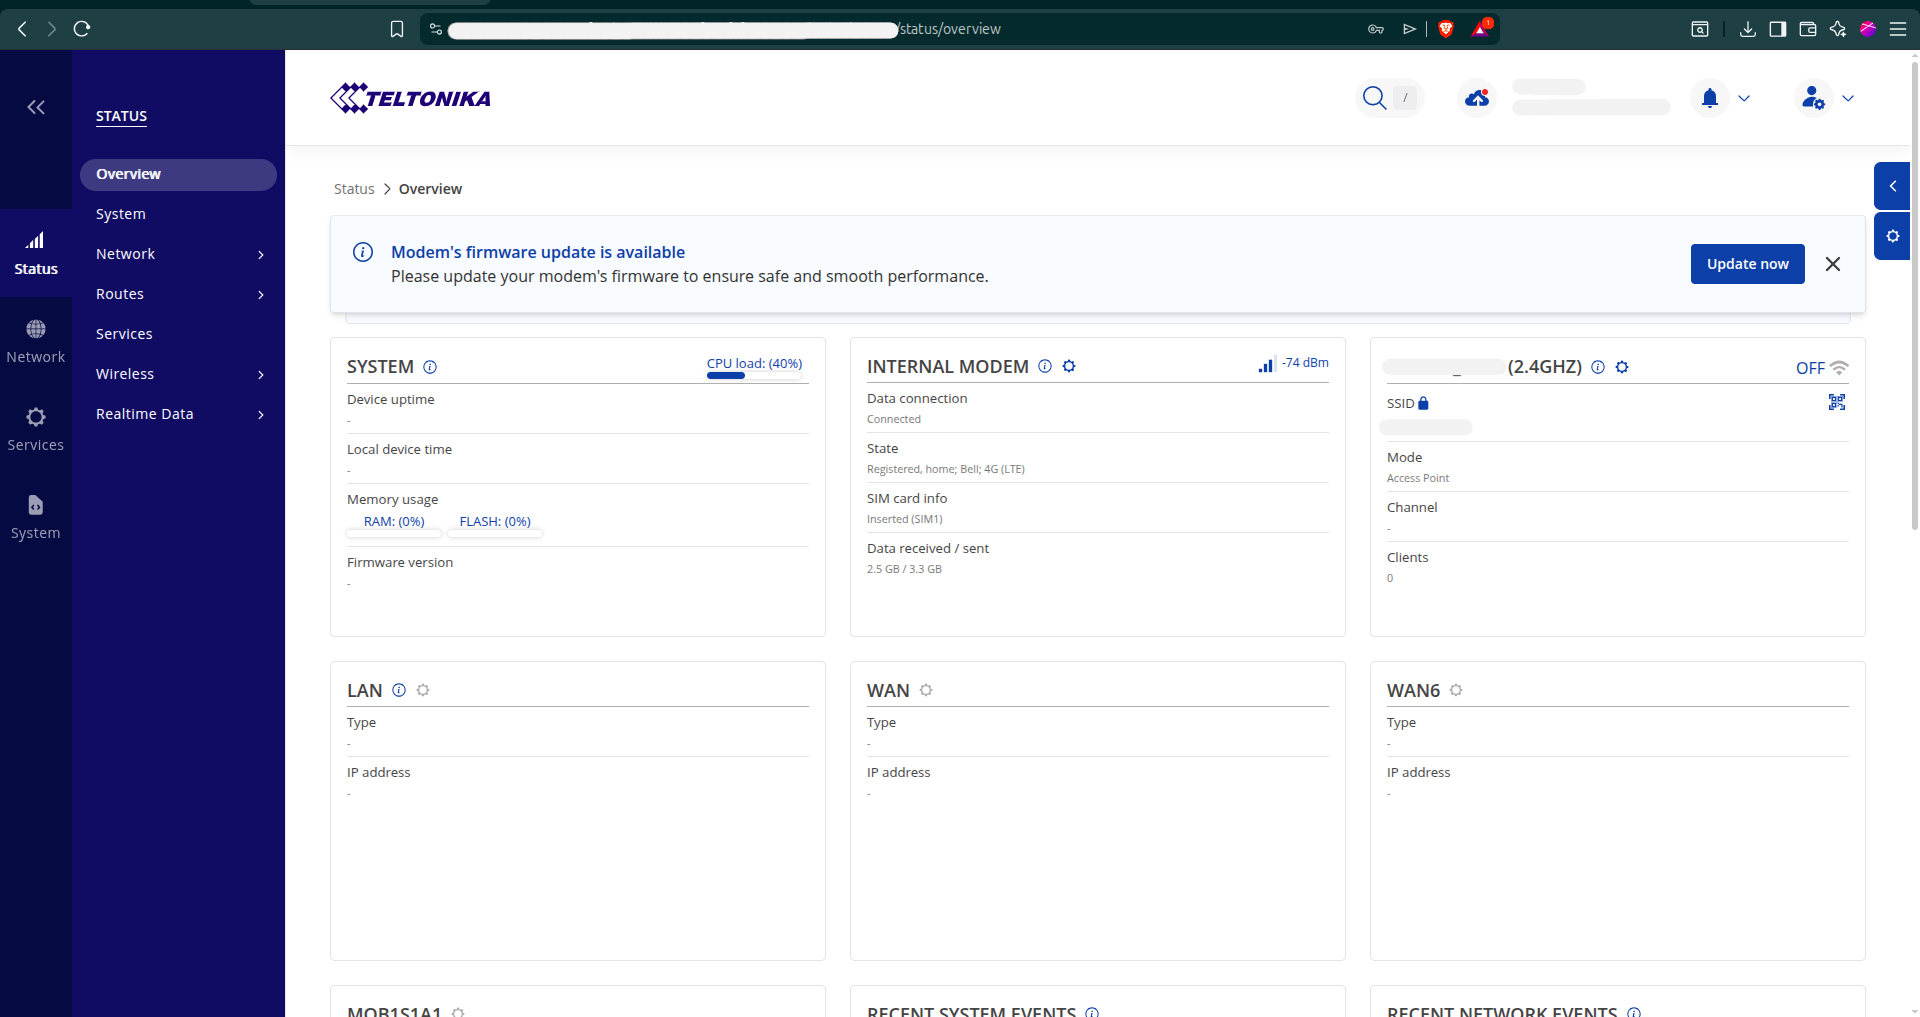
| VPN connects but disconnects frequently | Check signal strength on the Teltonika (Status -> Overview -> Internal Modem). Weak cellular signal can cause unstable VPN connections. Consider using TCP protocol for more reliable connections. |