Device Commands
- What is a command
- What is a command type
- Playbook
- Creating command schemas with CEX configuration
- What’s Next
What is a command
Command is a short-lived message sent to a connected endpoint from the Kaa platform. With the commands, you can toggle the lights on/off, open a car trunk, or request an immediate endpoint state report.
- Pending — the command was sent to the endpoint, but no execution result is known yet.
- Executed — the endpoint has responded, meaning it received the command, executed it, and sent the result back.
Consider the following example.
Let’s assume you just sent a command to your Tesla car to park itself in a parking slot. The platform immediately assigns pending to that command, while your Tesla receives the command and starts parking. After finishing with the task, the car reports the execution result of that command back to the platform and Kaa assigns executed to that command.
Every command has an execution status code and reason phrase that endpoints can specify at the moment of reporting the execution result back to the platform.
If, for example, your Tesla couldn’t finish the parking because it was taken by another vehicle, it may report the execution result specifying 409 status code and some meaningful reason phrase, which will be displayed for you in the Kaa UI.
What is a command type
A Command type represents the type of command to execute on an endpoint, e.g. reboot, close-door, switch-light, or for Tesla—park.
An endpoint can support as many command types as you define in its firmware.
Now, let’s jump into action and do some practice.
Playbook
We assume you already have an application, application version, and endpoint with a token created while following the “connecting your first device” tutorial. You can reuse them or create new ones.
Log in to your Kaa Cloud account to get started.
Invoking a command
When a user invokes a command (e.g., from Kaa UI) on a device that uses a synchronous protocol (e.g., HTTP), there is no way for the platform to push such command to the device. Instead, Kaa persists the command and waits until the device requests it for execution. This means that for devices with synchronous protocols it is their responsibility to periodically poll the platform for new commands.
So let’s invoke some command and make it available for execution by an endpoint.
Go to Device management → Devices → select your device → Commands tab.
In the Command execution widget, fill in the Command type with reboot and set Maximum command retention for delivery to 1 hour. This defines how long the command remains available for execution.
Click Run.

Once the command is invoked, it appears in a response to the polling during the time specified in the Maximum command retention for delivery field (1 hour in our case).
To poll the platform for new commands with the reboot command type, execute the bellow cURL.
The last part of the URL designates the command type, which in our case is reboot.
Replace <app-version-name> with the actual application version used by the endpoint and <endpoint-token> with the endpoint token.
curl --location --request POST 'https://connect.cloud.kaaiot.com:443/kp1/<app-version-name>/cex/<endpoint-token>/command/reboot' \
--data-raw '{}'
You have now retrieved the command you invoked earlier.
Capture the id from the response.
It’s an internal command ID used by Kaa to uniquely identify the command.
Note that the command is still in the Pending state in the “Commands history” widget on Kaa UI.
Let’s send the command execution result back to Kaa.
Specify the application version for <app-version-name>, the endpoint token for <endpoint-token> and the command ID for <command-ID> from the earlier received response body.
curl --location --request POST 'https://connect.cloud.kaaiot.com:443/kp1/<app-version-name>/cex/<endpoint-token>/result/reboot' \
--data-raw '[{
    "id": <command-ID>,
    "statusCode": 200,
    "reasonPhrase": "OK",
    "payload": "Success"
}]'
When the platform receives the execution result for the command with the specific command ID, it marks the command as executed and stops returning it in a response for the command polling.
To run the below MQTT client on your PC, you will need Python 3 installed. To speed things up a little, you can also just open and run it on Replit.com.
Initialize the ENDPOINT_TOKEN and the APPLICATION_VERSION variables with endpoint token and application version respectively.
# Simple MQTT-based command execution client for the Kaa IoT platform.
# Handles "reboot" and "zero" command types.
# See https://docs.kaaiot.io/KAA/docs/current/Tutorials/sending-commands-to-device/

import json
import paho.mqtt.client as mqtt
import random
import signal
import string
import time

KPC_HOST = "mqtt.next.kaaiot.com"  # Kaa Cloud plain MQTT host
KPC_PORT = 1883  # Kaa Cloud plain MQTT port

ENDPOINT_TOKEN = ""         # Paste endpoint token
APPLICATION_VERSION = ""    # Paste application version
COMMAND_TYPE = "zero"

class DataCollectionClient:

    def __init__(self, client):
        self.client = client
        self.data_collection_topic = f'kp1/{APPLICATION_VERSION}/dcx/{ENDPOINT_TOKEN}/json/32'

        command_reboot_topic = f'kp1/{APPLICATION_VERSION}/cex/{ENDPOINT_TOKEN}/command/reboot/status'
        self.client.message_callback_add(command_reboot_topic, self.handle_reboot_command)
        self.command_reboot_result_topic = f'kp1/{APPLICATION_VERSION}/cex/{ENDPOINT_TOKEN}/result/reboot'

        command_topic = f'kp1/{APPLICATION_VERSION}/cex/{ENDPOINT_TOKEN}/command/{COMMAND_TYPE}/status'
        self.client.message_callback_add(command_topic, self.handle_command)
        self.command_result_topic = f'kp1/{APPLICATION_VERSION}/cex/{ENDPOINT_TOKEN}/result/{COMMAND_TYPE}'

        request_command_topic = f'kp1/{APPLICATION_VERSION}/cex/{ENDPOINT_TOKEN}/command/{COMMAND_TYPE}/1/status'
        self.client.message_callback_add(request_command_topic, self.handle_command)

    def connect_to_server(self):
        print(f'Connecting to Kaa server at {KPC_HOST}:{KPC_PORT} using application version {APPLICATION_VERSION} and endpoint token {ENDPOINT_TOKEN}')
        self.client.connect(KPC_HOST, KPC_PORT, 60)
        print('Successfully connected')

    def disconnect_from_server(self):
        print(f'Disconnecting from Kaa server at {KPC_HOST}:{KPC_PORT}...')
        self.client.loop_stop()
        self.client.disconnect()
        print('Successfully disconnected')

    def handle_reboot_command(self, client, userdata, message):
        print(f'<--- Received "reboot" command on topic {message.topic} \nRebooting...')
        command_result = self.compose_command_result_payload(message)
        print(f'command result {command_result}')
        client.publish(topic=self.command_reboot_result_topic, payload=command_result)
        # With below approach we don't receive the command confirmation on the server side.
        # self.client.disconnect()
        # time.sleep(5)  # Simulate the reboot
        # self.connect_to_server()

    def handle_command(self, client, userdata, message):
        print(f'<--- Received "{COMMAND_TYPE}" command on topic {message.topic} \nSending values...')
        command_result = self.compose_command_result_payload(message)
        client.publish(topic=self.data_collection_topic, payload=self.compose_data_sample(0, 0, 0))
        client.publish(topic=self.command_result_topic, payload=command_result)

    def compose_command_result_payload(self, message):
        command_payload = json.loads(str(message.payload.decode("utf-8")))
        print(f'command payload: {command_payload}')
        command_result_list = []
        for command in command_payload:
            commandResult = {"id": command['id'], "statusCode": 200, "reasonPhrase": "OK", "payload": "Success"}
            command_result_list.append(commandResult)
        return json.dumps(
            command_result_list
        )

    def compose_data_sample(self, fuelLevel, minTemp, maxTemp):
        return json.dumps({
            'timestamp': int(round(time.time() * 1000)),
            'fuelLevel': fuelLevel,
            'temperature': random.randint(minTemp, maxTemp),

        })


def on_message(client, userdata, message):
    print(f'Message received: topic {message.topic}\nbody {str(message.payload.decode("utf-8"))}')


def on_connect(client, userdata, flags, rc):
    client.subscribe(f"kp1/{APPLICATION_VERSION}/cex/{ENDPOINT_TOKEN}/command/{COMMAND_TYPE}/1/status")
    client.publish(f"kp1/{APPLICATION_VERSION}/cex/{ENDPOINT_TOKEN}/command/{COMMAND_TYPE}/1", json.dumps({"observe":True}))

def main():
    # Initiate server connection
    client = mqtt.Client(client_id=''.join(random.choice(string.ascii_uppercase + string.digits) for _ in range(6)))

    data_collection_client = DataCollectionClient(client)
    data_collection_client.connect_to_server()

    client.on_connect = on_connect
    client.on_message = on_message

    # Start the loop
    client.loop_start()

    fuelLevel, minTemp, maxTemp = 100, 95, 100

    # Send data samples in loop
    listener = SignalListener()
    while listener.keepRunning:

        payload = data_collection_client.compose_data_sample(fuelLevel, minTemp, maxTemp)

        result = data_collection_client.client.publish(topic=data_collection_client.data_collection_topic, payload=payload)
        if result.rc != 0:
            print('Server connection lost, attempting to reconnect')
            data_collection_client.connect_to_server()
        else:
            print(f'--> Sent message on topic "{data_collection_client.data_collection_topic}":\n{payload}')

        time.sleep(3)

        fuelLevel = fuelLevel - 0.3
        if fuelLevel < 1:
            fuelLevel = 100

    data_collection_client.disconnect_from_server()


class SignalListener:
    keepRunning = True

    def __init__(self):
        signal.signal(signal.SIGINT, self.stop)
        signal.signal(signal.SIGTERM, self.stop)

    def stop(self, signum, frame):
        print('Shutting down...')
        self.keepRunning = False


if __name__ == '__main__':
    main()
Run the Python script.
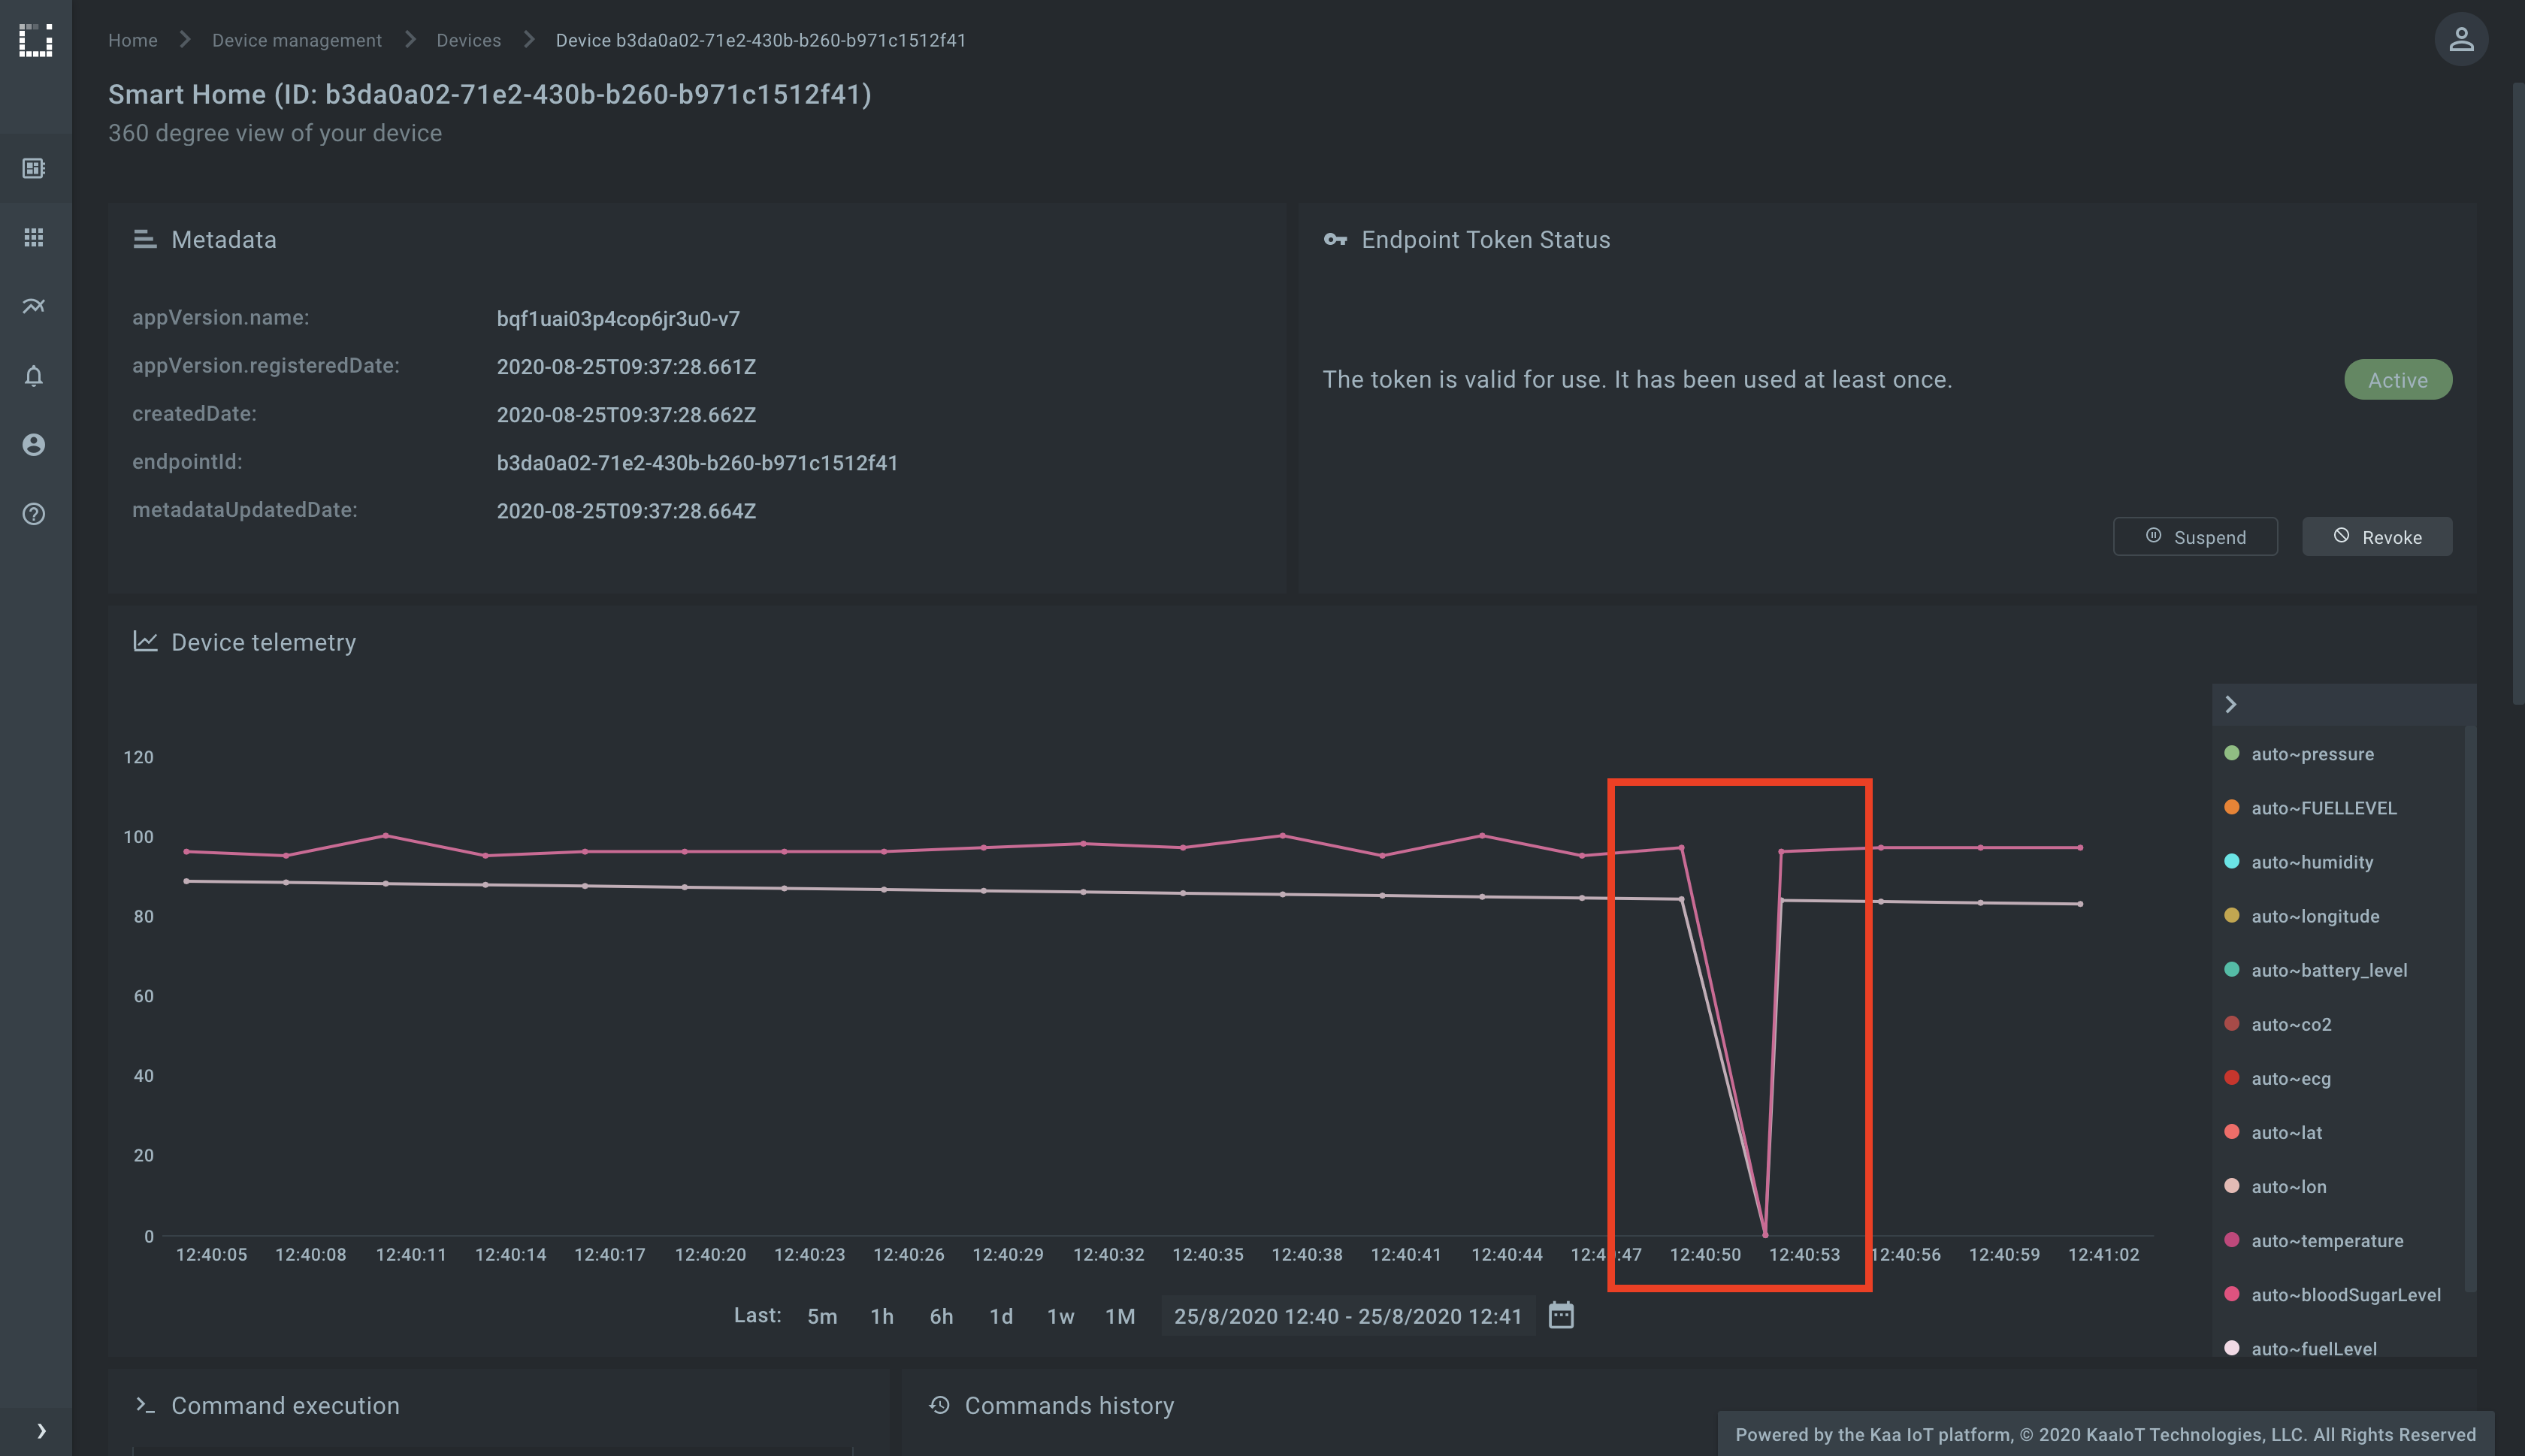
Now that the simulator is running, go to the endpoint dashboard and send a command of type zero to the endpoint.
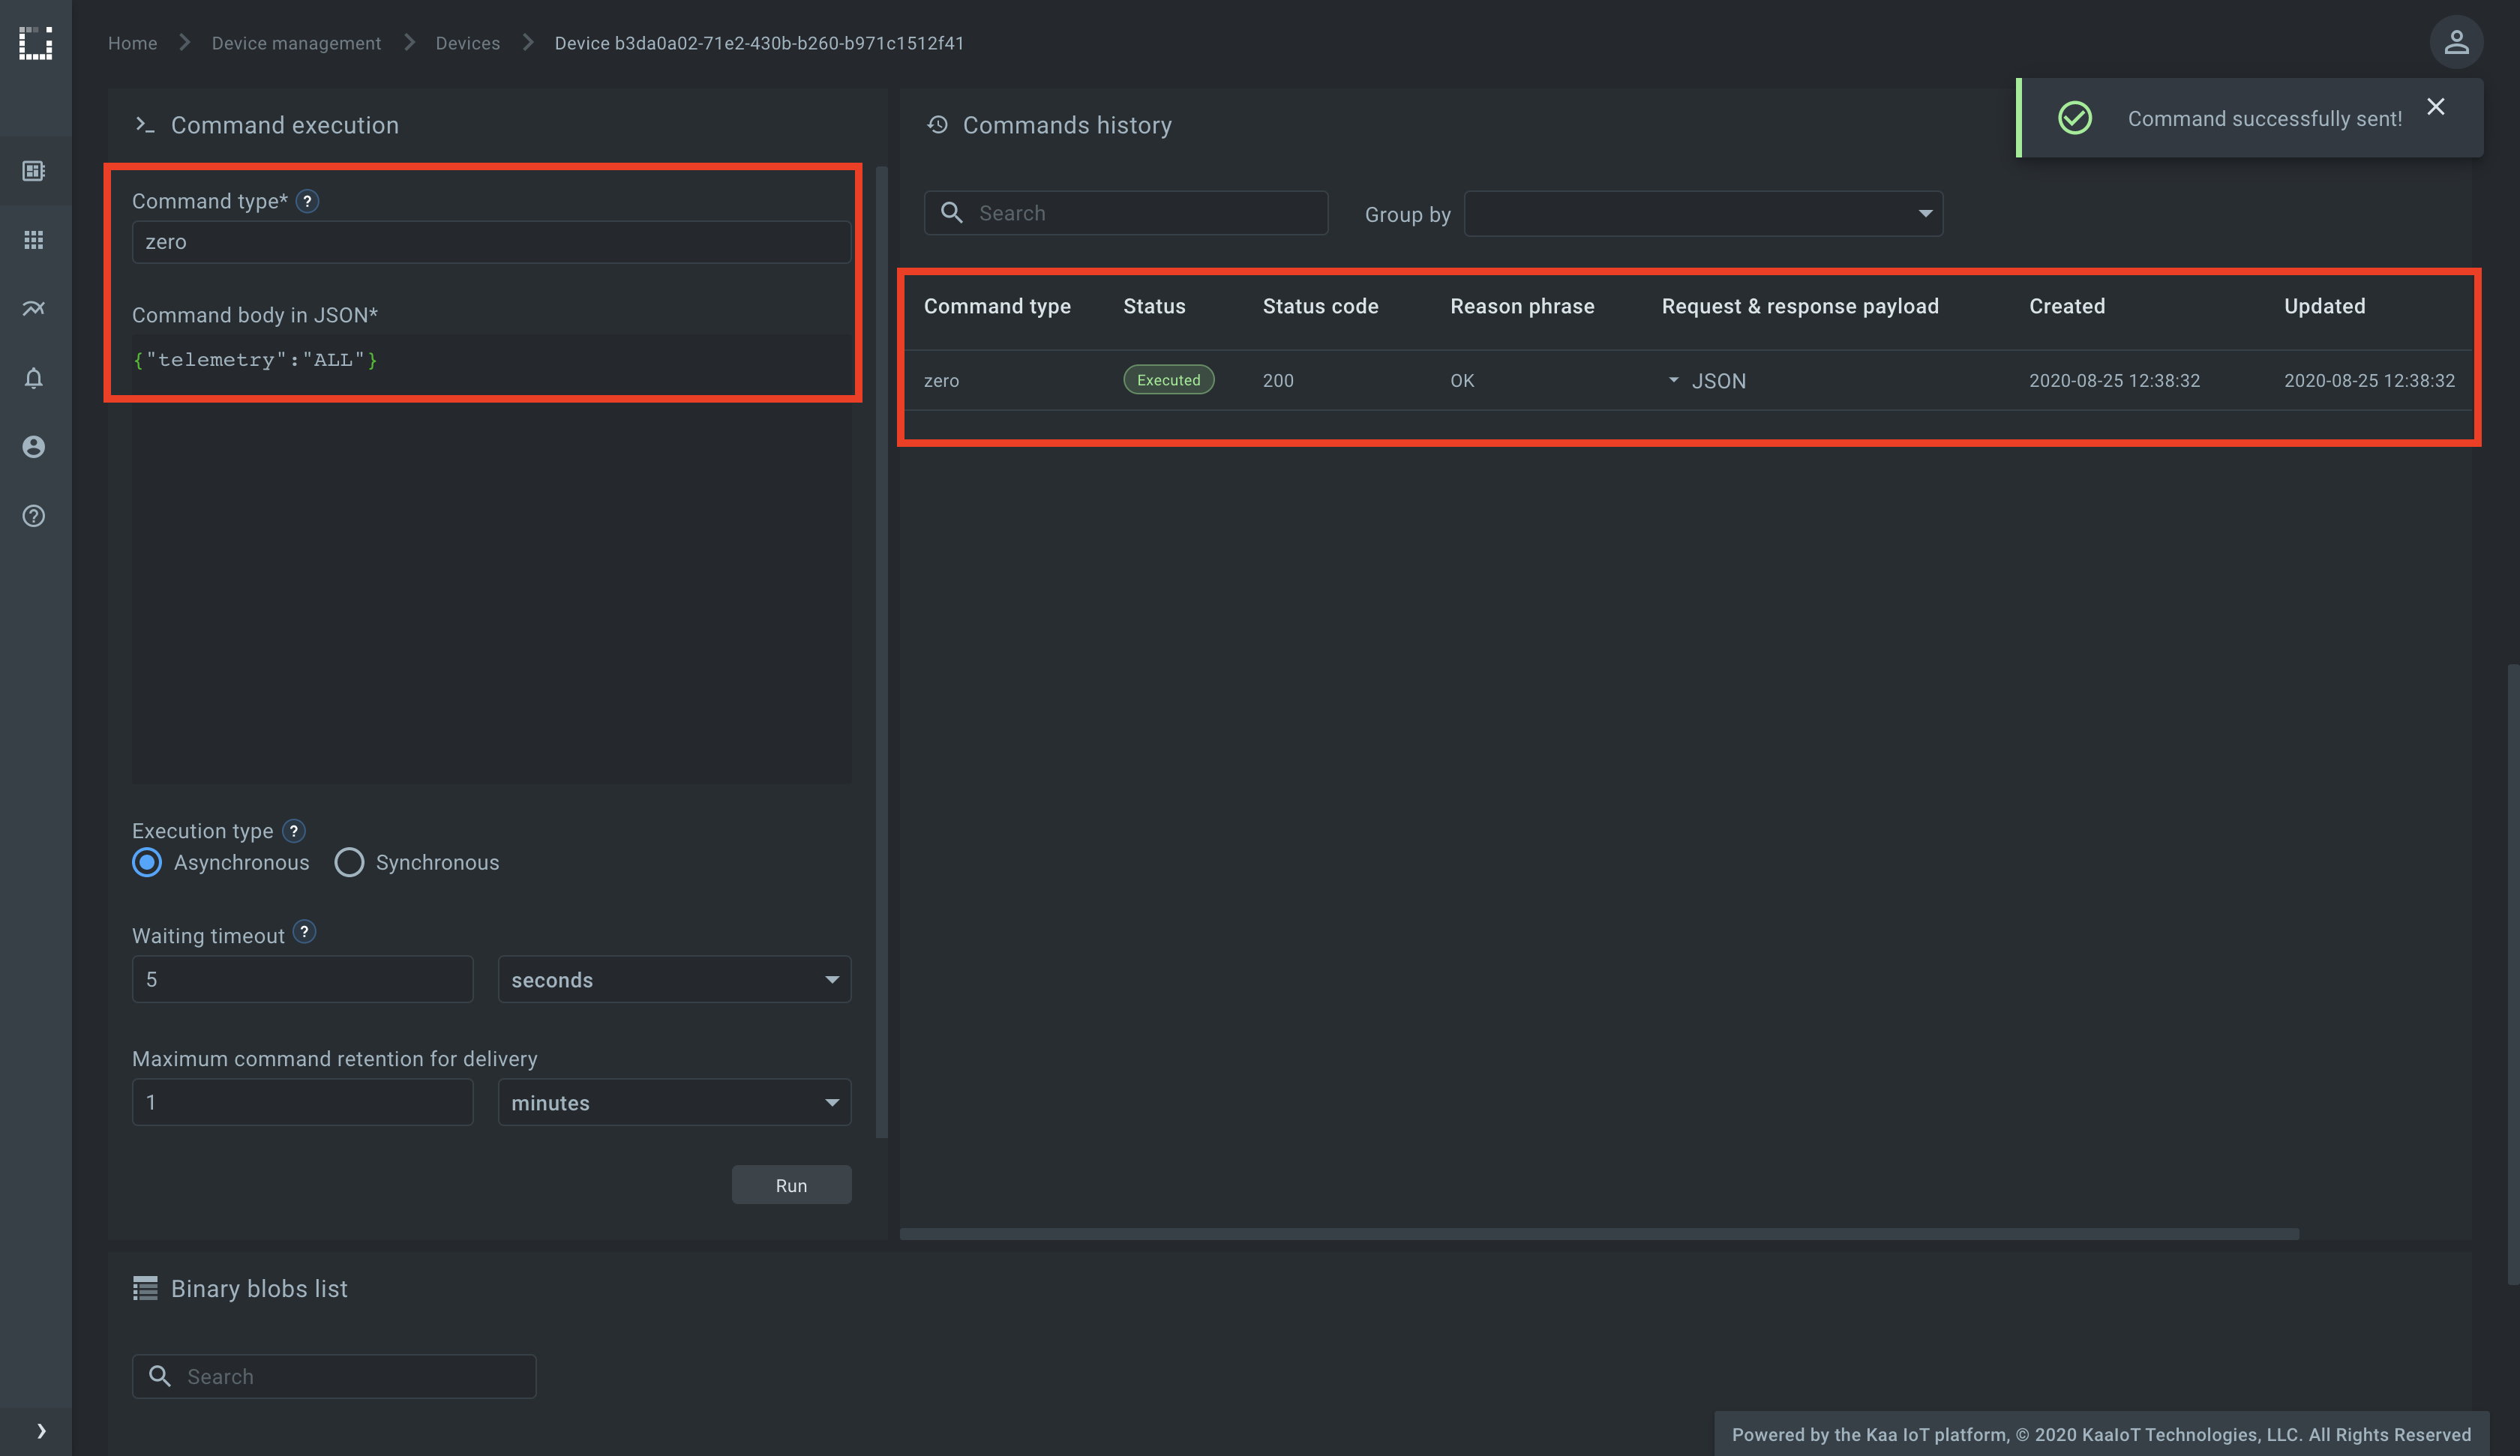
Check the Device telemetry widget and see that the endpoint responded with zero telemetry values.
Now repeat the above procedure with any other command specifying custom Command type and Command body in JSON.
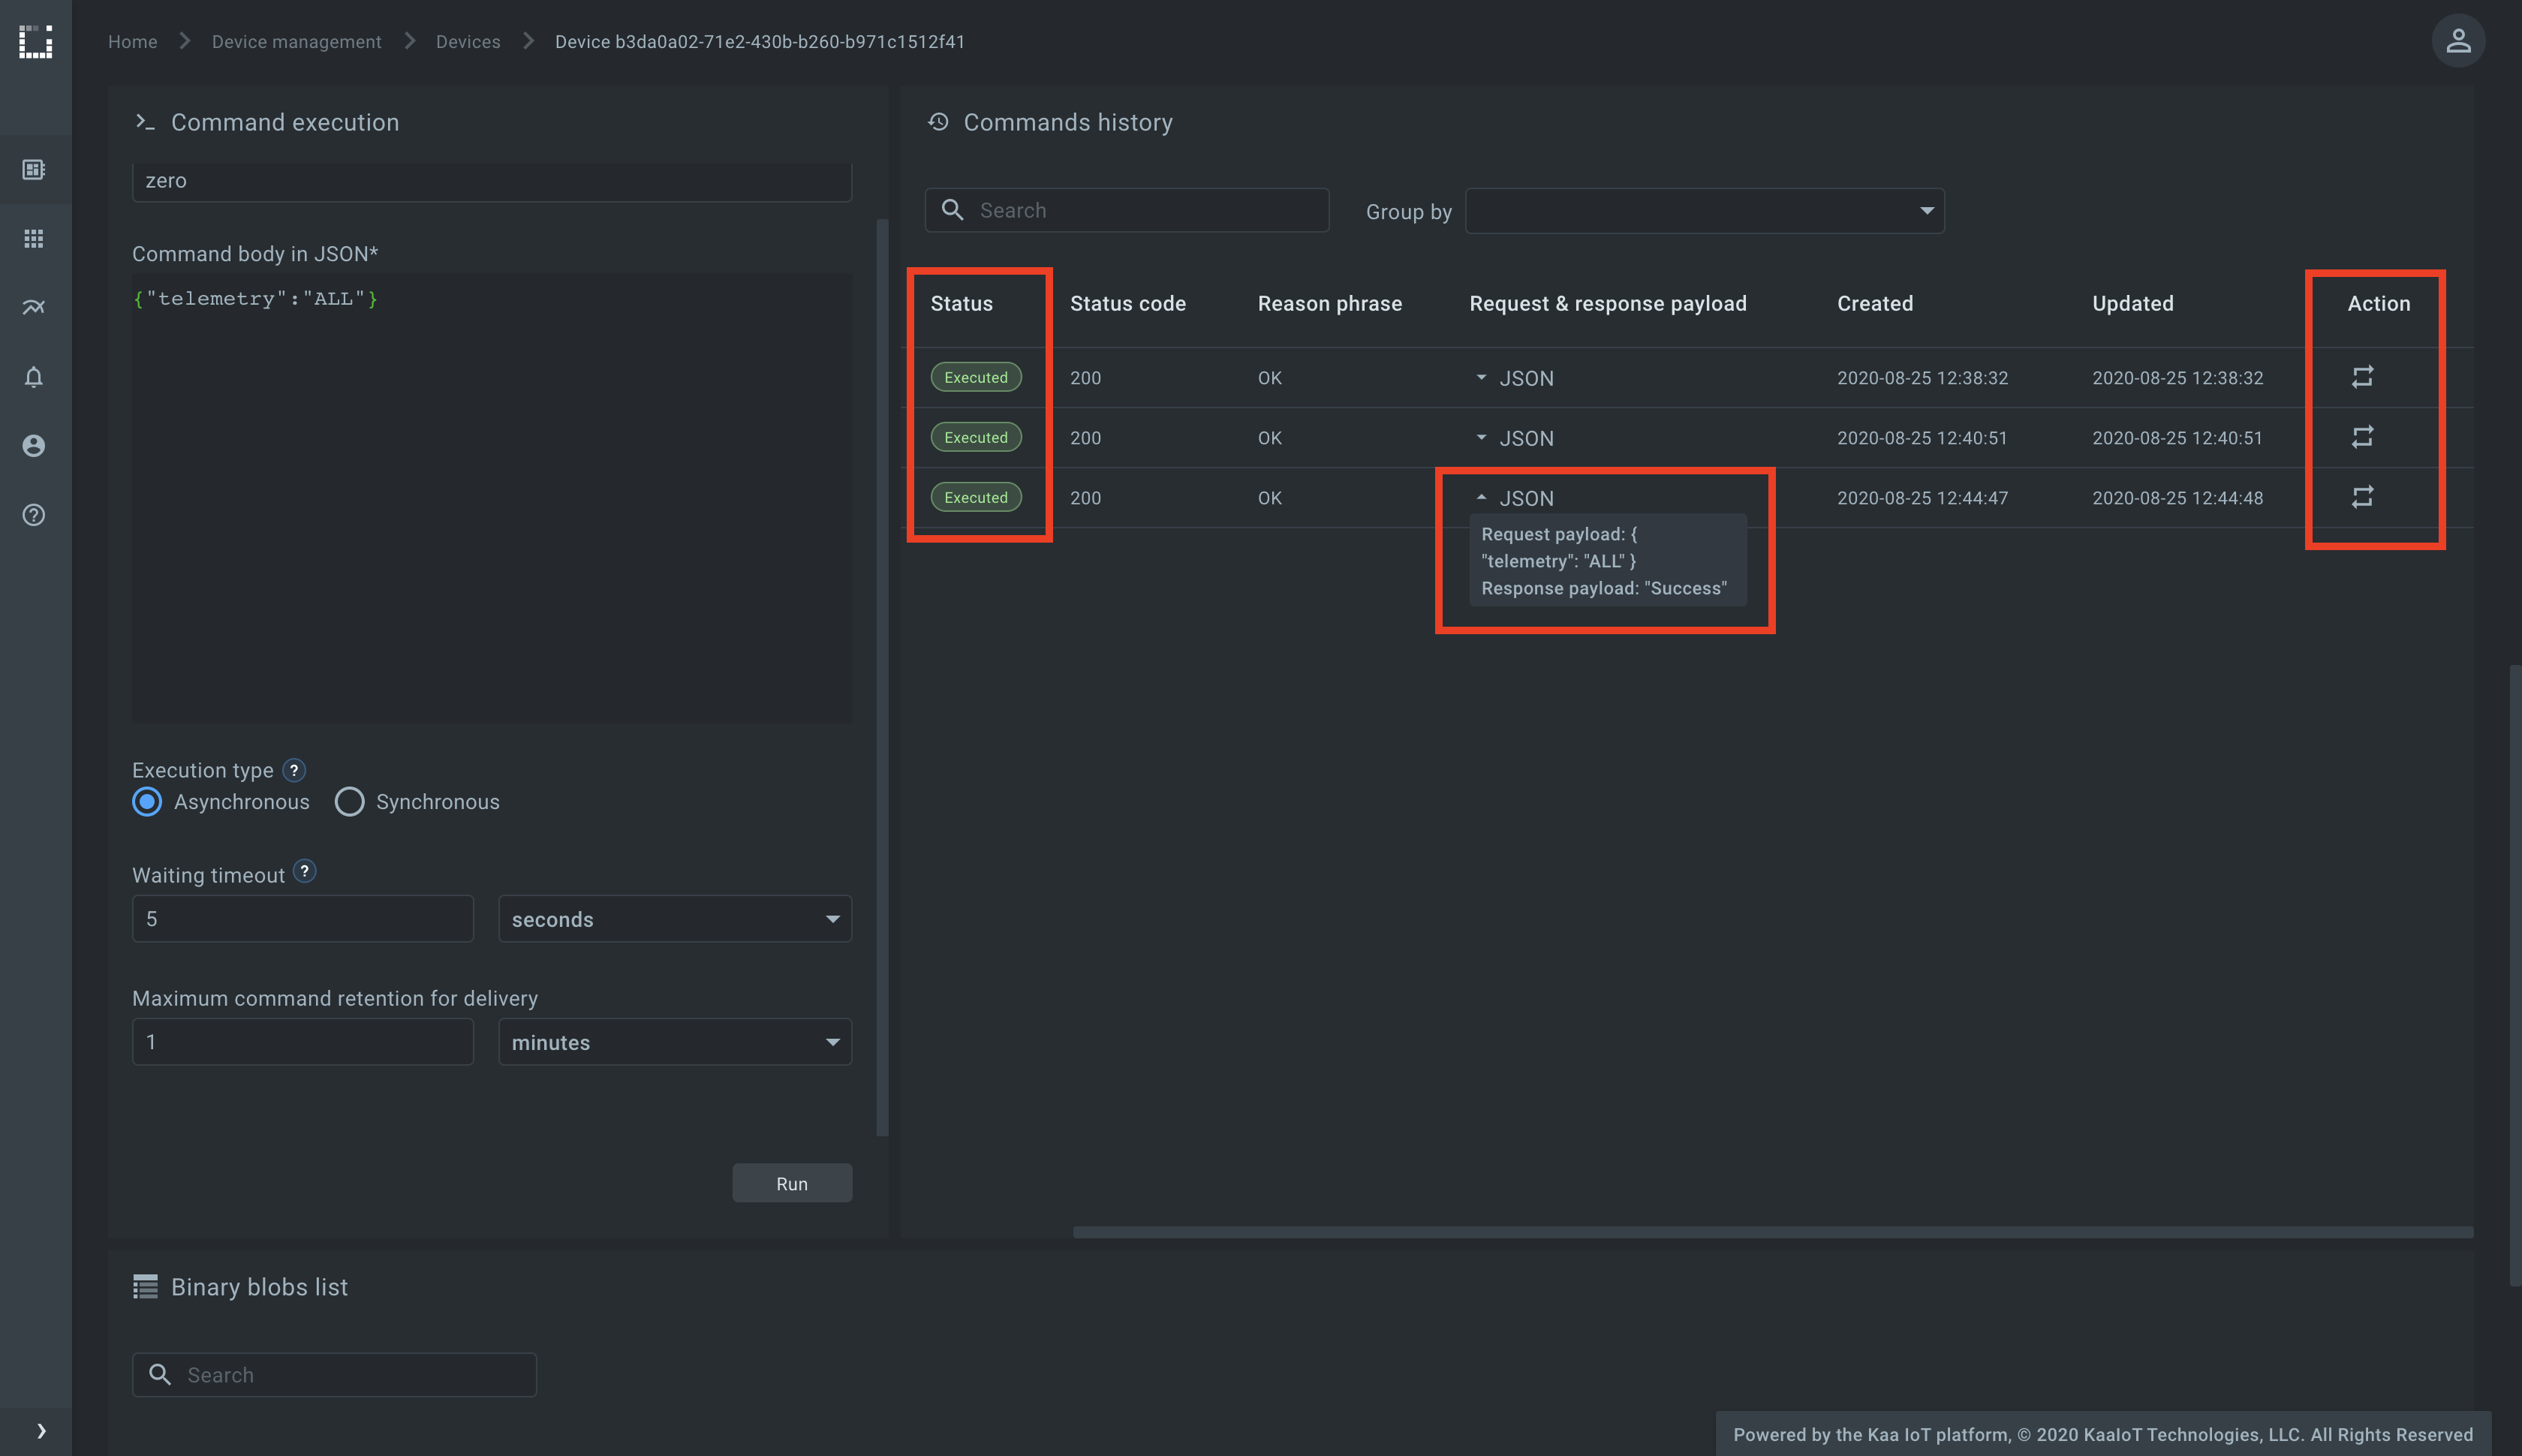
Browsing command history
You can browse command history using the Commands history widget on Kaa UI.
You can view command status (“Pending” or “Executed”), its request and response payloads, and re-run the command.
Creating command schemas with CEX configuration
In addition to sending ad-hoc commands, Kaa allows you to define reusable command schemas in the Application version through the CEX configuration. This approach lets you:
- Predefine a set of fields for a command.
- Provide default values for specific parameters.
- Make some fields constant while keeping others configurable at runtime.
Such schemas can then be used in the Command Form widget, allowing developers and operators to send commands with minimal manual input.
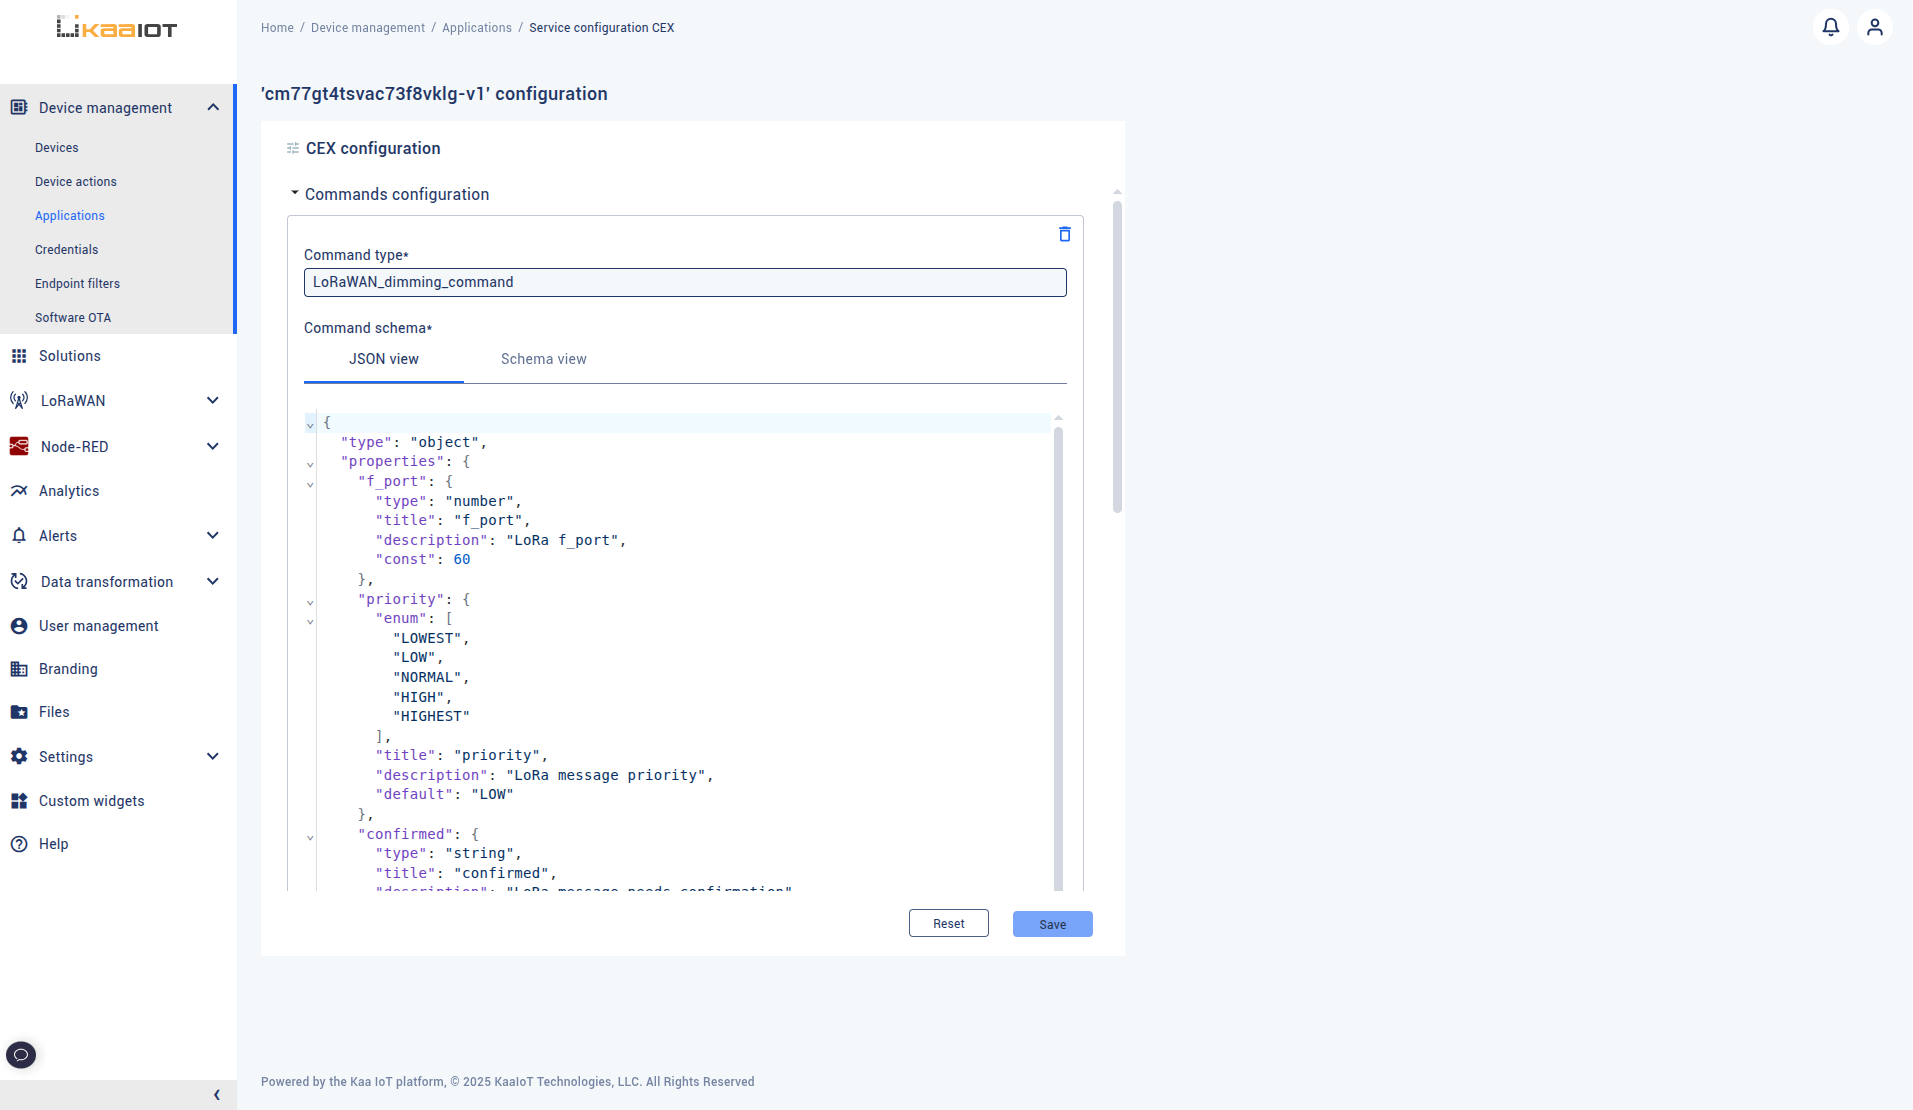
Example: LoRaWAN dimming command
The following example defines a command schema for a LoRaWAN light controller with dimming:
{
  "type": "object",
  "properties": {
    "f_port": {
      "type": "number",
      "title": "f_port",
      "description": "LoRa f_port",
      "const": 60
    },
    "priority": {
      "enum": ["LOWEST", "LOW", "NORMAL", "HIGH", "HIGHEST"],
      "title": "priority",
      "description": "LoRa message priority",
      "default": "LOW"
    },
    "confirmed": {
      "type": "string",
      "title": "confirmed",
      "description": "LoRa message needs confirmation",
      "const": "false"
    },
    "command": {
      "type": "string",
      "title": "command",
      "description": "Command type",
      "const": "dimming"
    },
    "output_mode": {
      "enum": ["off", "on", "blinking"],
      "title": "output_mode",
      "description": "Output mode"
    },
    "dimming": {
      "type": "number",
      "title": "dimming",
      "description": "Dimming value in percents (0..100)"
    },
    "period_s": {
      "type": "number",
      "title": "period_s",
      "description": "Blinking period in seconds (1..255), required if blinking mode is selected"
    }
  },
  "required": [
    "f_port",
    "priority",
    "confirmed",
    "command",
    "output_mode",
    "dimming"
  ]
}
In this schema:
f_port,confirmed, andcommandare defined as constants, ensuring they always have the same values.priorityhas a predefined list of options with a default value (LOW), but can be changed by the user when sending the command.output_mode,dimmingare required fields that should be provided each time.period_srequired if blinking mode is selected
Using the schema in Command Form
Once defined in the Application version CEX configuration, the schema becomes available in the Command Form widget.
- Open the Command Form widget for the device.
- Select the predefined schema.
- Save the widget configuration.
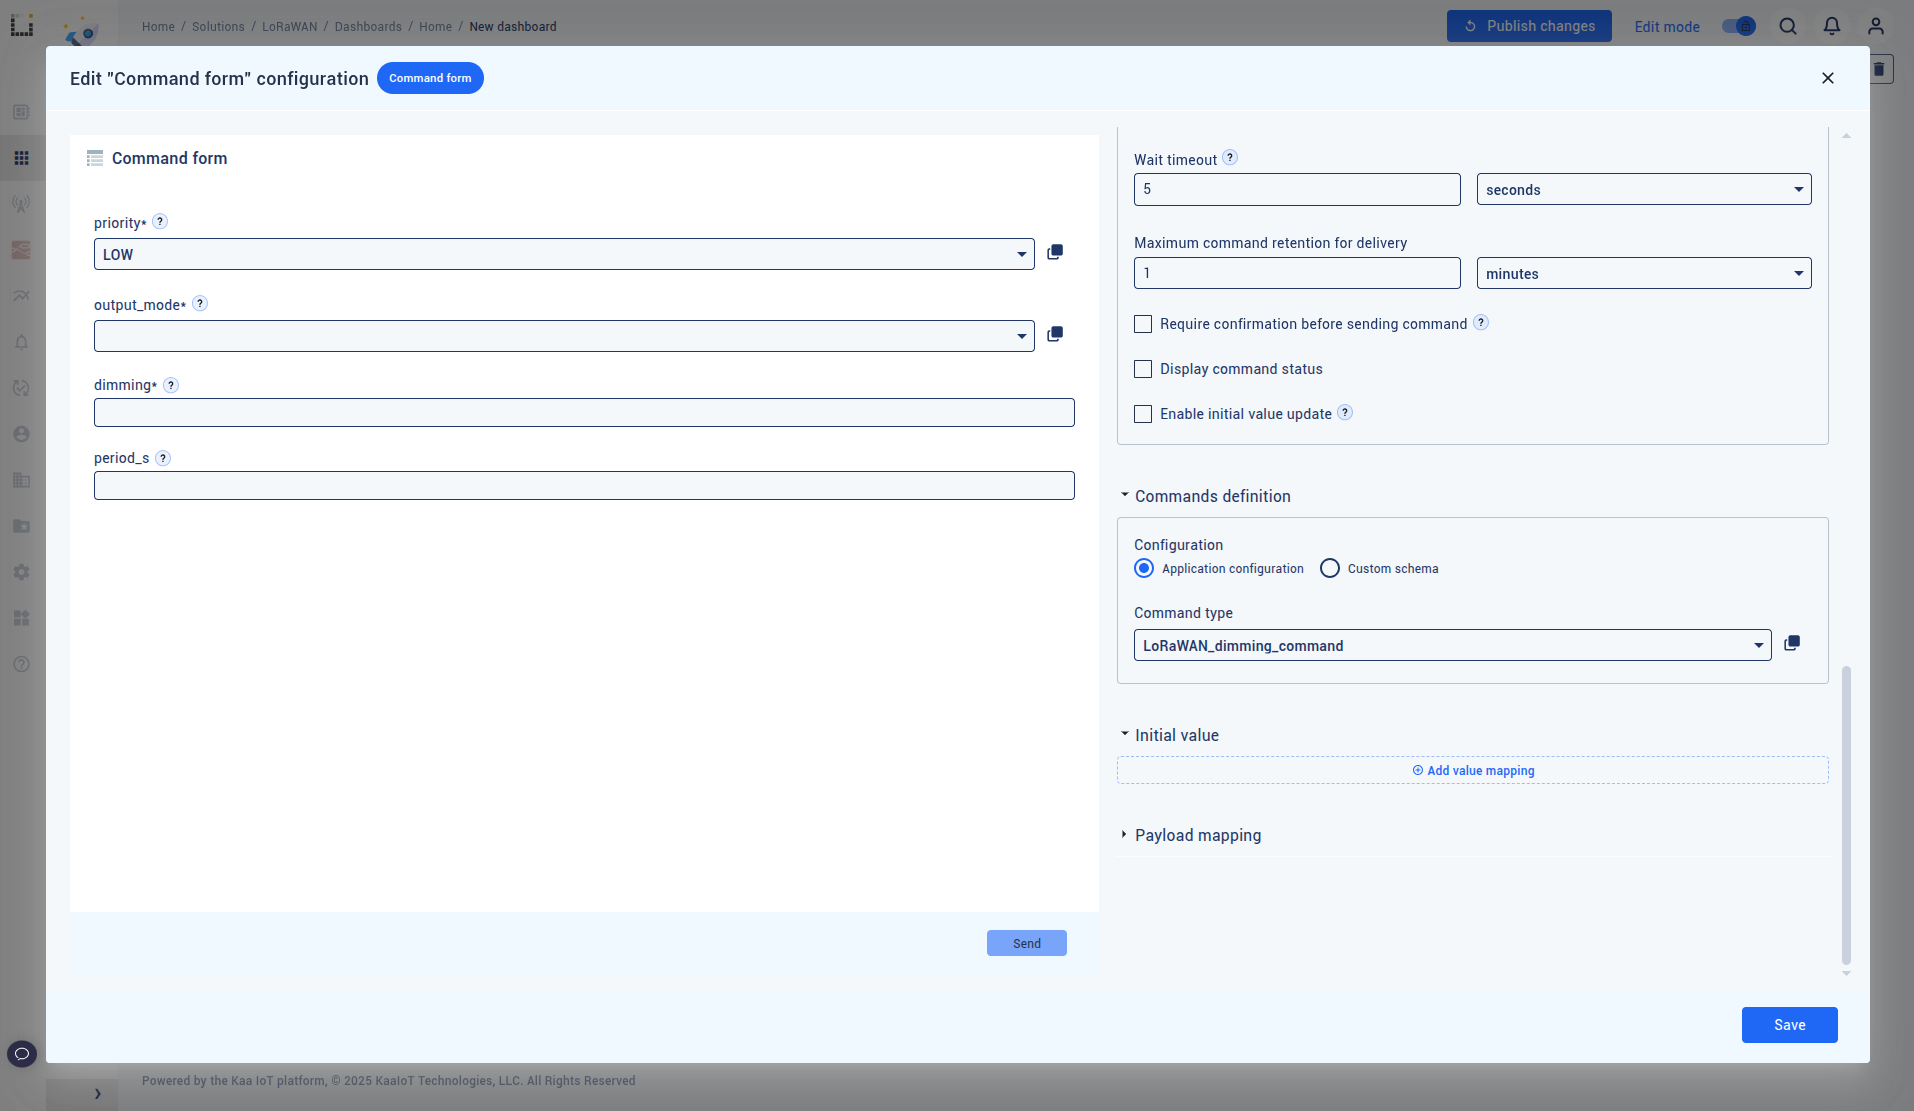
After that the command form can be used for command sending. Let’s provide values for configurable fields
priority = NORMALoutput_mode = blinkingdimming = 50period_s = 5
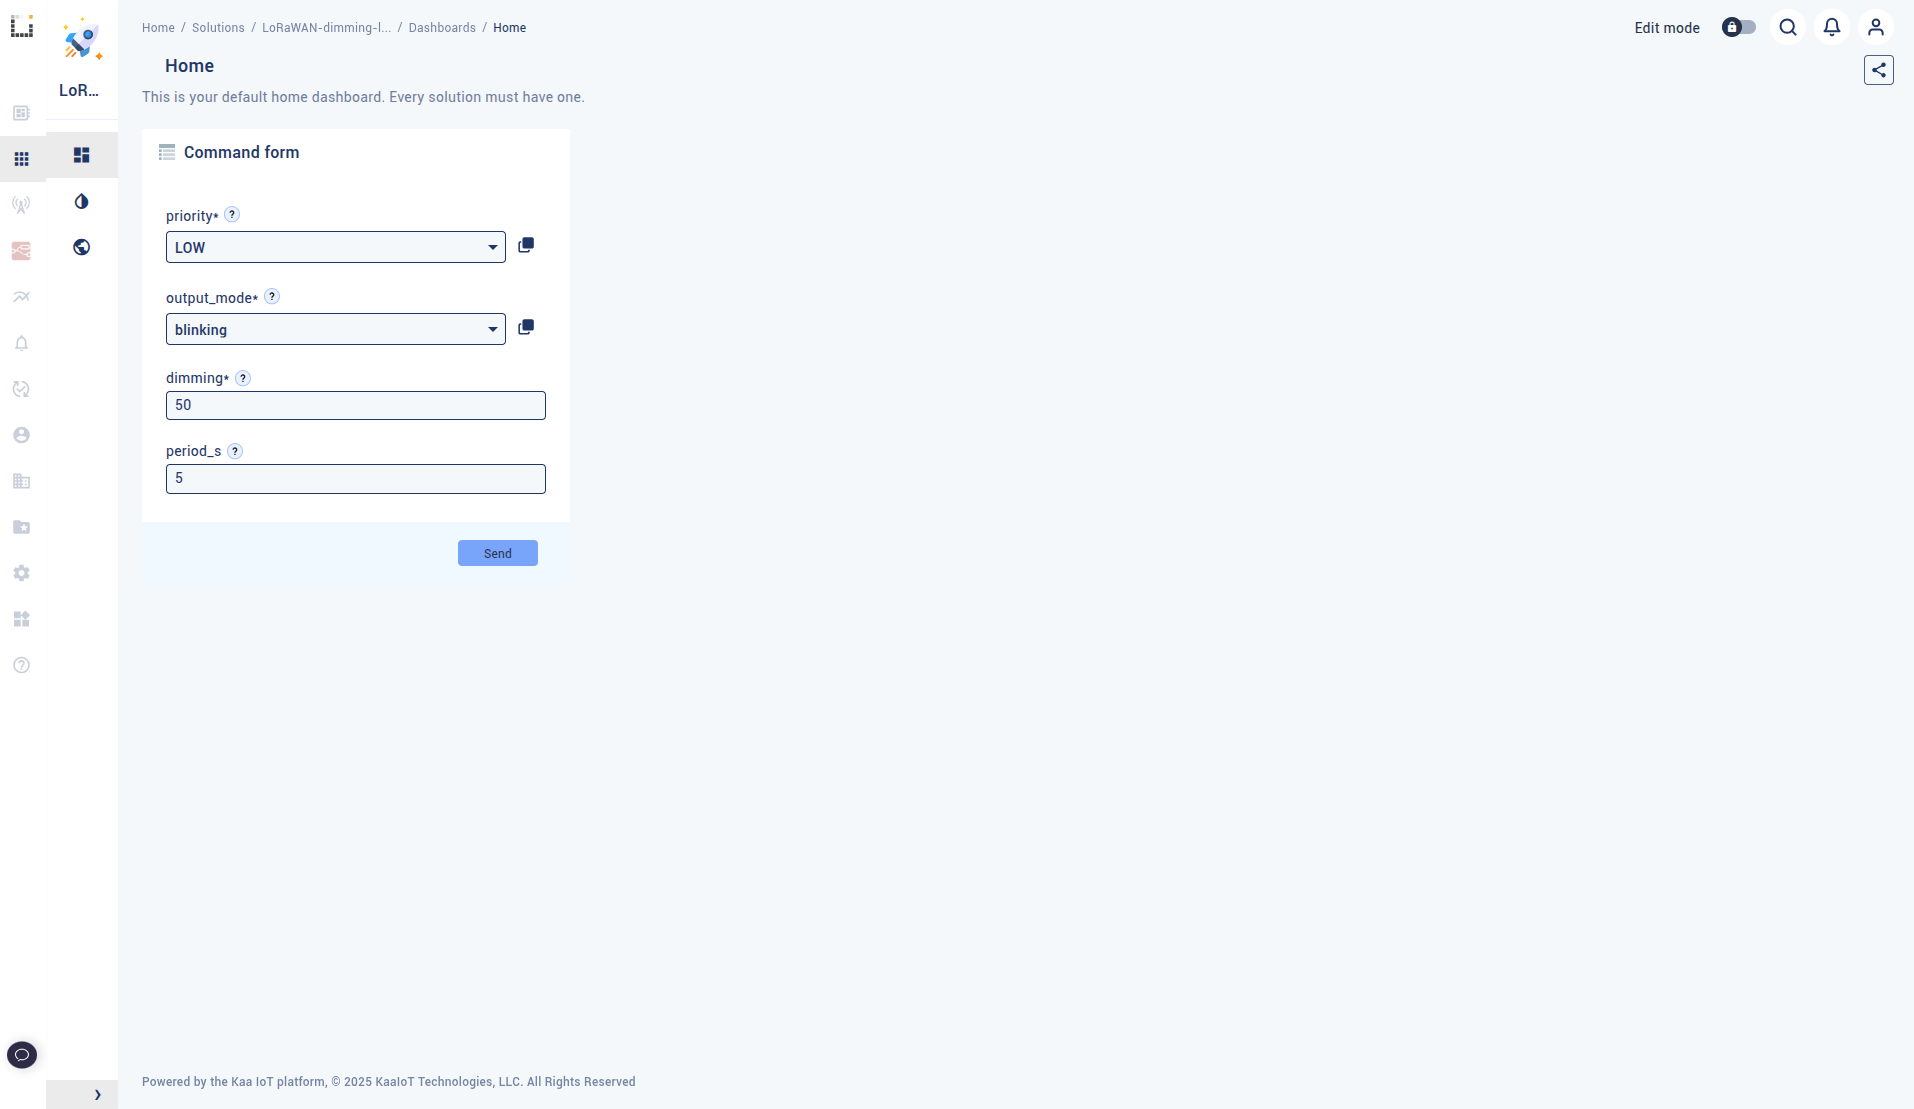
Click Send. The command payload will be automatically generated and sent:
{
  "f_port": 60,
  "priority": "NORMAL",
  "confirmed": "false",
  "command": "dimming",
  "output_mode": "blinking",
  "dimming": 50,
  "period_s": 5
}
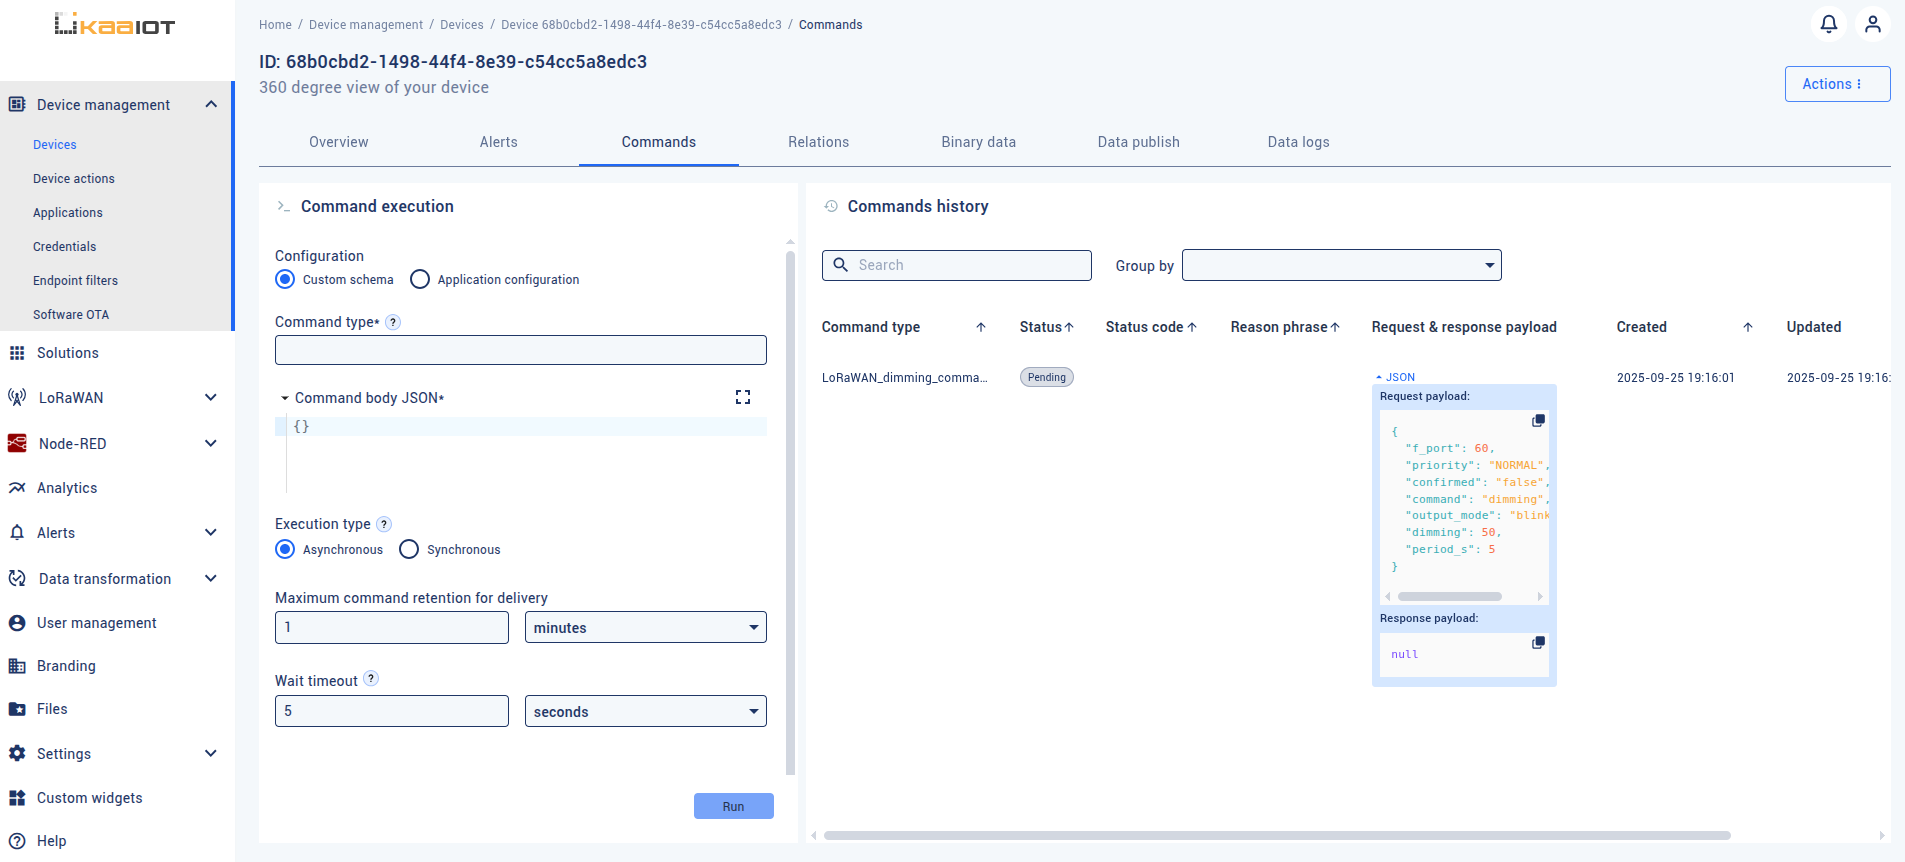
This approach ensures reusable, consistent command templates while still allowing flexibility where needed.
What’s Next
Read about the difference between Device Commands and Device Configuration Repository.