How to connect the Deye SUN-12K-SG04LP3-EU Hybrid Inverter
- Overview
- Prerequisites
- Resources
- Configuring Deye Inverter
- Setting up Deye MQTT Client
- (Optional) Viewing Your Data with Kaa Dashboard
Overview
This tutorials shows how to integrate the Deye SUN-12K-SG04LP3-EU hybrid inverter with the KAA platform.
It utilizes the deye-controller library to fetch data from the inverter and then uses kaa_mqtt_client to send data to the KAA platform.
Prerequisites
- The Deye Inverter (in this example, the model is
SUN-12K-SG04LP3-EU) is configured and connected to the internet. - You have a Kaa Cloud account.
Resources
- Deye Controller to read and write data from the Deye Inverter.
- Python MQTT Client to send logs from the Deye Controller.
- Solarman Proxy to set up a TCP proxy between the Deye inverter and a remote server.
Configuring Deye Inverter
You can connect to the Deye Web UI via a local network or through a TCP proxy. I’ll show you how to configure it in both ways.
Local Network
- Navigate to Deye’s settings by going to
{your_inverter_ip}/config_hide.html. - Scroll down to Internal server parameters setting.
- Set Protocol to
TCP-Serverand Port to8899. - Save the settings.
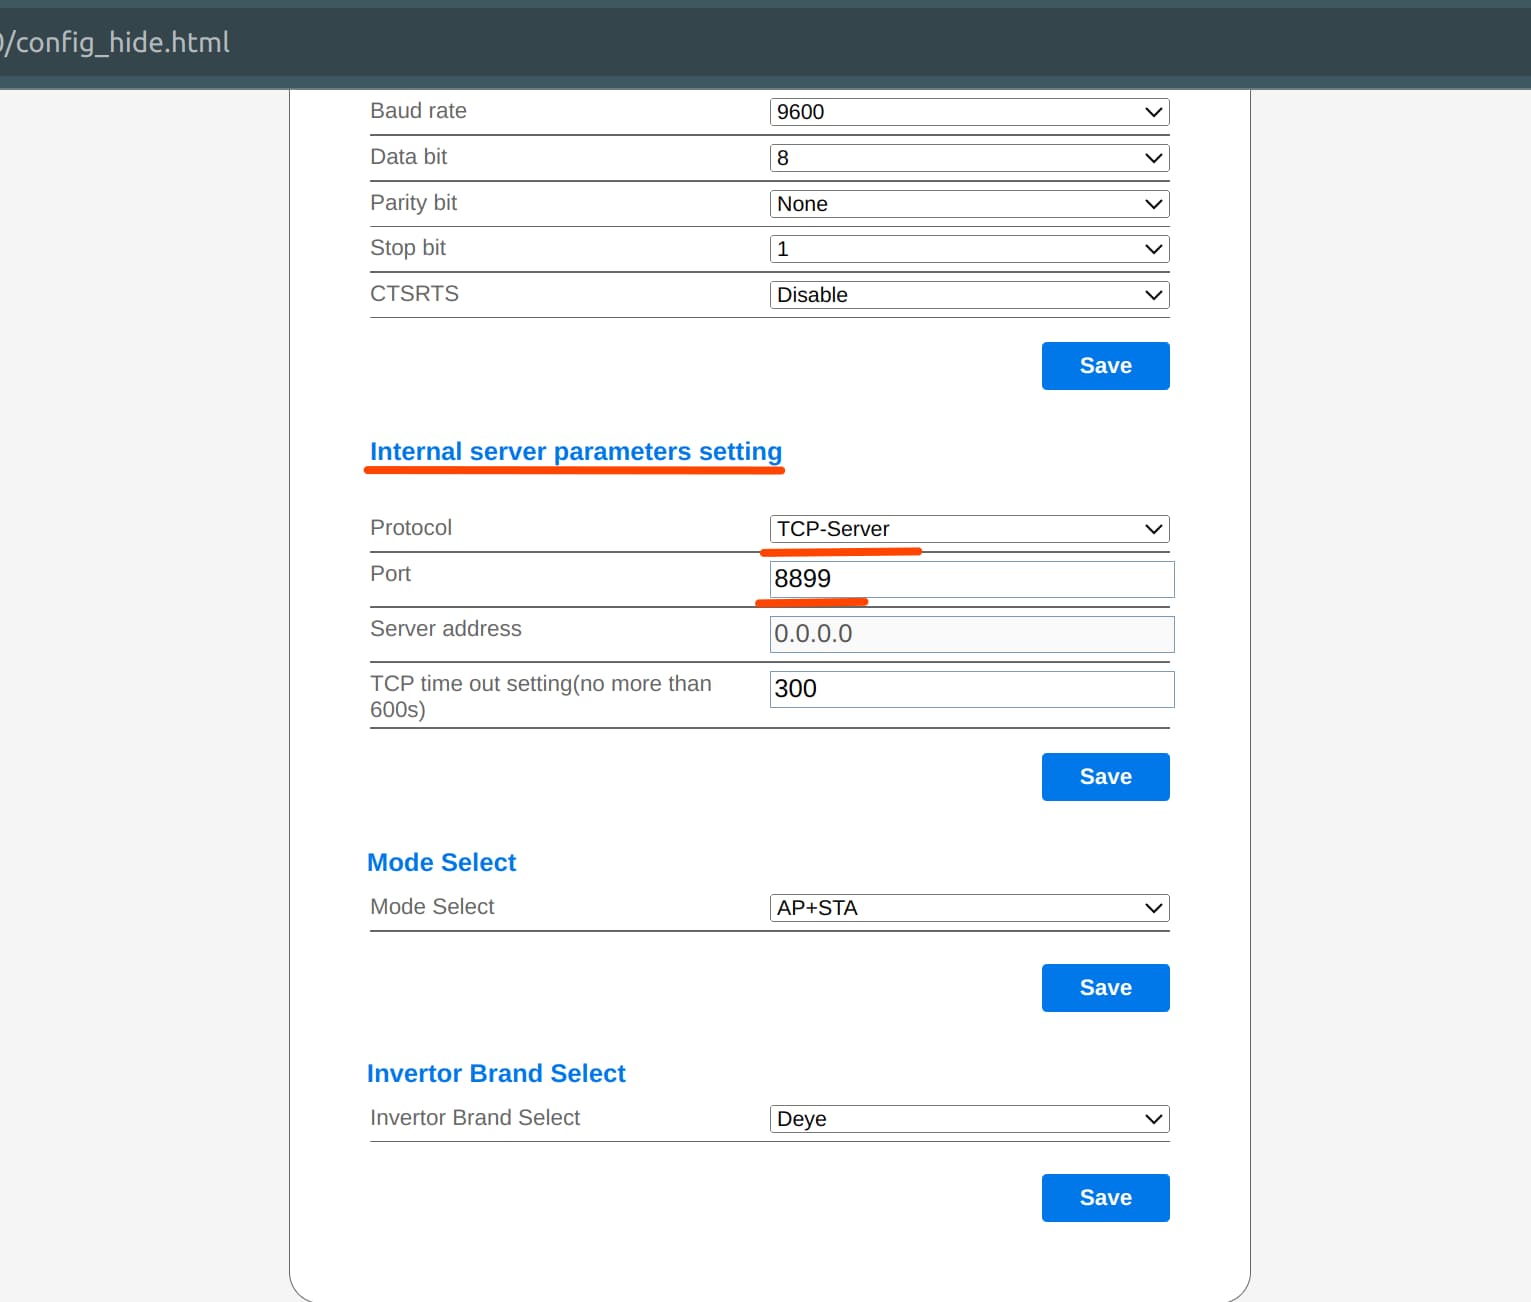
This will enable the MQTT client to read data from the Deye inverter over your local network.
TCP Proxy
For remote access, you will need a server with a static IP. We’ll use go-solarman-proxy as the TCP proxy, which requires Go to run. This setup allows you to send data to a remote server without being restricted to the local network where the inverter is installed.
-
Navigate to
{your_inverter_ip}/config_hide.html. -
Under Server A Settings, set both IP address and Domain Name to your static server’s IP. Choose a port, such as
12345.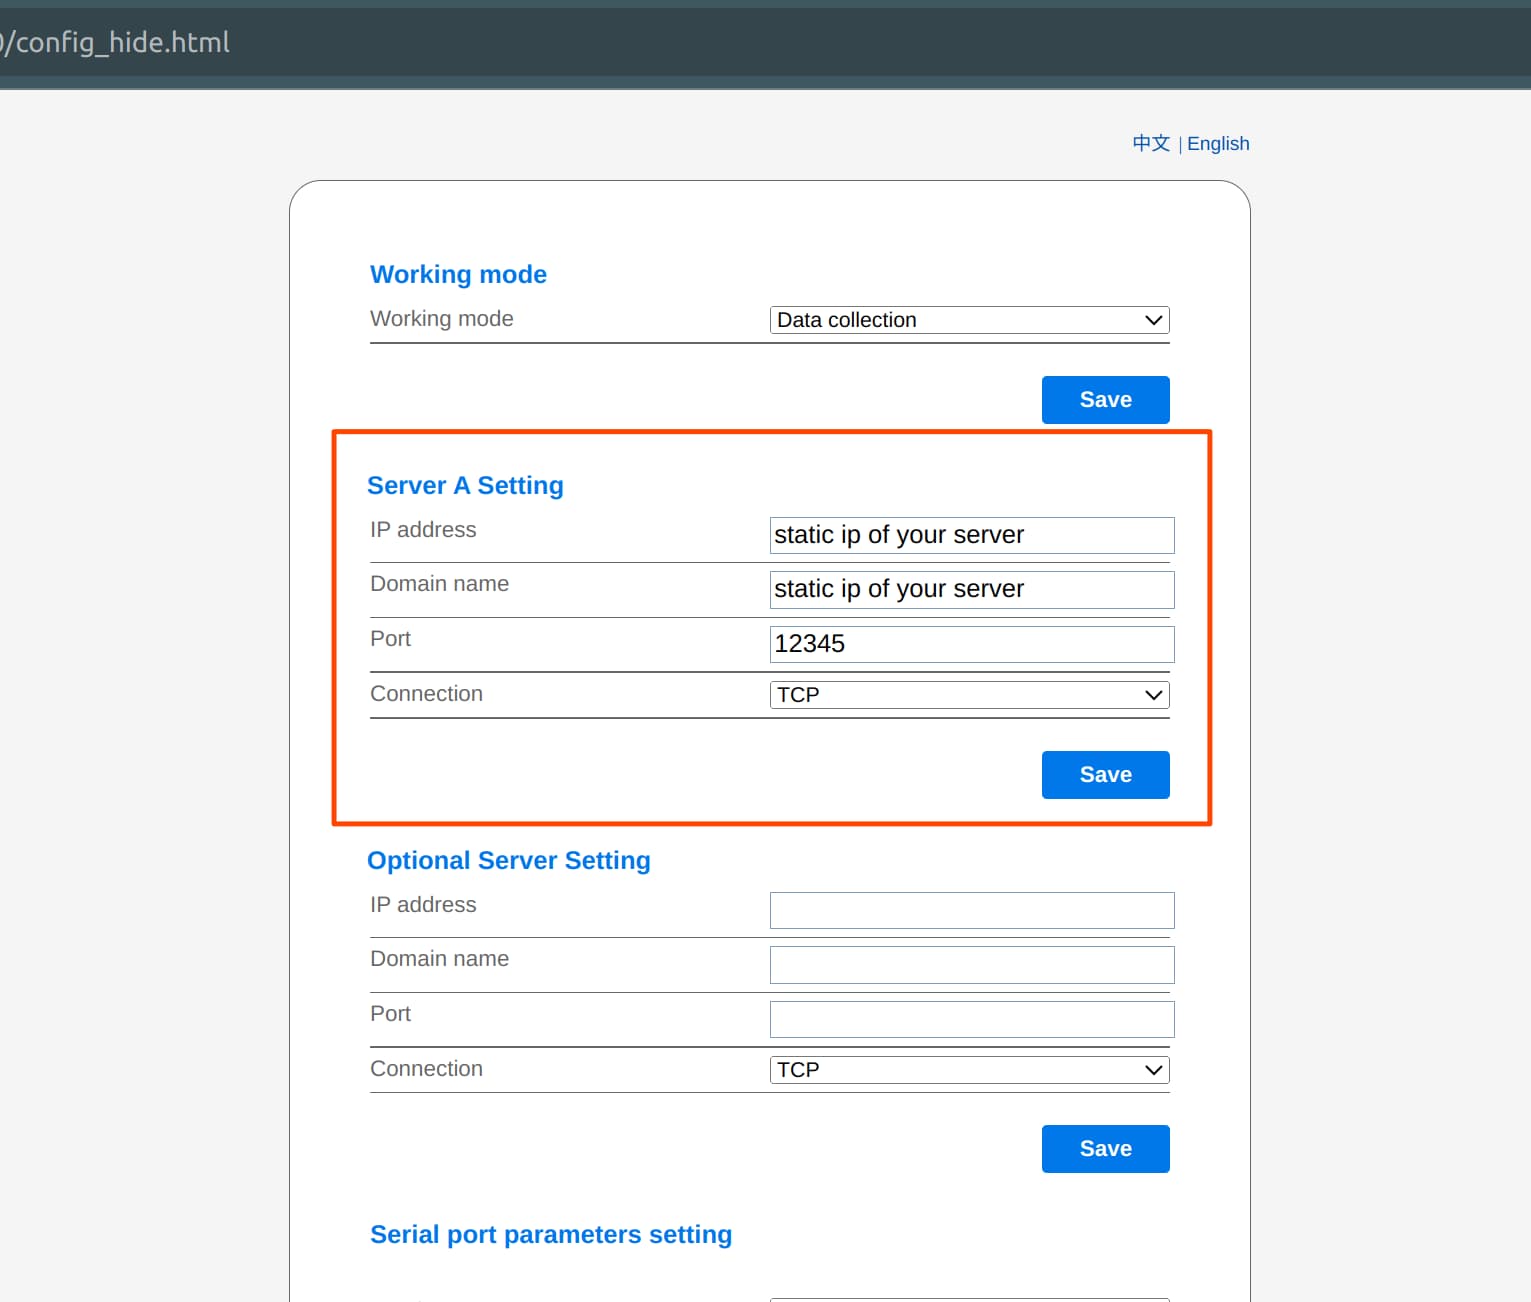
-
In Internal server parameters setting, set Protocol to
TCP-Client, IP to the desired IP (such as192.168.3.123), and Port to8899.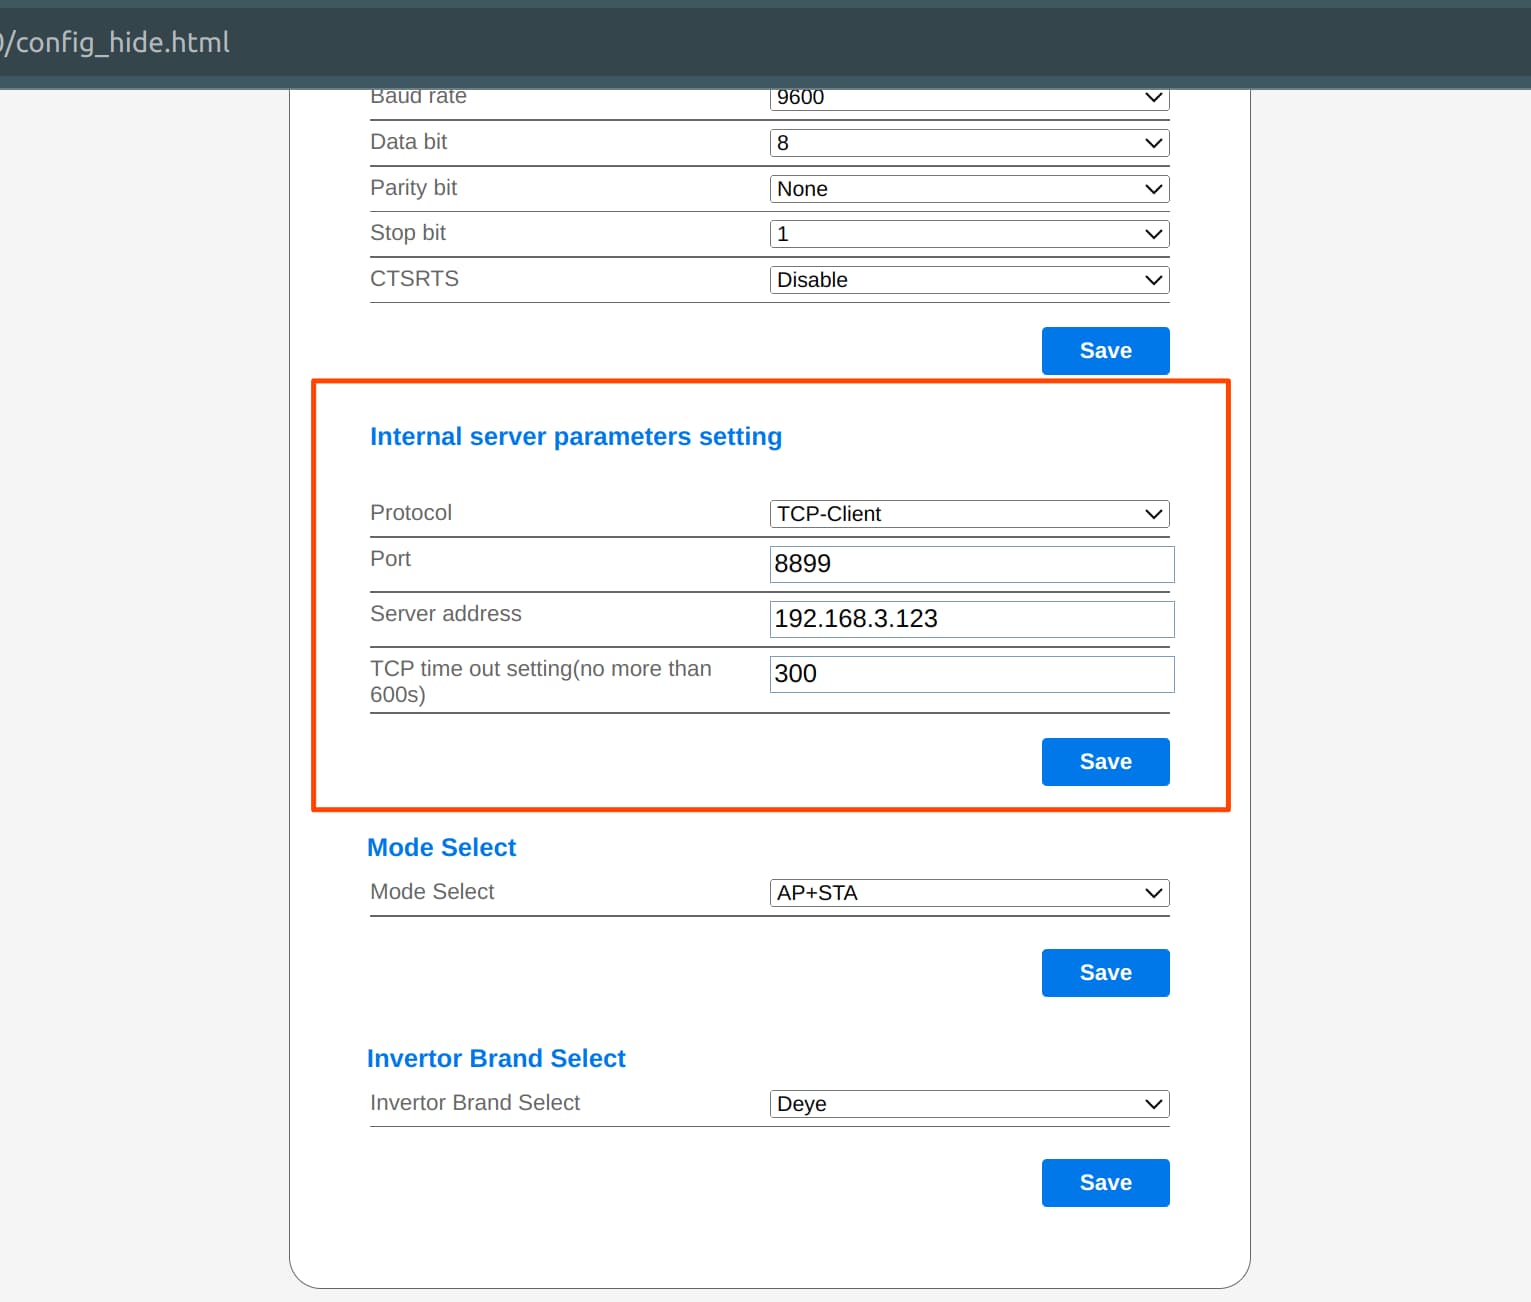
-
Download and install go-solarman-proxy according to the documentation.
-
Launch the proxy with the following command:
go-solarman-proxy 0.0.0.0 12345
If the connection is successful, this will link the Deye logger to your server. The proxy will then allow the MQTT Client to read data from the Deye logger.
Setting up Deye MQTT Client
Download the Python MQTT client from here.
Set up the environment and navigate to the examples/deye directory.
Environment Variables
This project requires the following environment variables to work properly:
export IP="{local-or-proxy-ip}"
export SERIAL_NUMBER="{your-deye-device-serial-number}"
export DEFAULT_KPC_HOST="mqtt.cloud.kaaiot.com"
export DEFAULT_KPC_PORT="1883"
export APPLICATION_VERSION="{your-application-version}"
export ENDPOINT_TOKEN="{your-endpoint-token}"
-
DEFAULT_KPC_HOST, DEFAULT_KPC_PORT, APPLICATION_VERSION, and ENDPOINT_TOKEN: These values can be found here.
-
IP: Open you Deye inverter’s Web Interface. If you’re connecting locally, use the IP address found in the
index_cn.htmlfile under the Device Information tab. For a proxy setup, set the IP tolocalhost.
Running the Project
To start the project, install required libraries by executing:
pip install -r requirements.txt
Then insert the environment variables into your terminal and execute main.py.
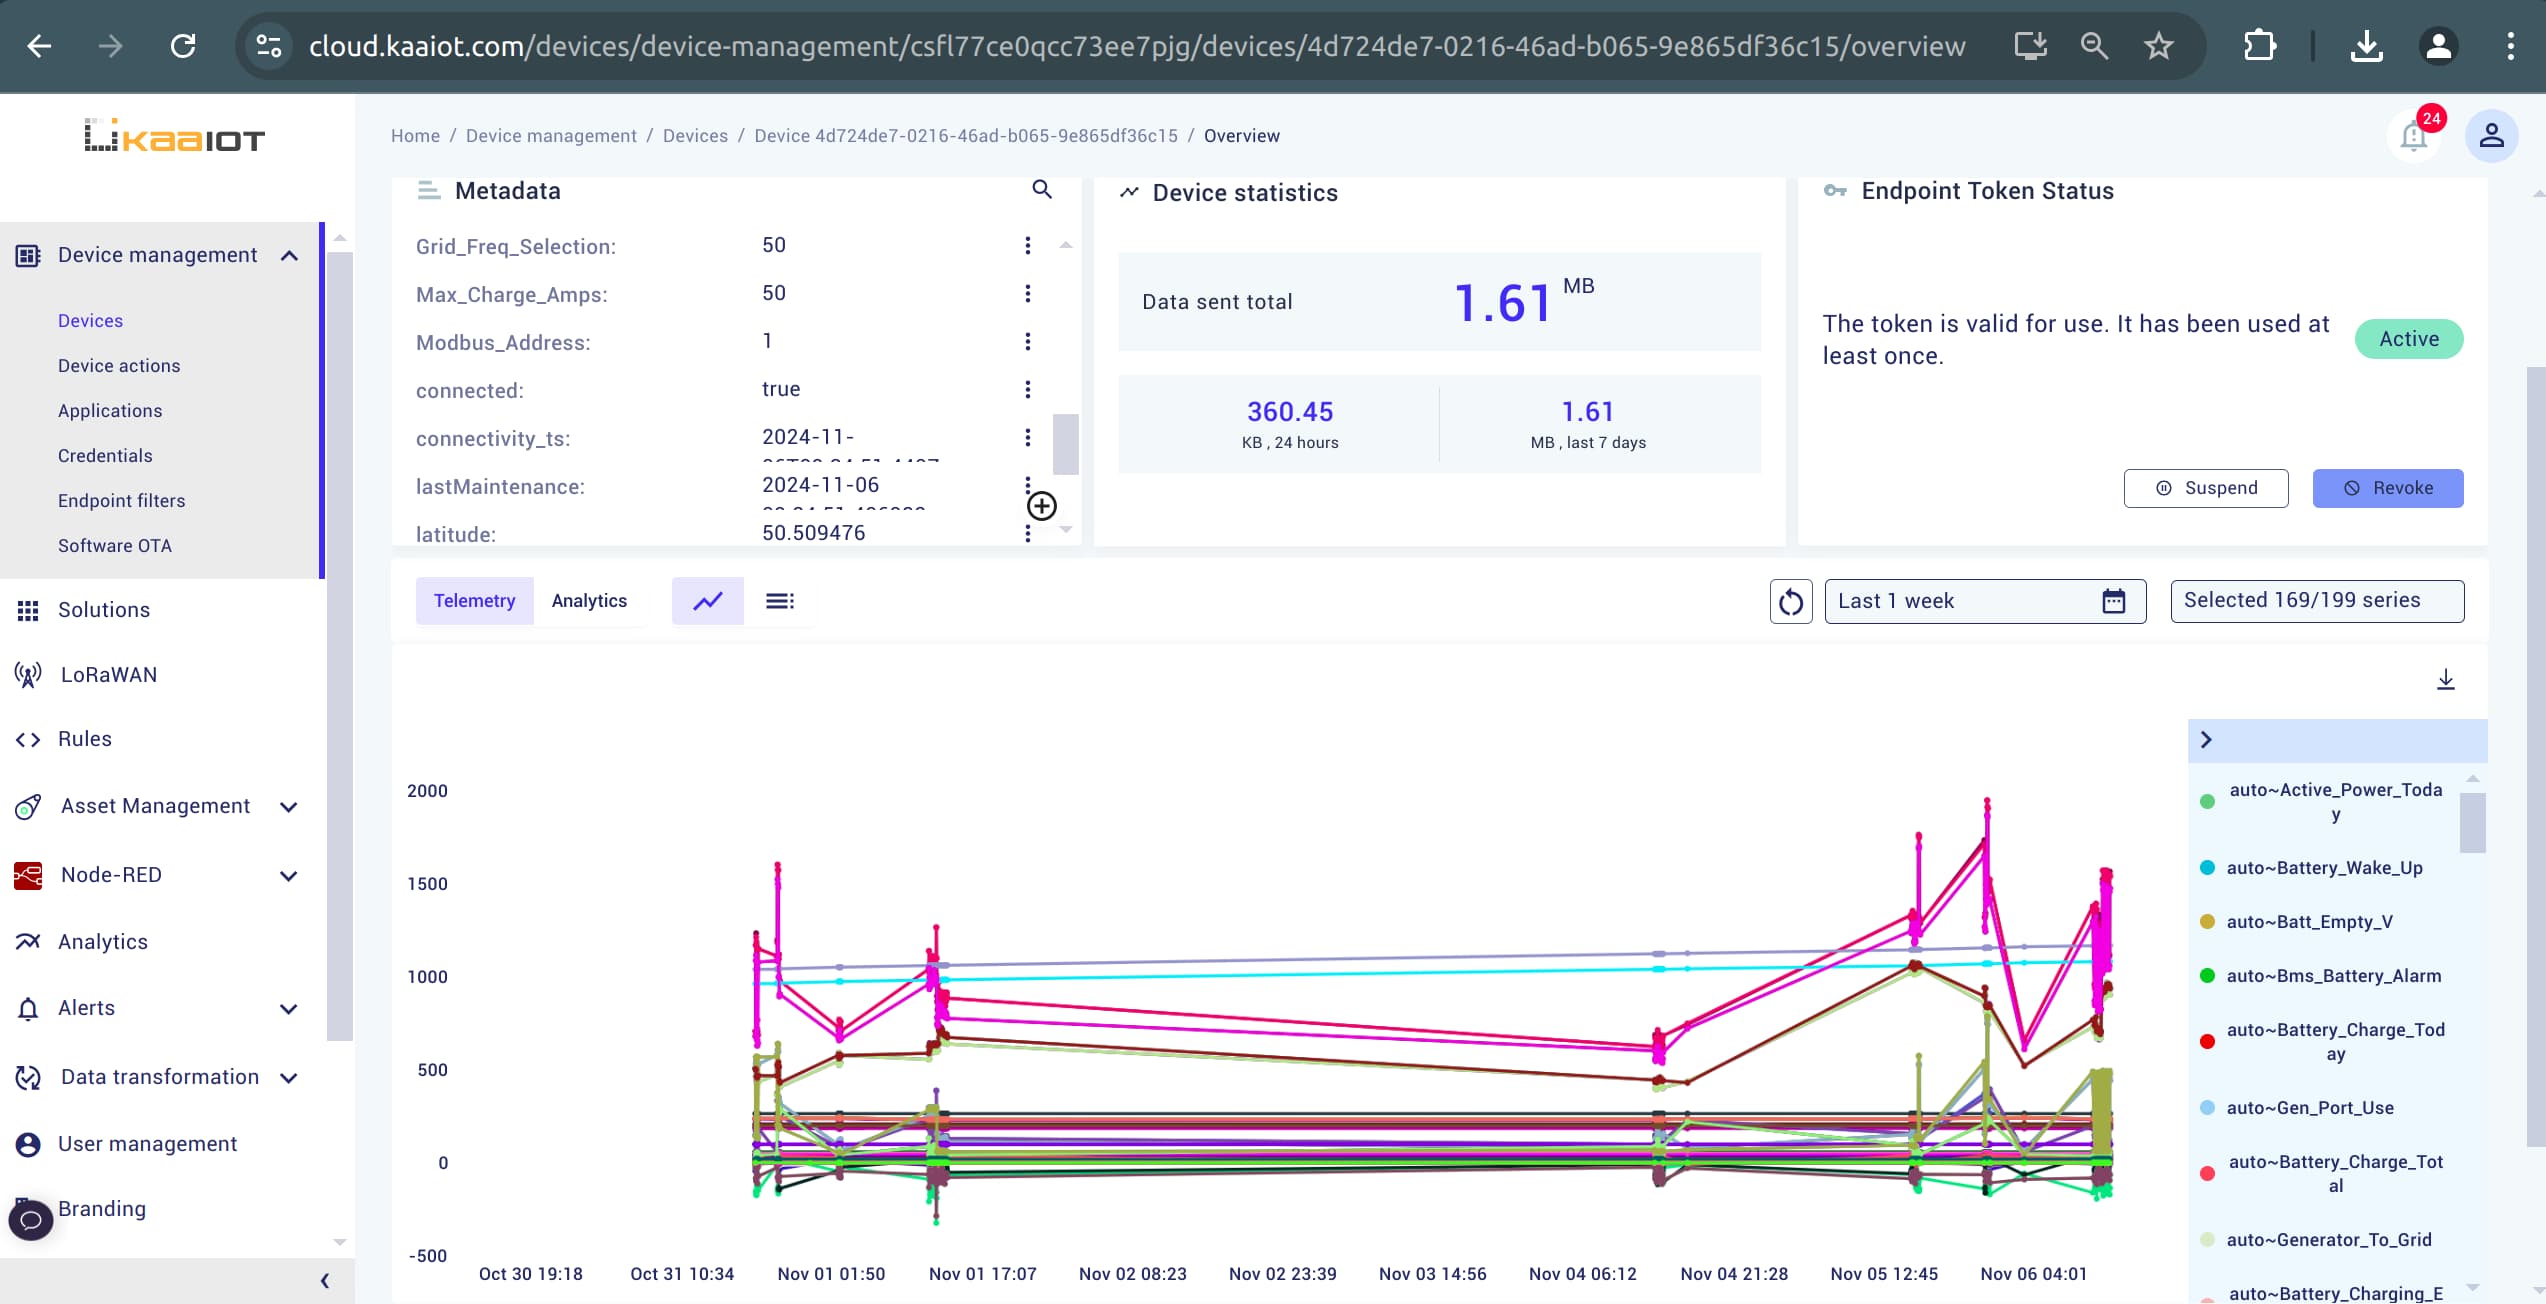
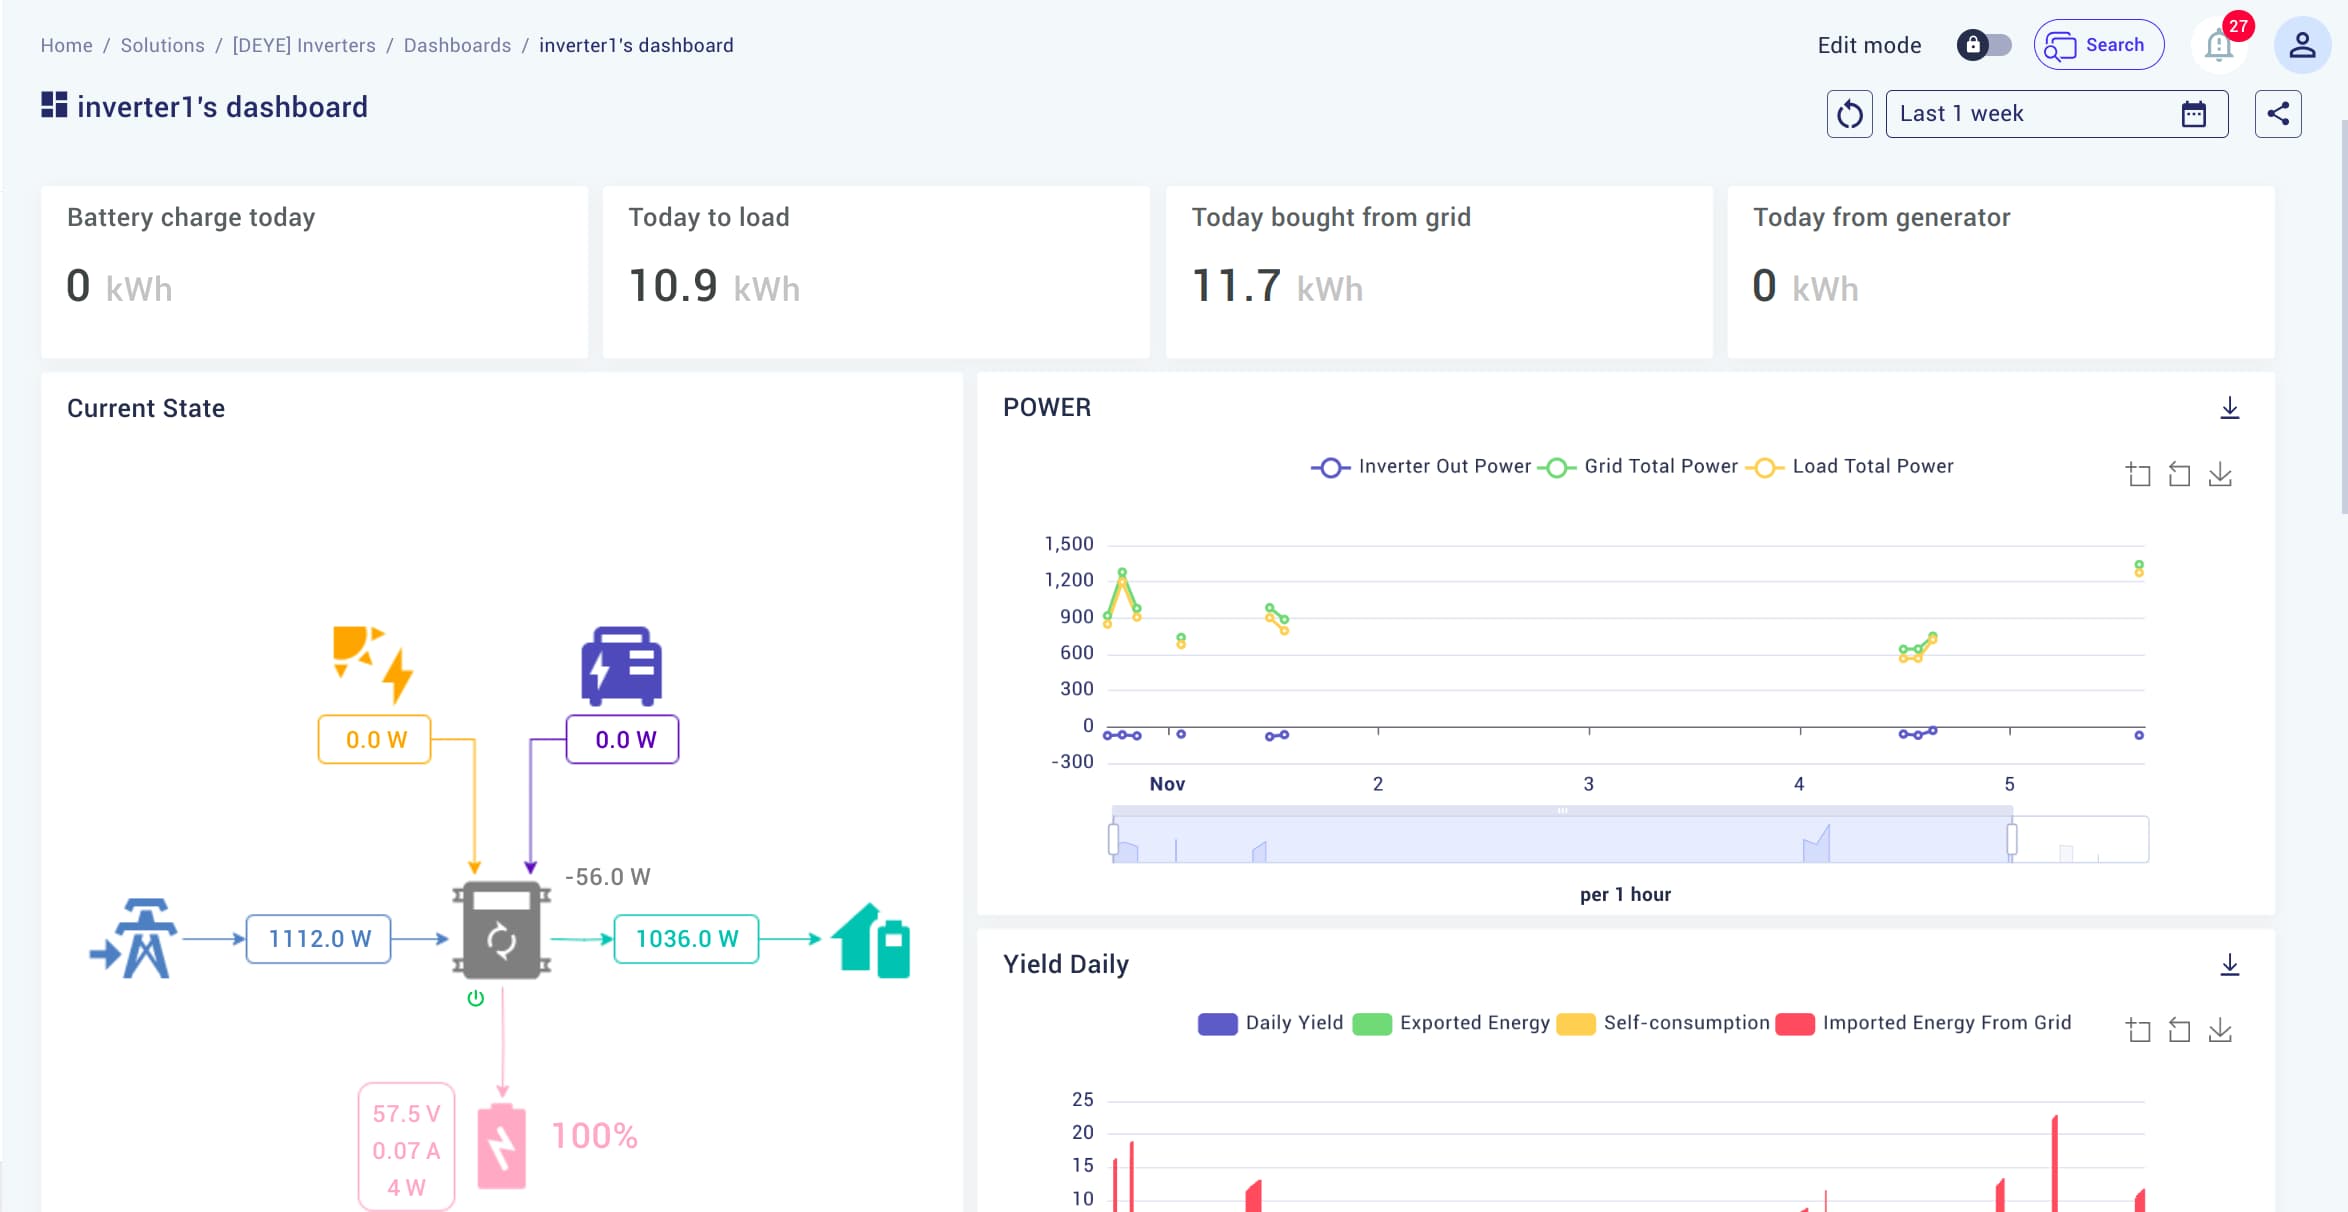
(Optional) Viewing Your Data with Kaa Dashboard
You can use the Kaa dashboard to create a custom UI to view your data and go beyond the default device page.
Add envoriment variables
This part requires the TENANT_ID and APPLICATION_NAME variables to work:
export TENANT_ID="{your-tenant-id}"
export APPLICATION_NAME="{your-application-name}"
Add them and restart the program to apply changes.
Creating a Dashboard
In Kaa console open the Solutions tab. A solution is automatically created for each application, but you can create a new one if needed.

Quick Start
To keep things simple, here’s a quick example.
After running the python3 main.py script, a JSON template will be generated using the environment variables you provided earlier.
To apply the template, follow these steps:
-
In the top right corner, click Import Dashboard.
-
Navigate to the
./template/outputfolder and copy the code fromoverview.json. -
Paste the code into the import dialog.
You should now see a dashboard similar to the one shown at the beginning of this section.