LoRaWAN Integration
- Overview
- Preparation
- MikroTik KNOT LR8 Kit Initial Setup
- TTN Console
- MikroTik Gateway Setup
- Integrating TTN Device with Kaa
Overview
This tutorial provides step-by-step instructions for connecting and integrating any LoRaWAN device with the Kaa Platform. It is compatible with The Things Network (TTN), The Things Industries (TTI), as well as self-hosted instances.
In this guide, we use the MikroTik KNOT LR8 Kit as the LoRaWAN gateway. While gateway configuration steps may vary depending on your specific hardware, the integration process for LoRaWAN devices remains mostly the same across different setups.
Preparation
Before starting, make sure you have the following tools and accounts ready:
-
The Things Network (TTN) account
You’ll need an account on The Things Network, The Things Industries, or your own self-hosted instance.
In this tutorial, we’ll primarily use TTN, but the process is similar for TTI and self-hosted TTN setups. -
Kaa account
To forward and process your data in the Kaa Platform, you’ll need an account. -
LoRaWAN Device
For this example, we’ll integrate a Sensative multi-sensor.
However, any other LoRaWAN-compliant device should work with similar configuration steps. -
LoRaWAN Gateway
We’ll be using the MikroTik KNOT LR8 Kit, which includes a built-in LoRaWAN gateway. You may use a different gateway, but configuration steps may vary.
MikroTik KNOT LR8 Kit Initial Setup
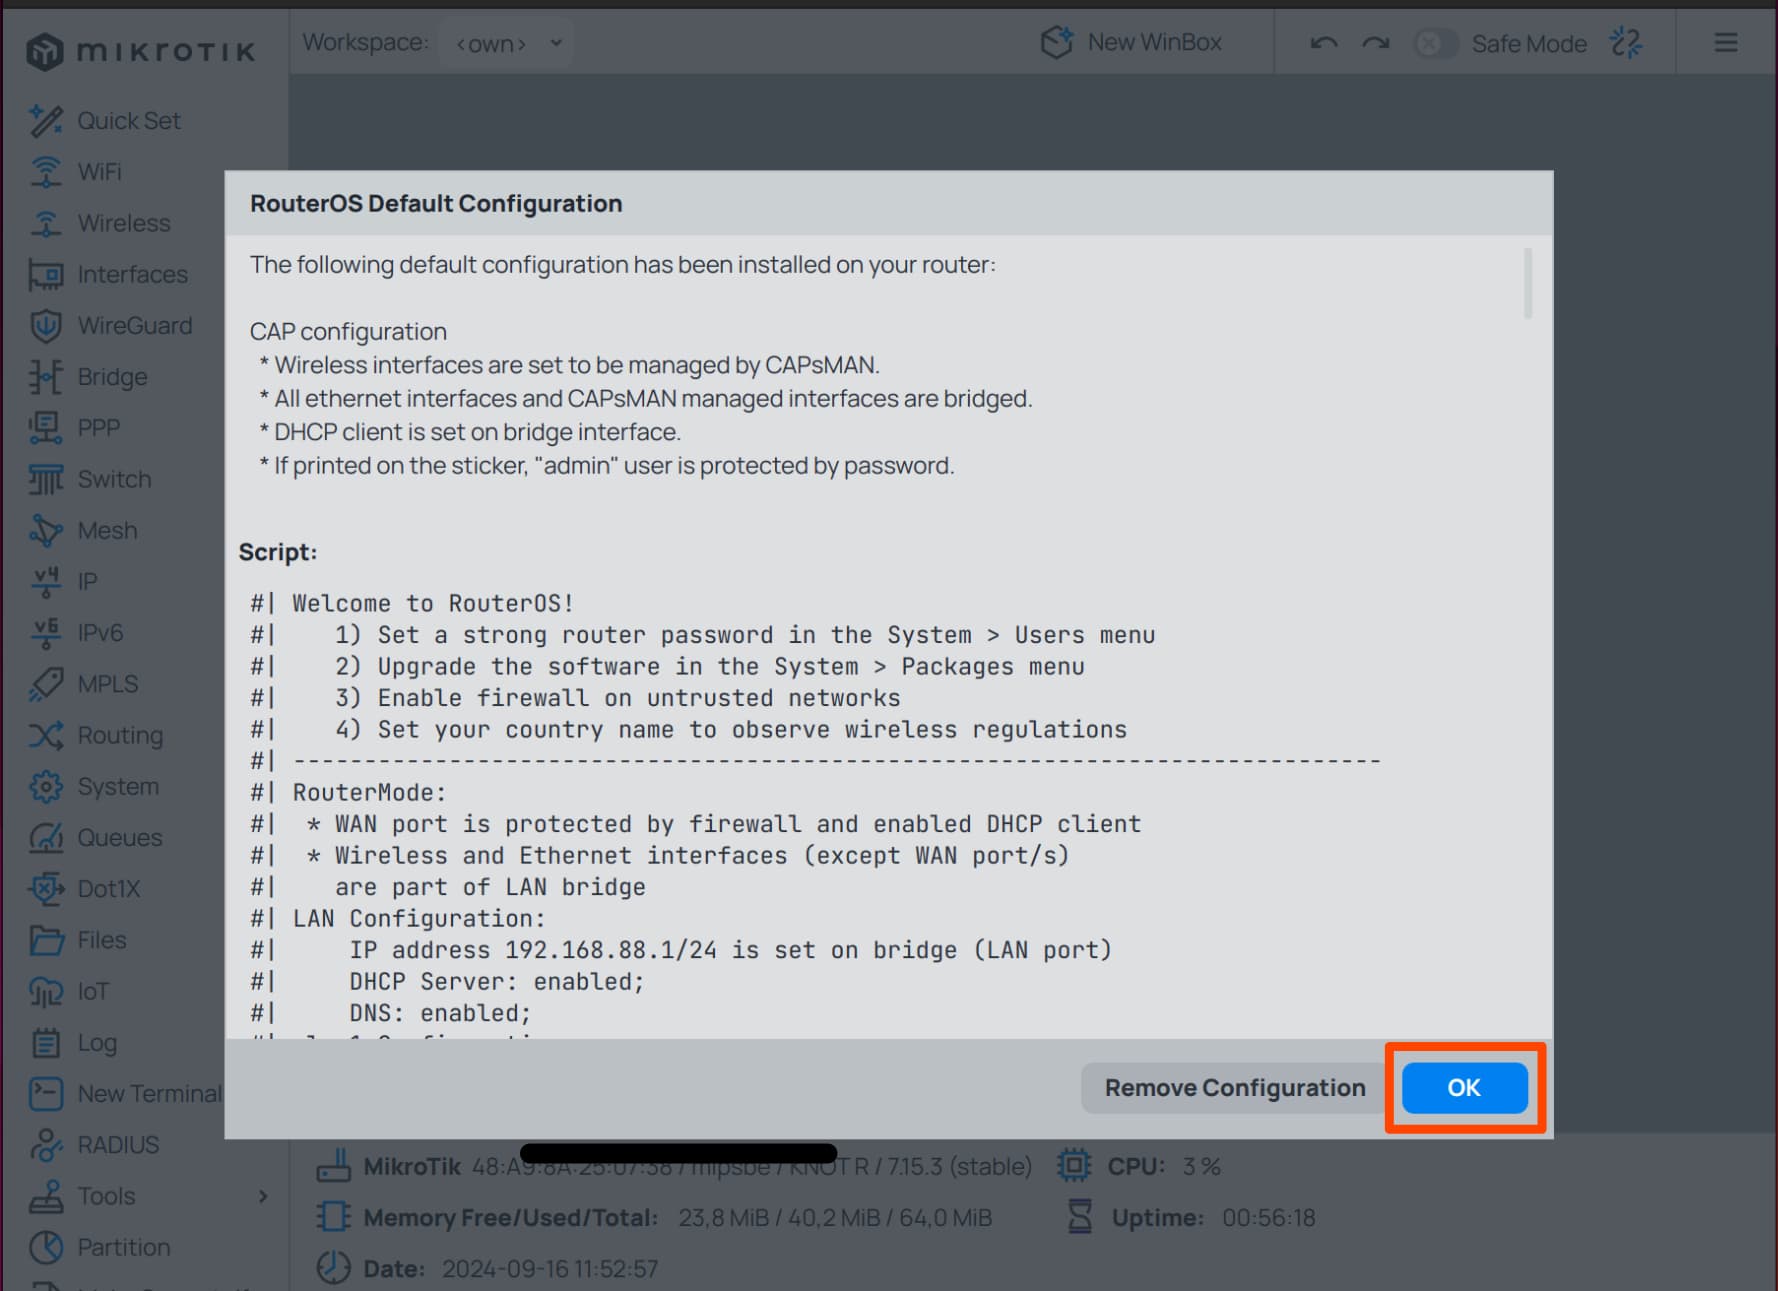
To begin, configure the MikroTik KNOT LR8 Kit:
- Power on your MikroTik device and connect it to your LAN network.
- Connect the MikroTik directly to your PC via Ethernet to access its web interface.
- Access the MikroTik web UI by navigating to
http://192.168.88.1in your browser. The default login isadminwith no password.
Note: If you encounter issues accessing the UI, you may need to reset the device to factory settings.
Refer to this official guide for reset instructions.
Leave the default settings as they are for now. We’ll return to them later.
However, it is recommended to set a password by navigating to System -> Password
TTN Console
After successfully logging in, navigate to the TTN Console.
You’ll be prompted to choose a regional network cluster, such as:
eu1– Europenam1– North Americaau1– Australia
Select the cluster according to the gateway (devices) location. Once you’ve selected the network cluster, you’ll be redirected to the TTN Console.
MikroTik Gateway Setup
To register your MikroTik LoRaWAN gateway on The Things Network (TTN), you need to configure both the TTN console and the MikroTik.
Specify Network Server
The first step is to define the LoRaWAN network server that your MikroTik gateway will connect to.
Follow these steps:
-
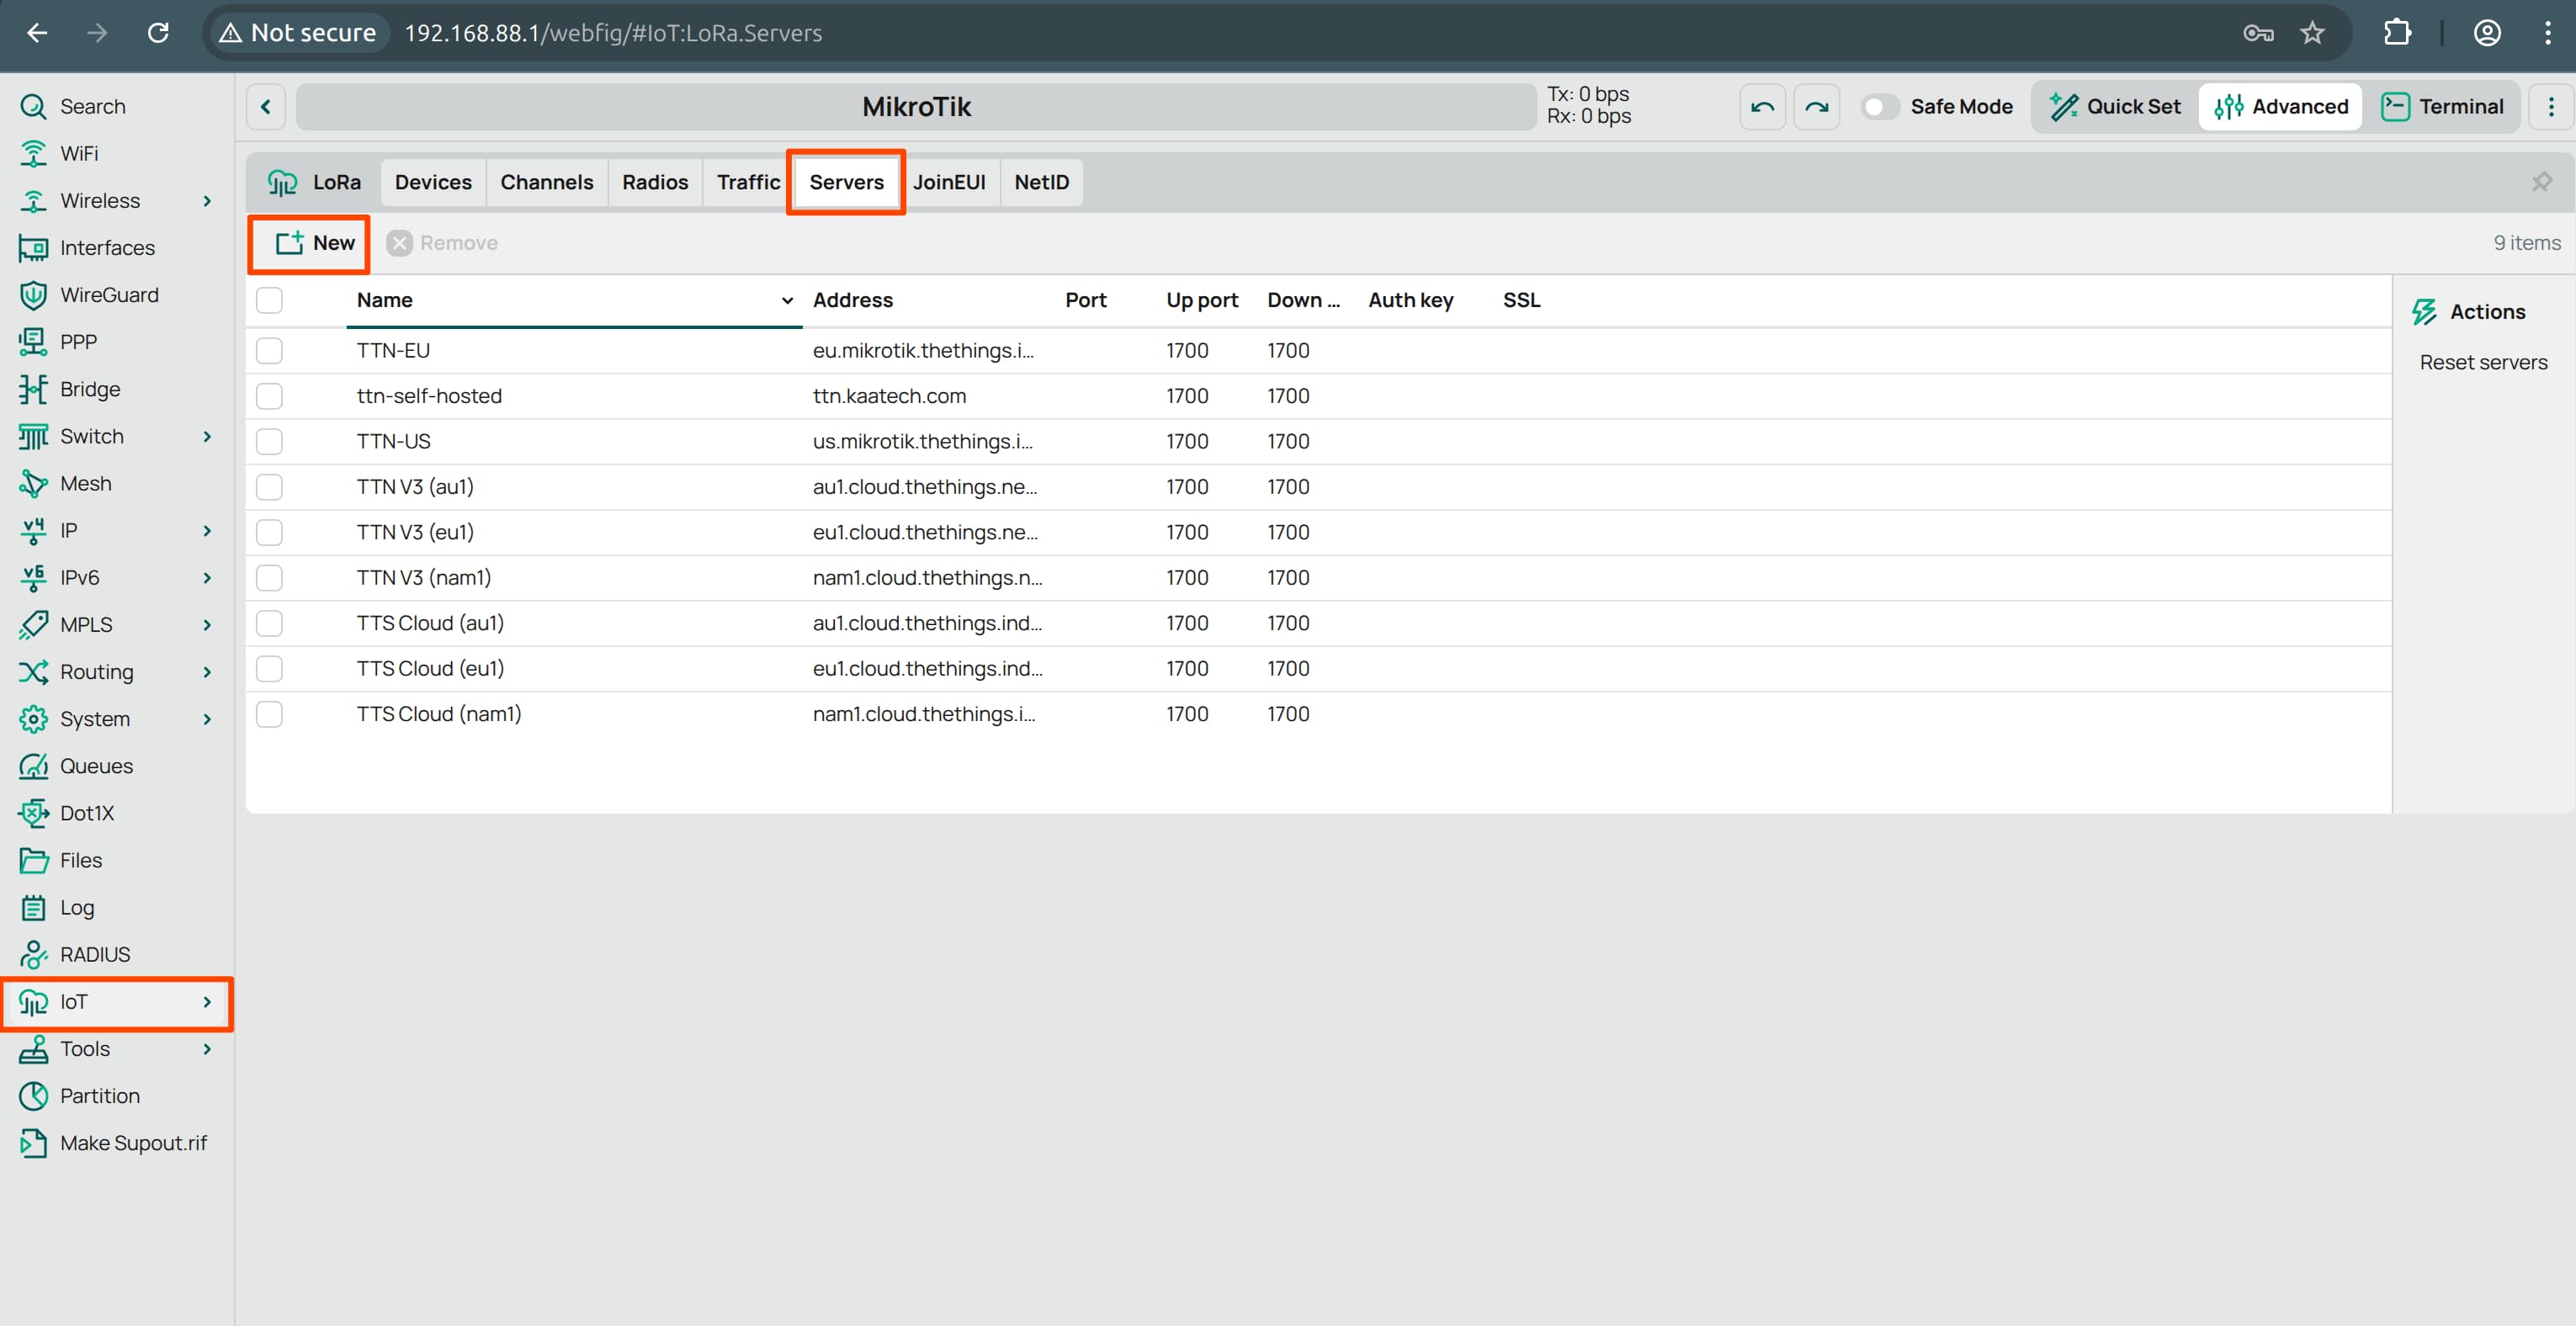
Open MikroTik’s LoRa settings and navigate to IoT -> LoRa -> Servers.
-
Add a new server:
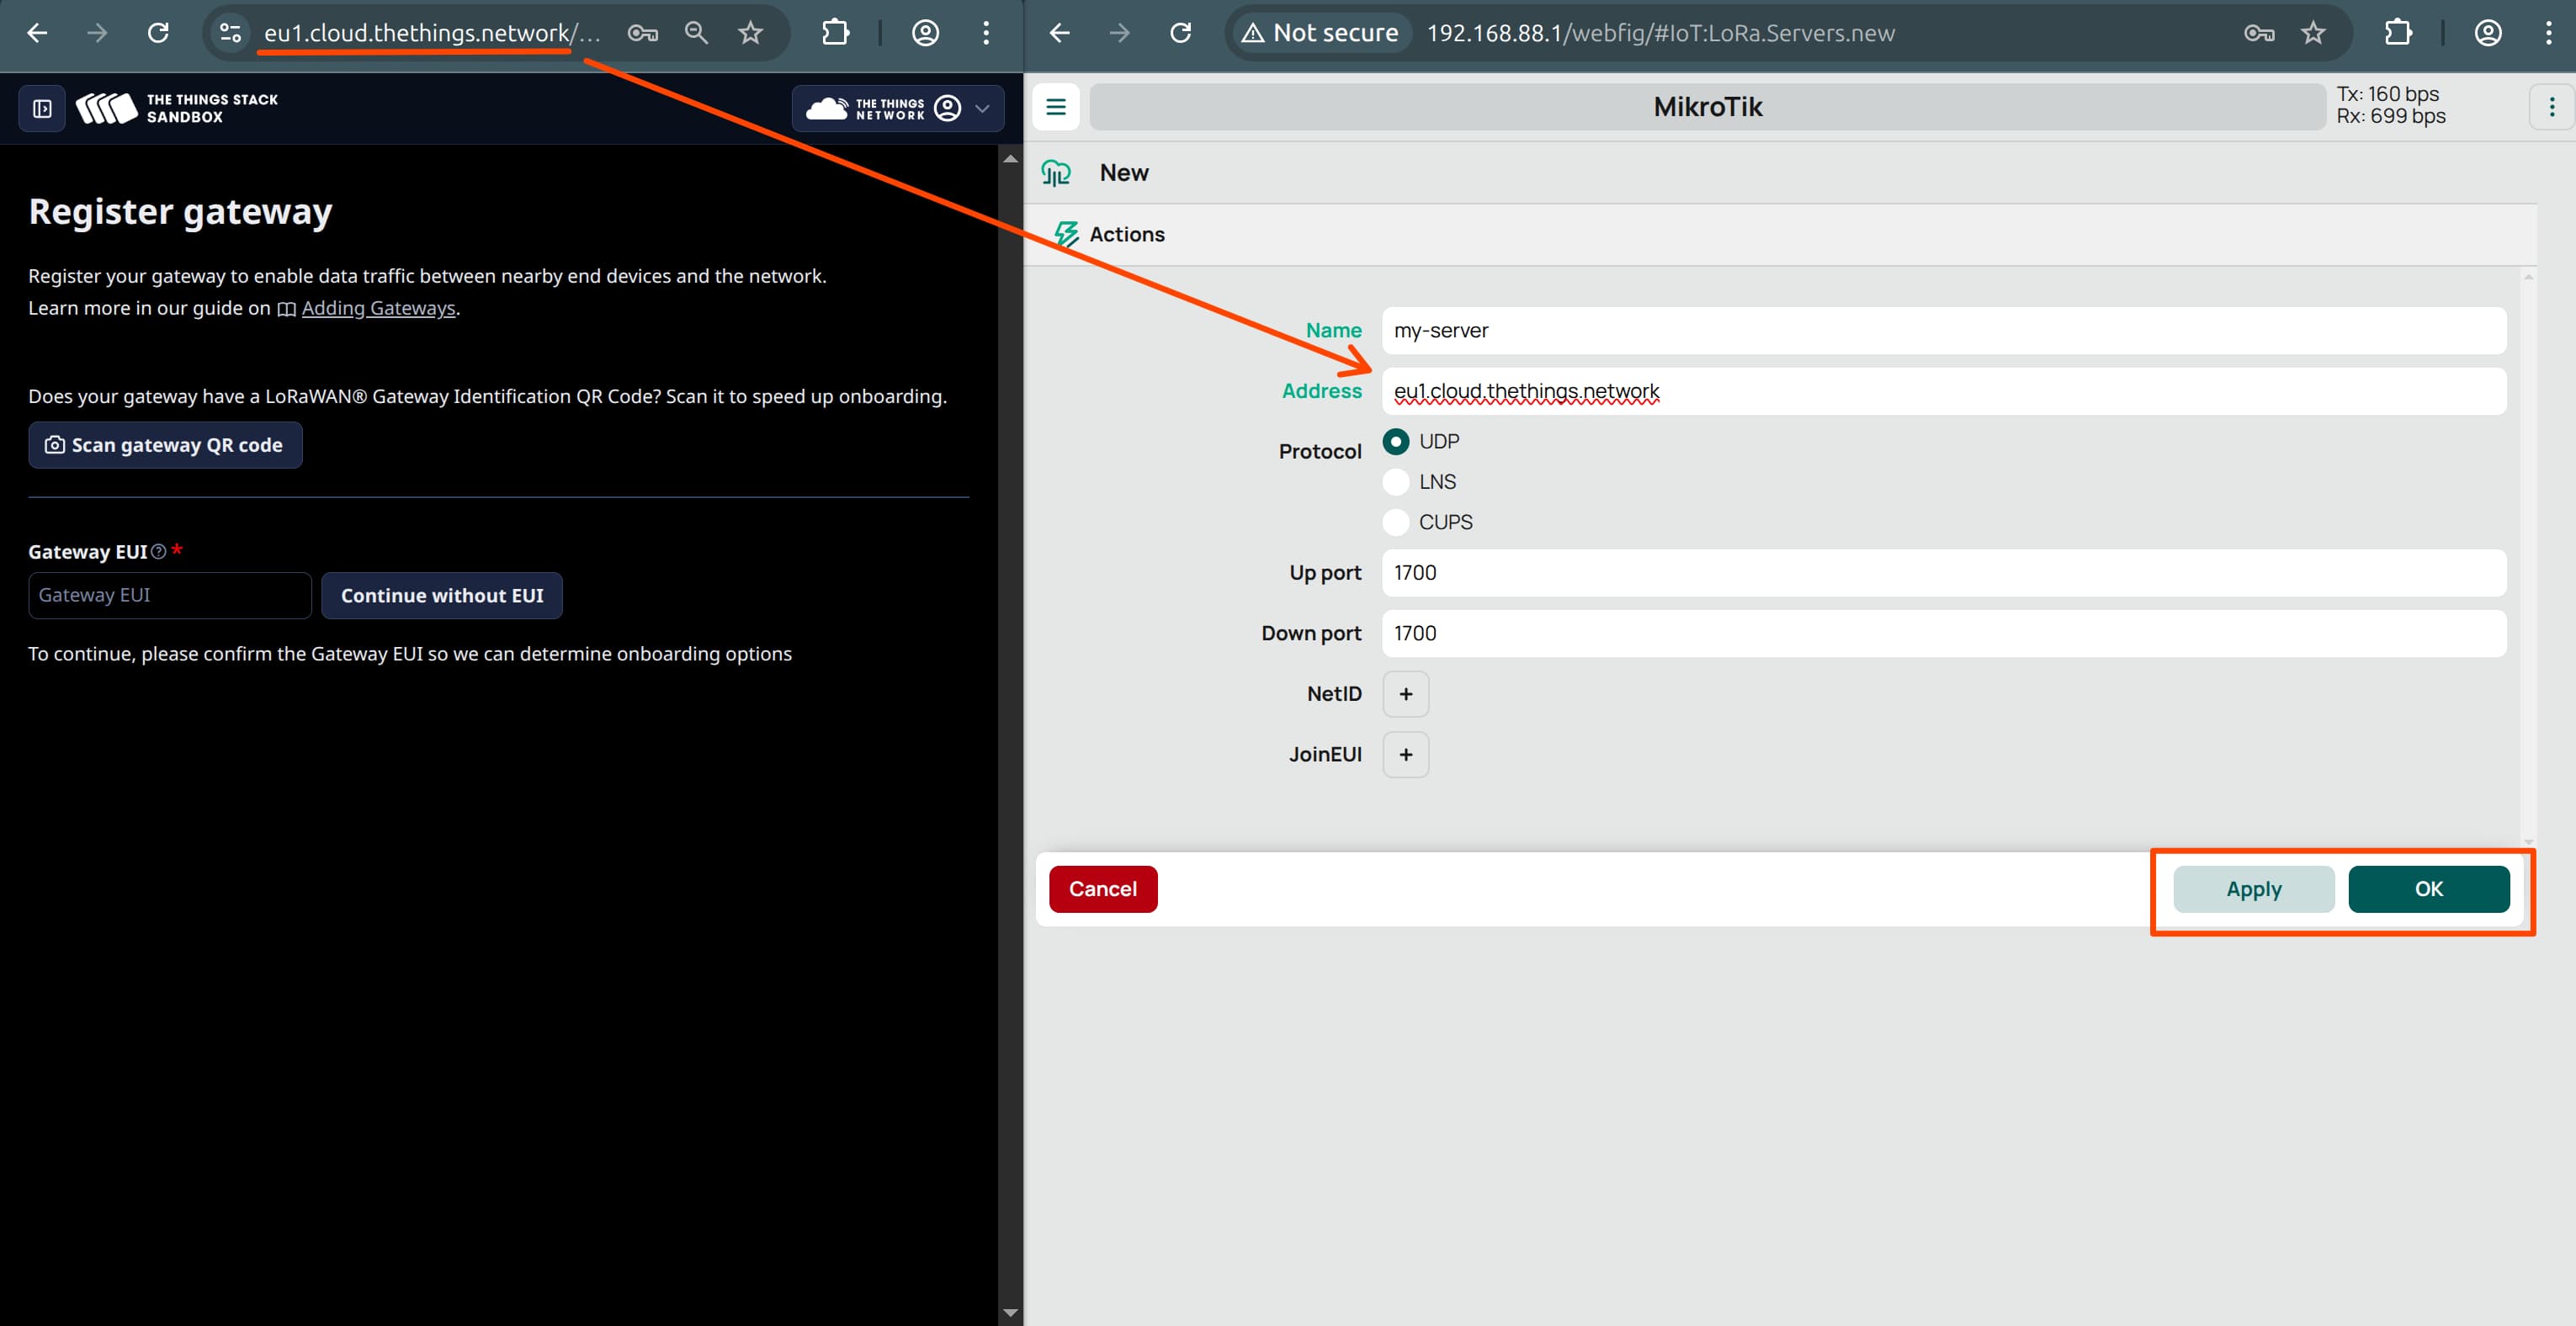
- For Name, enter any custom name (e.g.,
my-server). - For Address, enter the domain name of your TTN cluster (e.g.,
eu1.cloud.thethings.network).
Use the appropriate address for TTI or your self-hosted instance.
- For Name, enter any custom name (e.g.,
Configure MikroTik’s LoRa Gateway
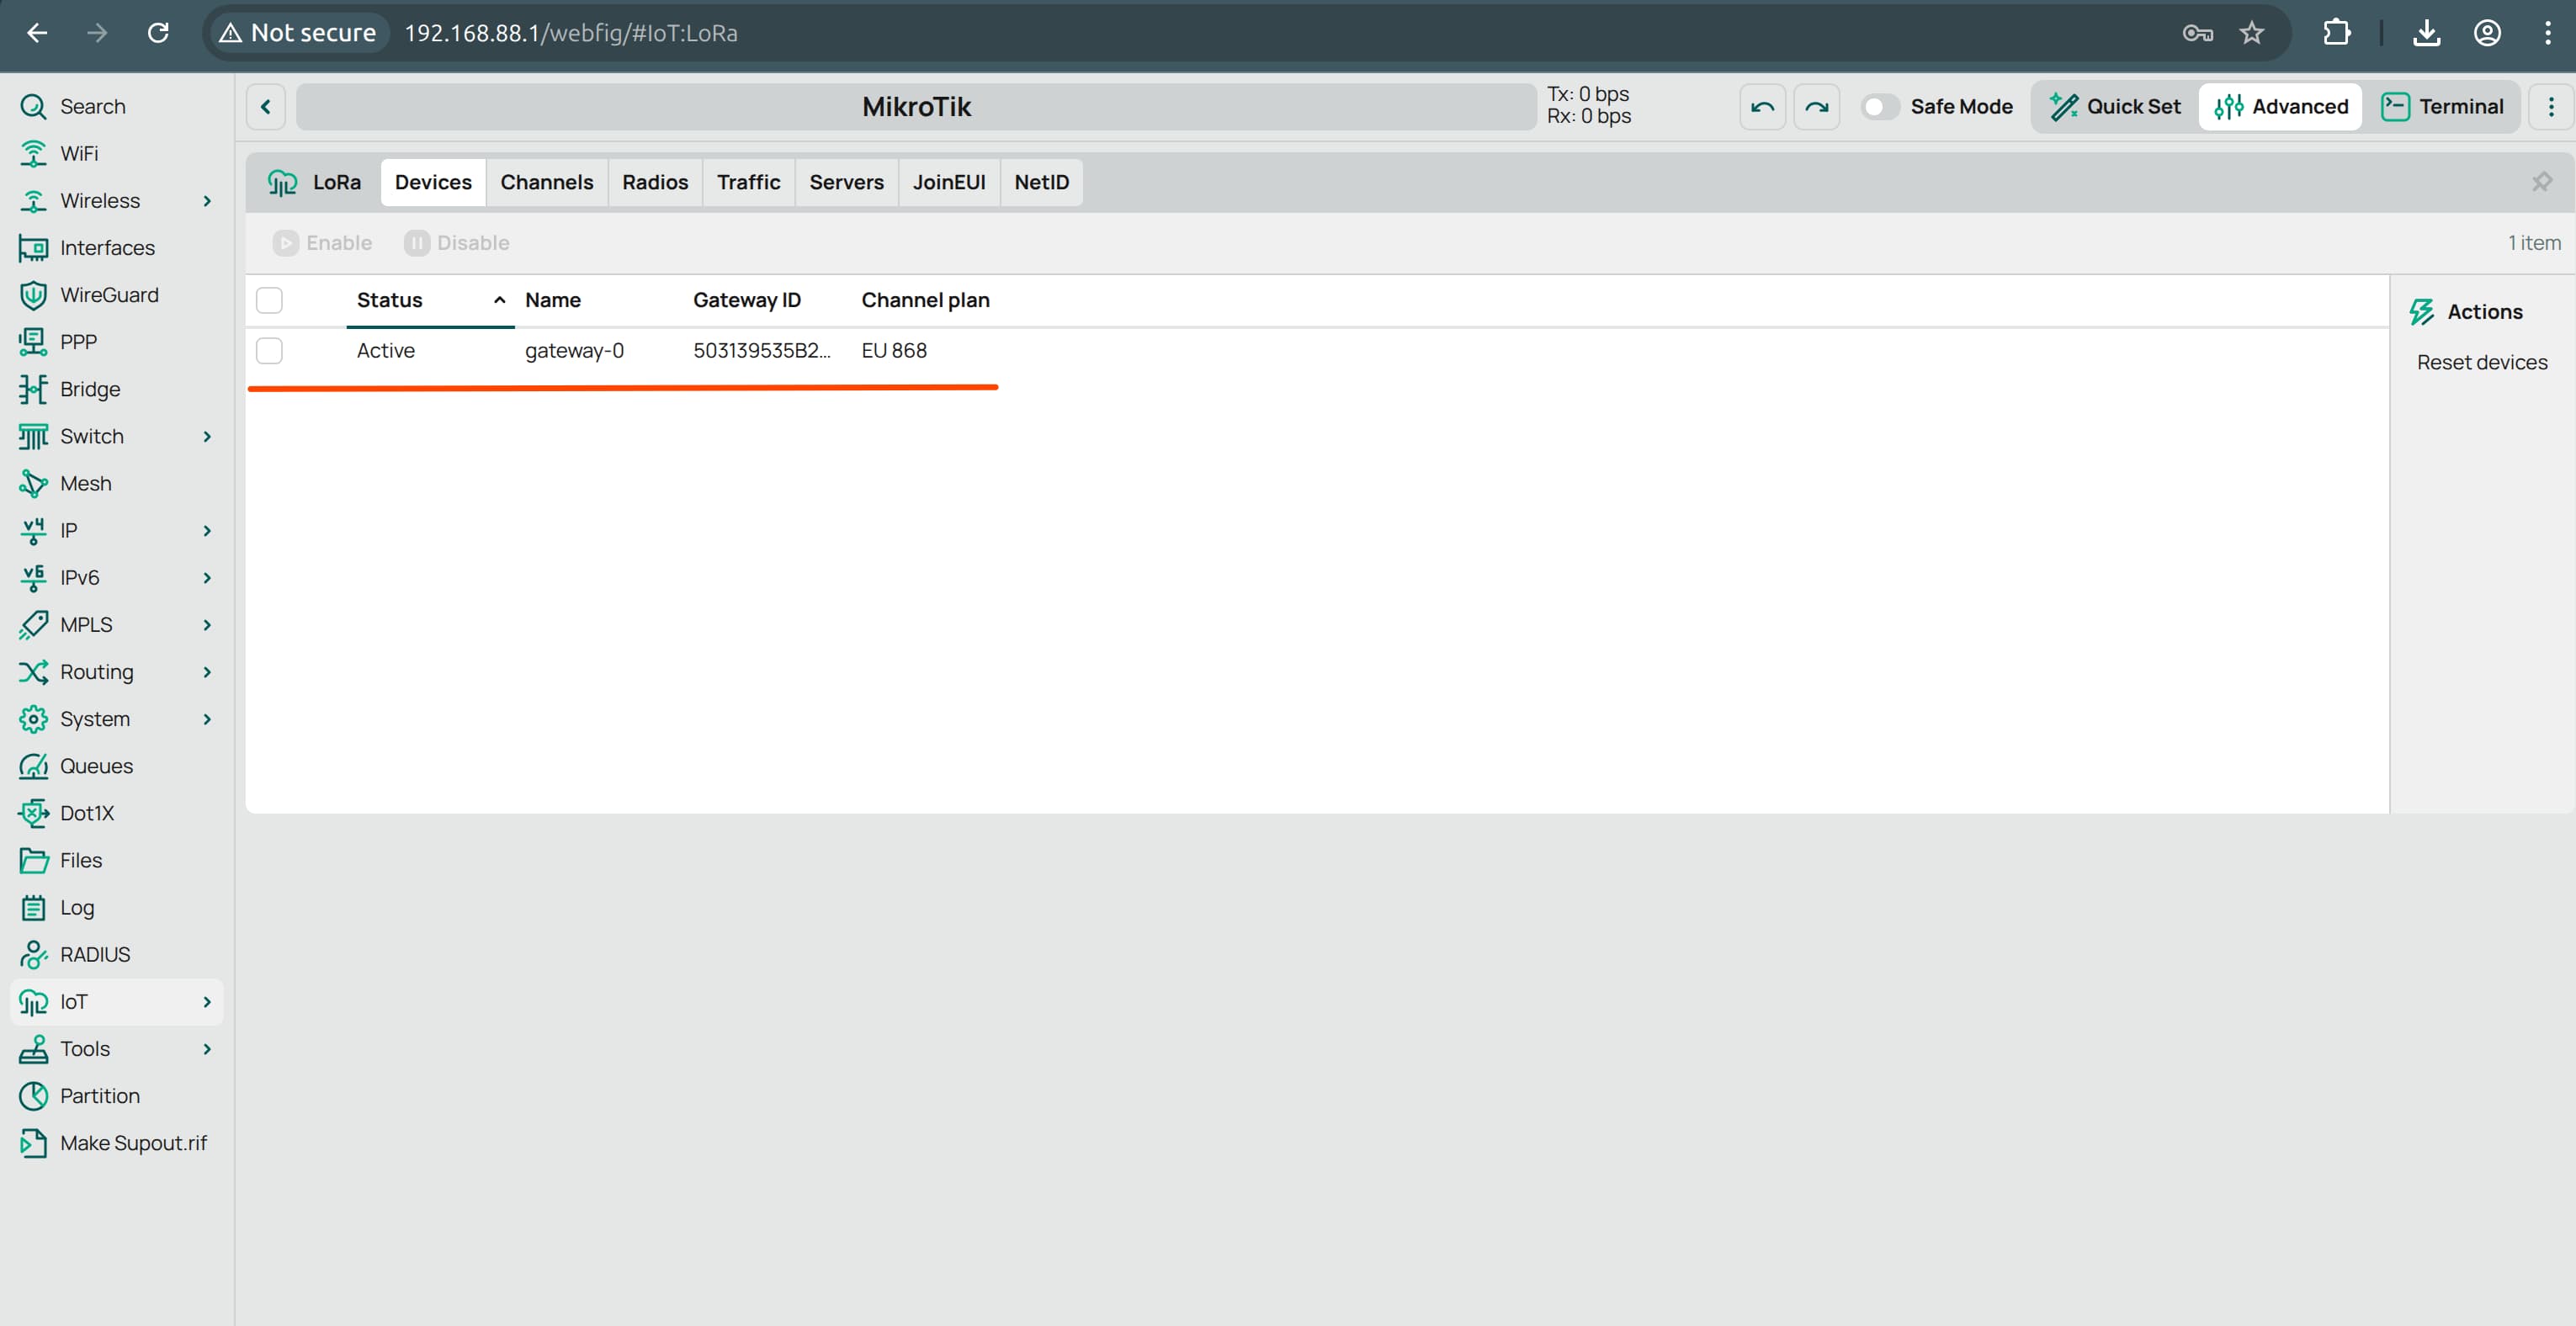
- Go to IoT -> LoRa -> Devices, and click on the listed gateway (there should only be one).
-
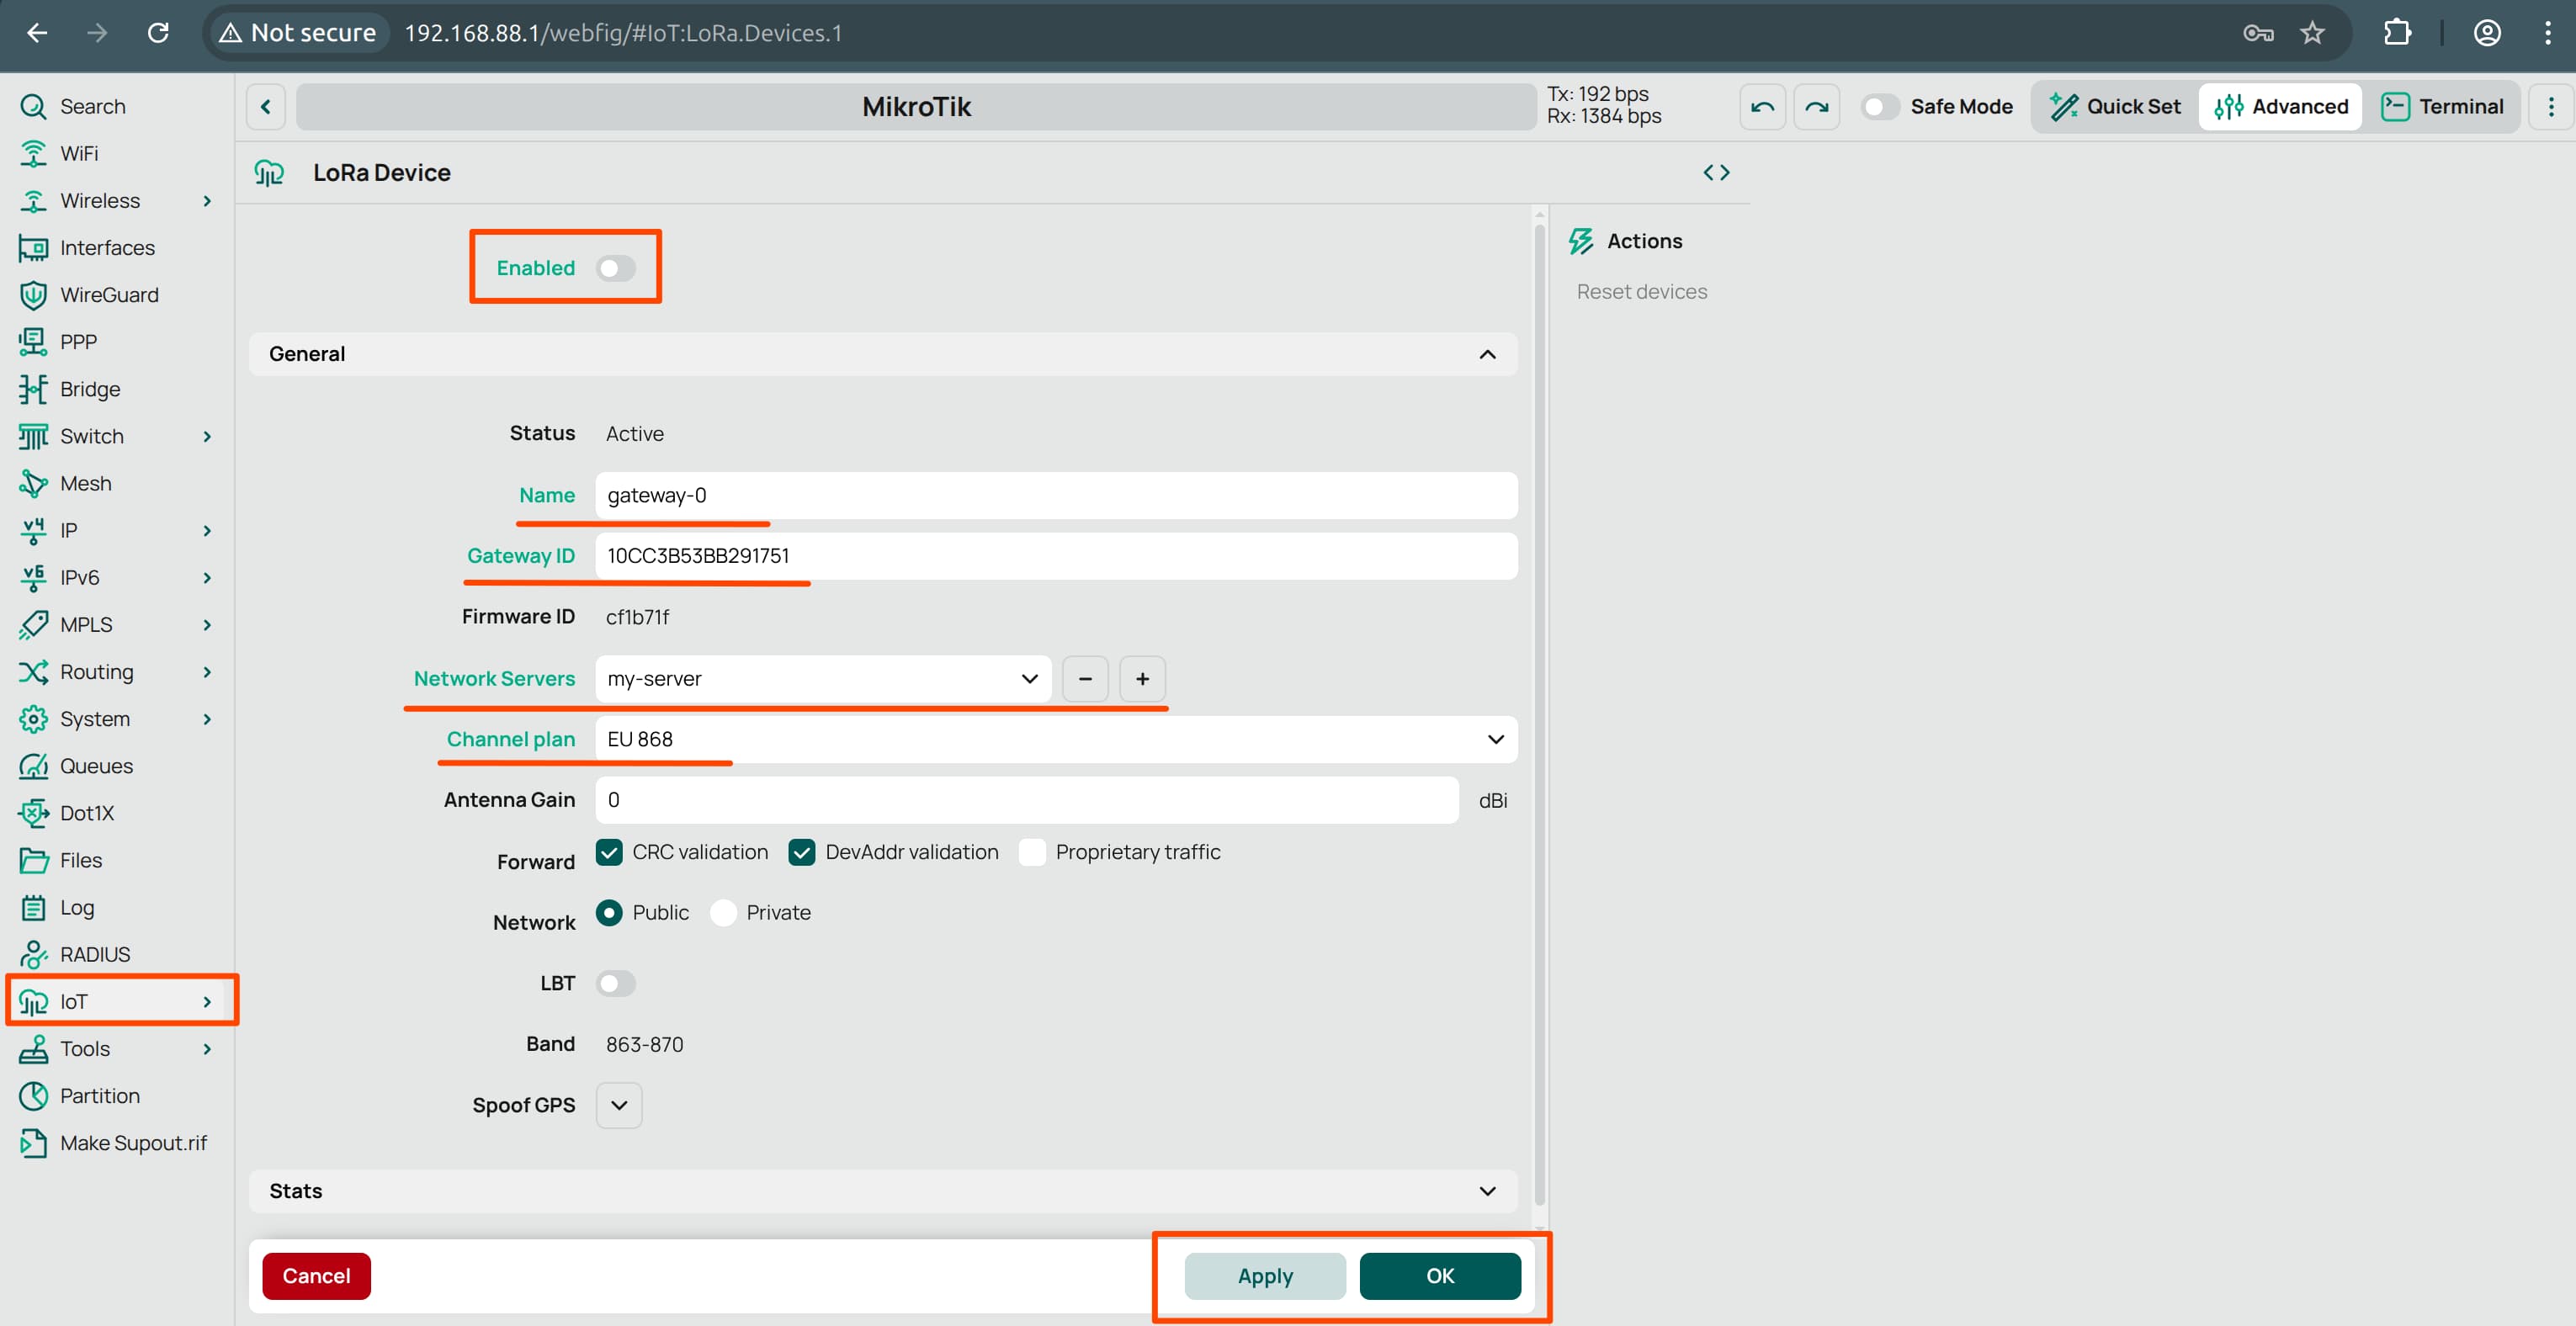
Configure the following fields:
- Gateway ID:
This is the unique identifier used by TTN to register your gateway.
You can create a custom ID using letters, numbers, and hyphens.Important: Do not copy the Gateway ID from the screenshot below. For security reasons, create your own.
-
Network Server:
Select themy-serveryou created in the previous step. - Channel Plan:
Select the plan that matches your LoRaWAN device’s frequency band, which is typically printed on the device’s packaging.
For example, useEU868for European devices that operate on the868 MHzband.
Note: You can find a complete list of supported LoRa frequency plans here.
- Gateway ID:
- Apply the changes.
Important: You cannot modify settings while the gateway is enabled.
To apply changes:- First disable the gateway.
- Make your configuration changes.
- Then re-enable the gateway after applying the settings.
TTN Gateway Setup
Now that your MikroTik gateway is configured, it’s time to connect it to The Things Network (TTN).
Follow these steps:
-
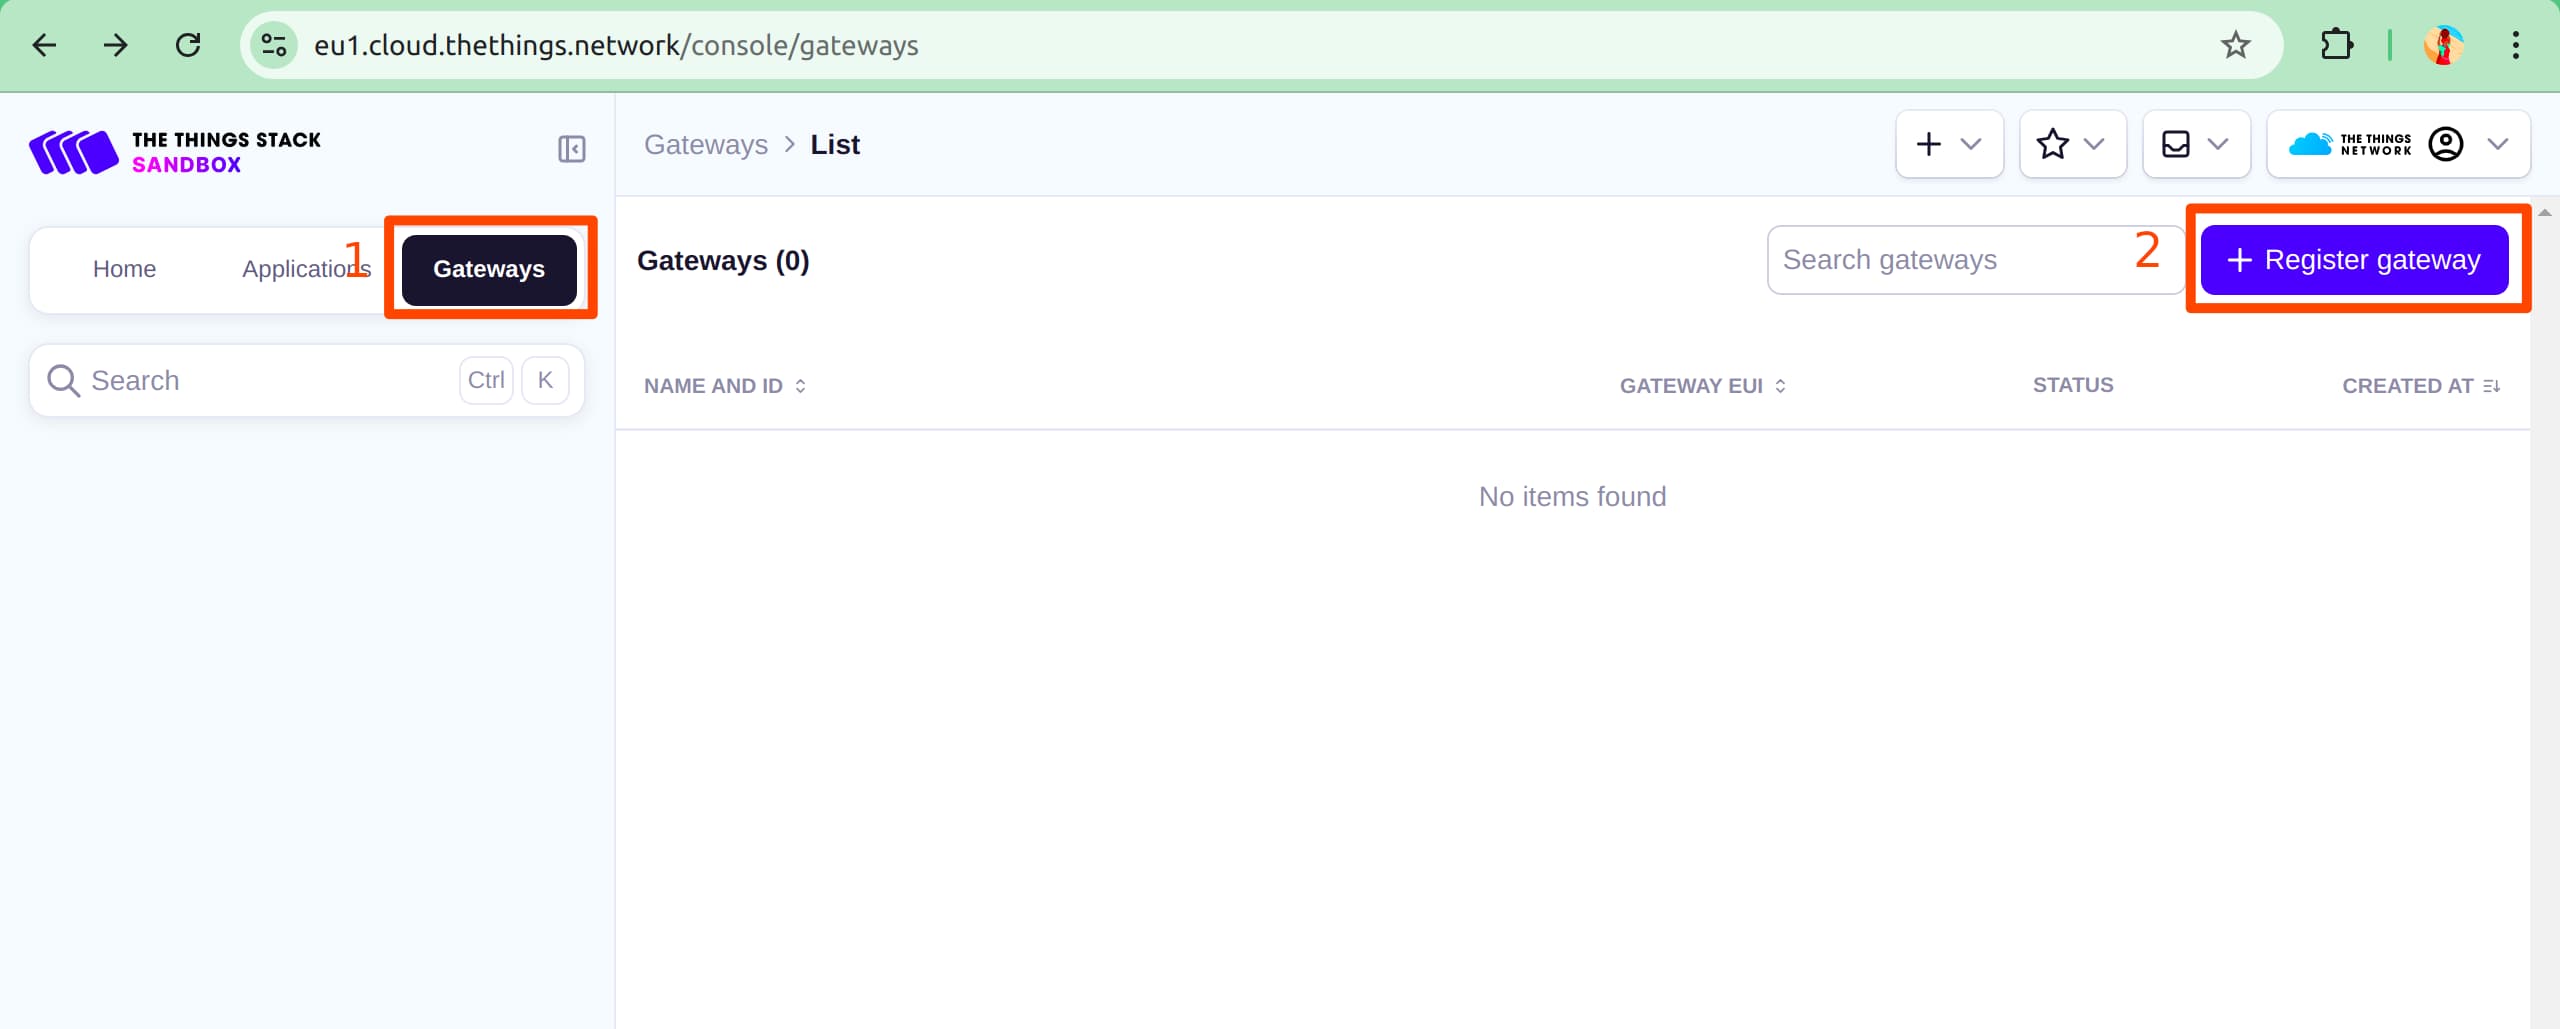
In the TTN Console, navigate to Gateways -> Register Gateway.
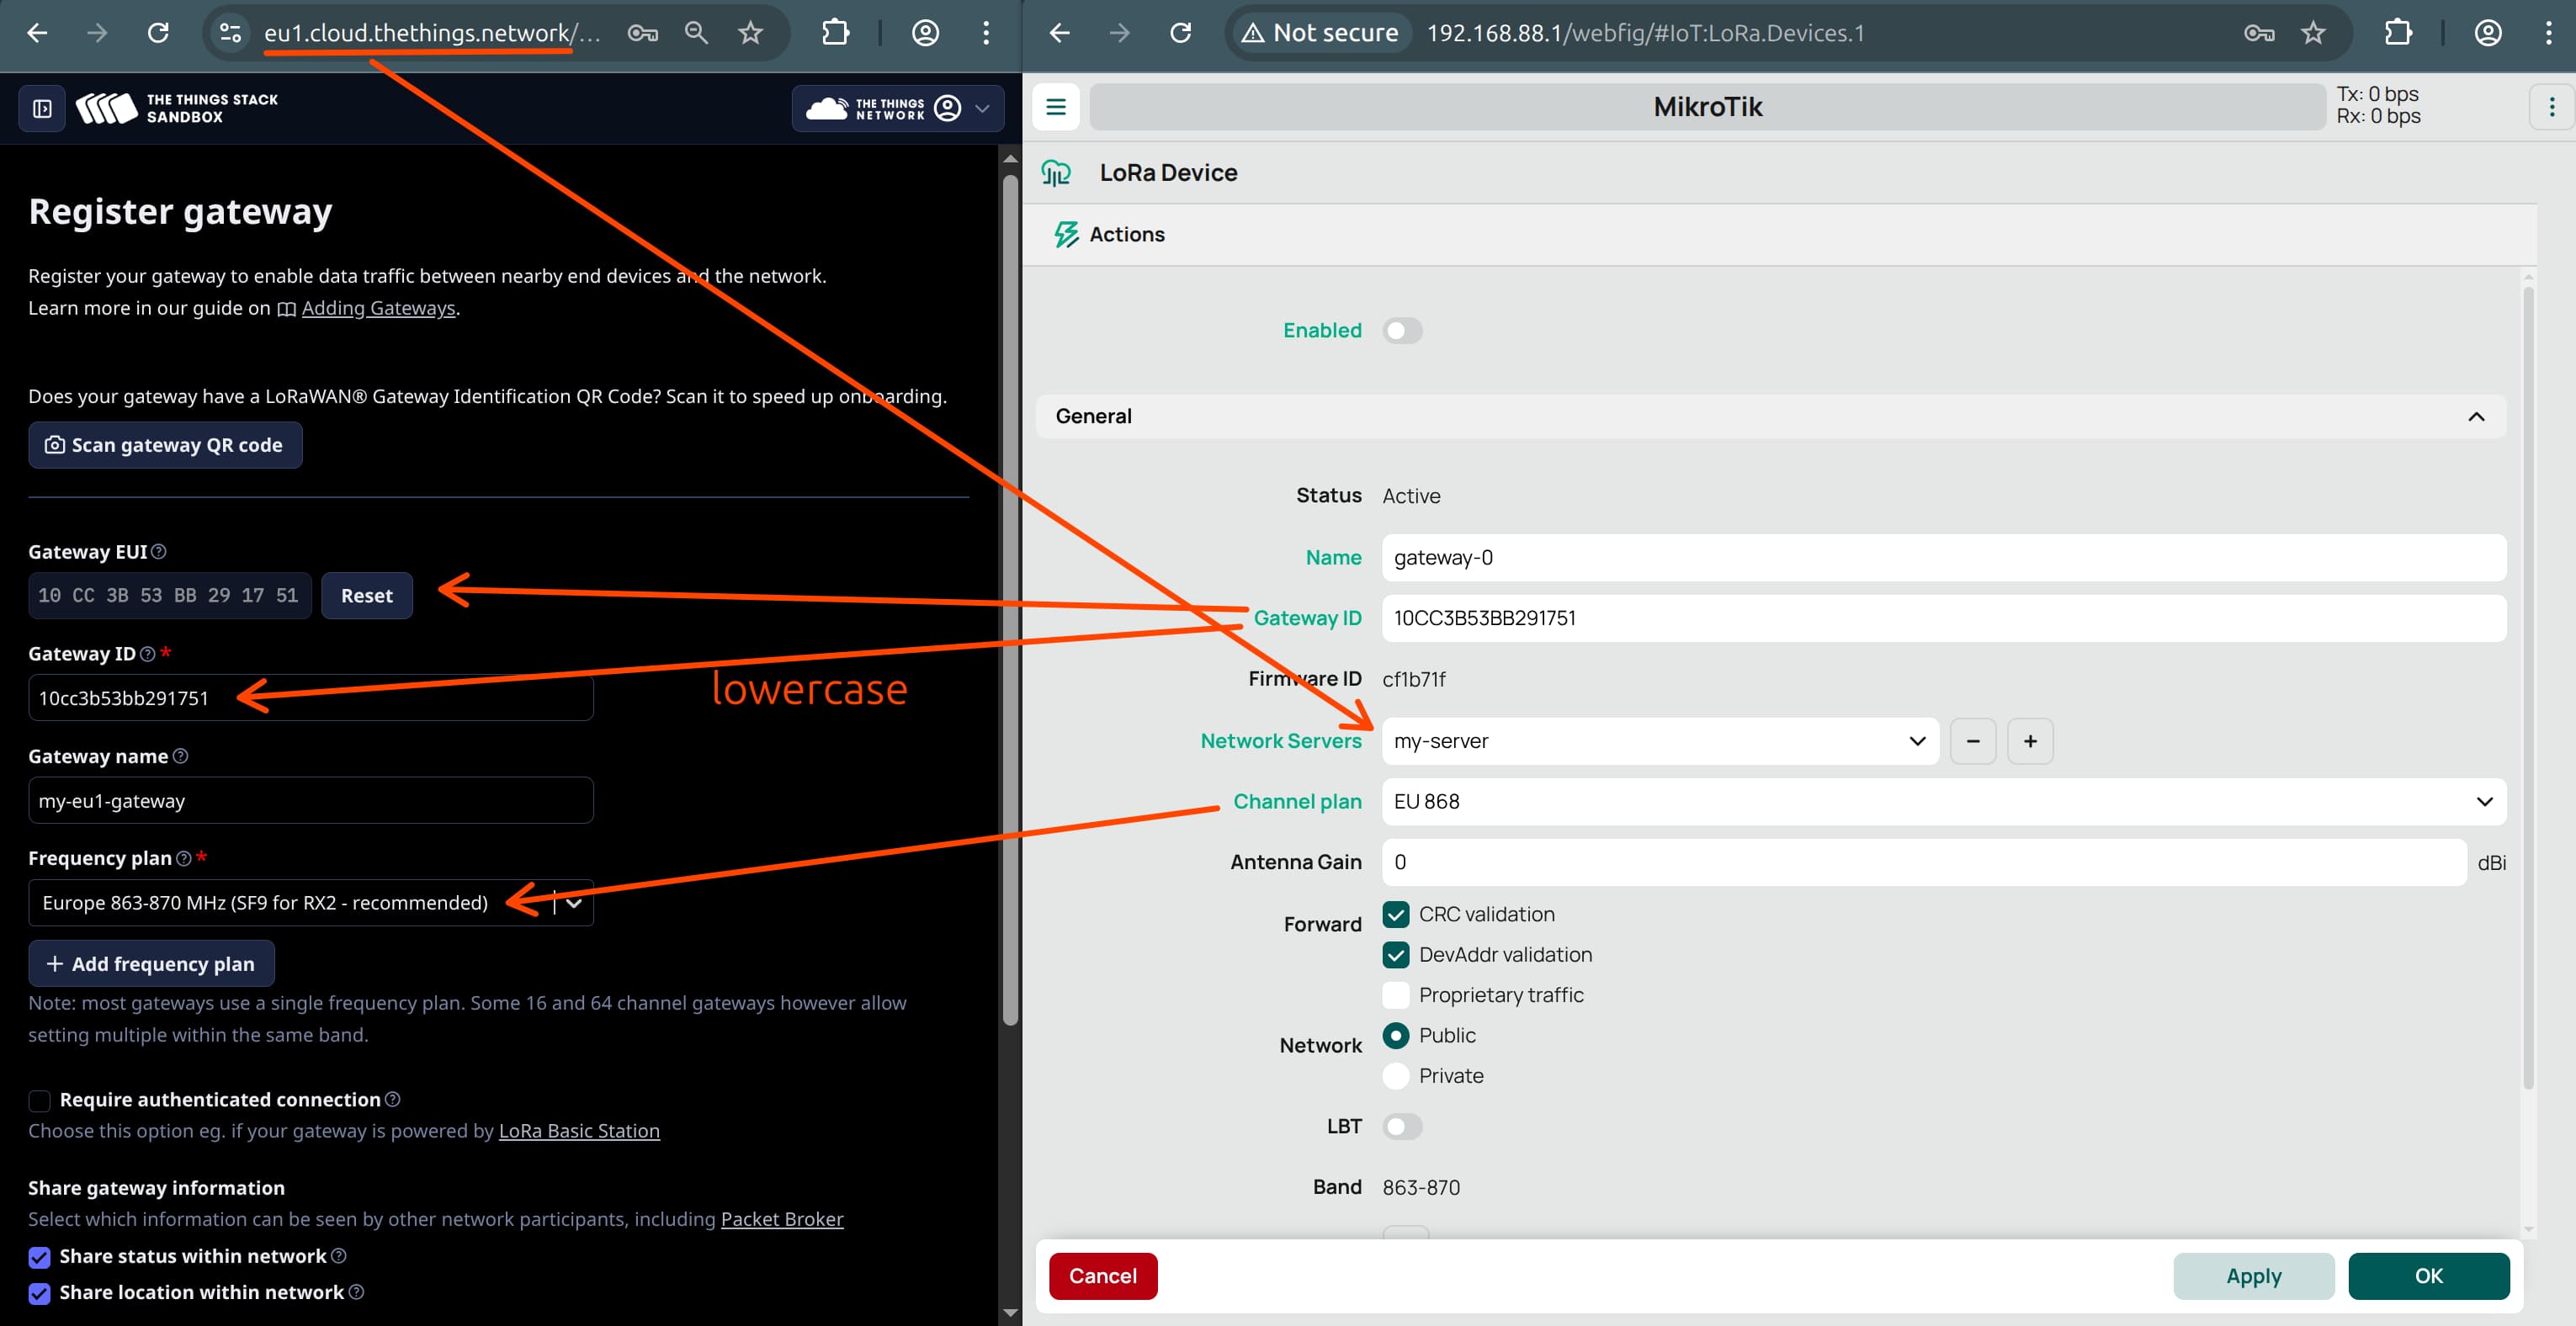
- Fill in the required fields using the information from your MikroTik gateway settings.
- Copy the Gateway ID, Frequency Plan, and other relevant settings from the MikroTik UI.
- Paste them into the corresponding fields in the TTN registration form.
-
In the TTN Console UI, scroll down and click Register Gateway.
- In the MikroTik UI, ensure the LoRa gateway is enabled.
Your gateway should connect to the TTN server within 1–3 minutes.
If it doesn’t connect:
- Try restarting your MikroTik router by powering it off and back on. After that, wait another 1–3 minutes.
- If the issue persists, double-check all fields to ensure they were entered correctly and match your TTN configuration.
TTN Application Setup
First of all we need to create Application on the TTN.
In The Things Network (TTN), an Application is a logical container that groups one or more LoRaWAN devices.
It defines how devices are managed, identified, and how their uplink/downlink messages are routed to integrations or external platforms.
Follow these steps to set it up:
-
Navigate to the Applications tab and click Add Application.

-
Create a new application:
- Enter a unique Application ID (you can choose any name).
- The App Name and Description are optional.
Register New TTN Device
When the Application is created, we can go to the Device creation.
In this section, we’ll register a Sensative Multi-Sensor as an example.
Even if you’re using a different LoRaWAN device, the steps will be mostly the same.
Start by navigating to your previously created TTN Application.
From there, click Register end device.
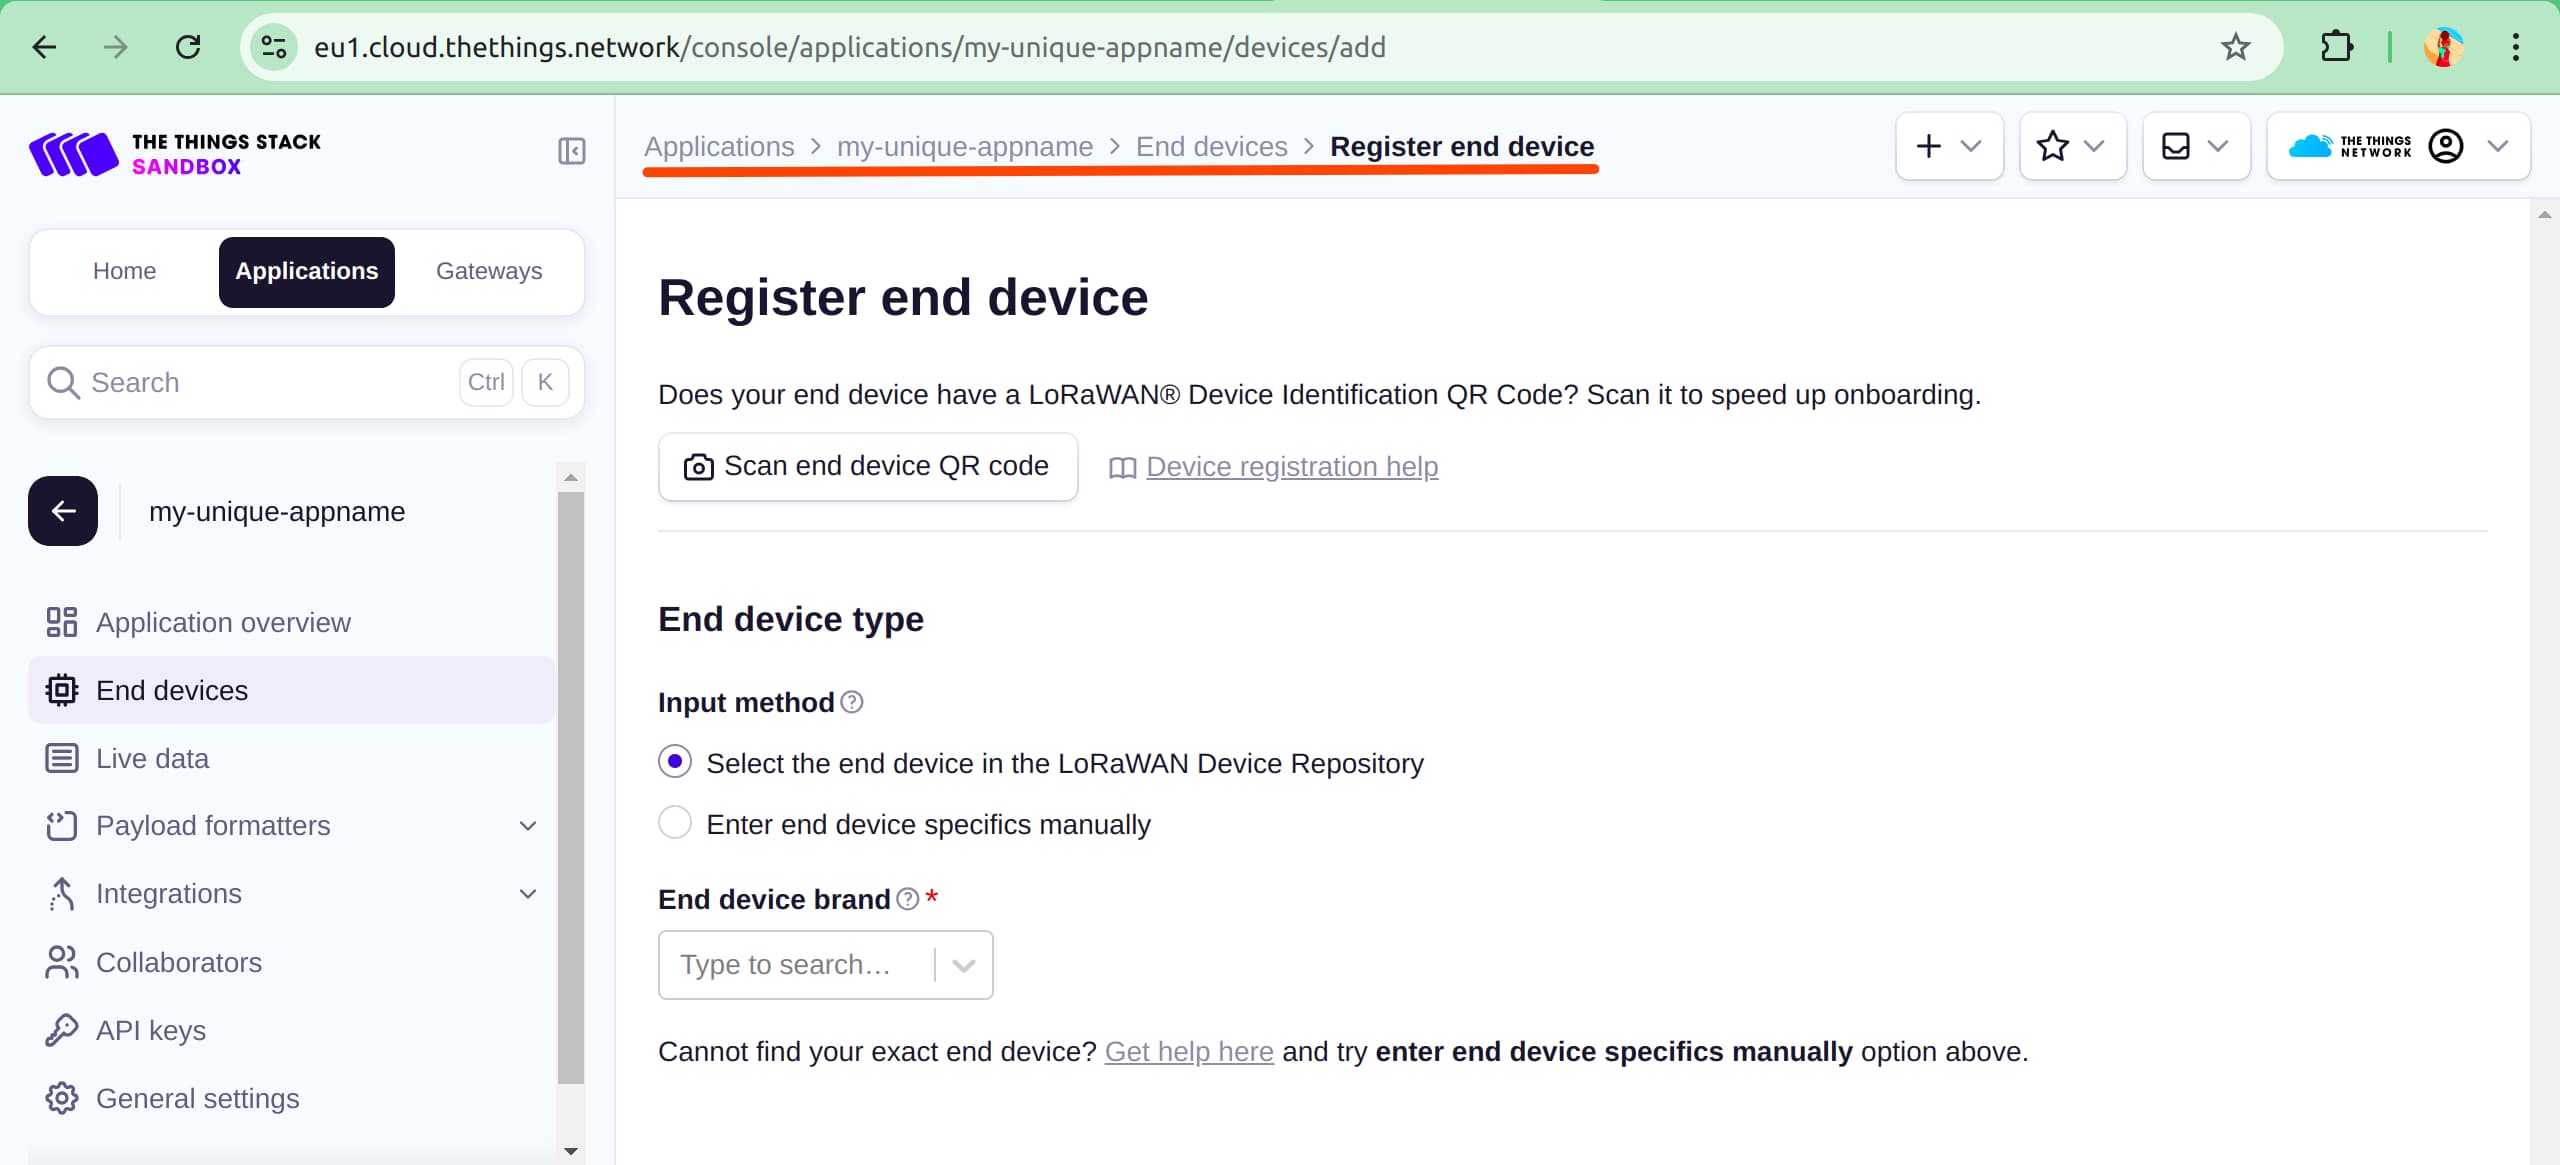
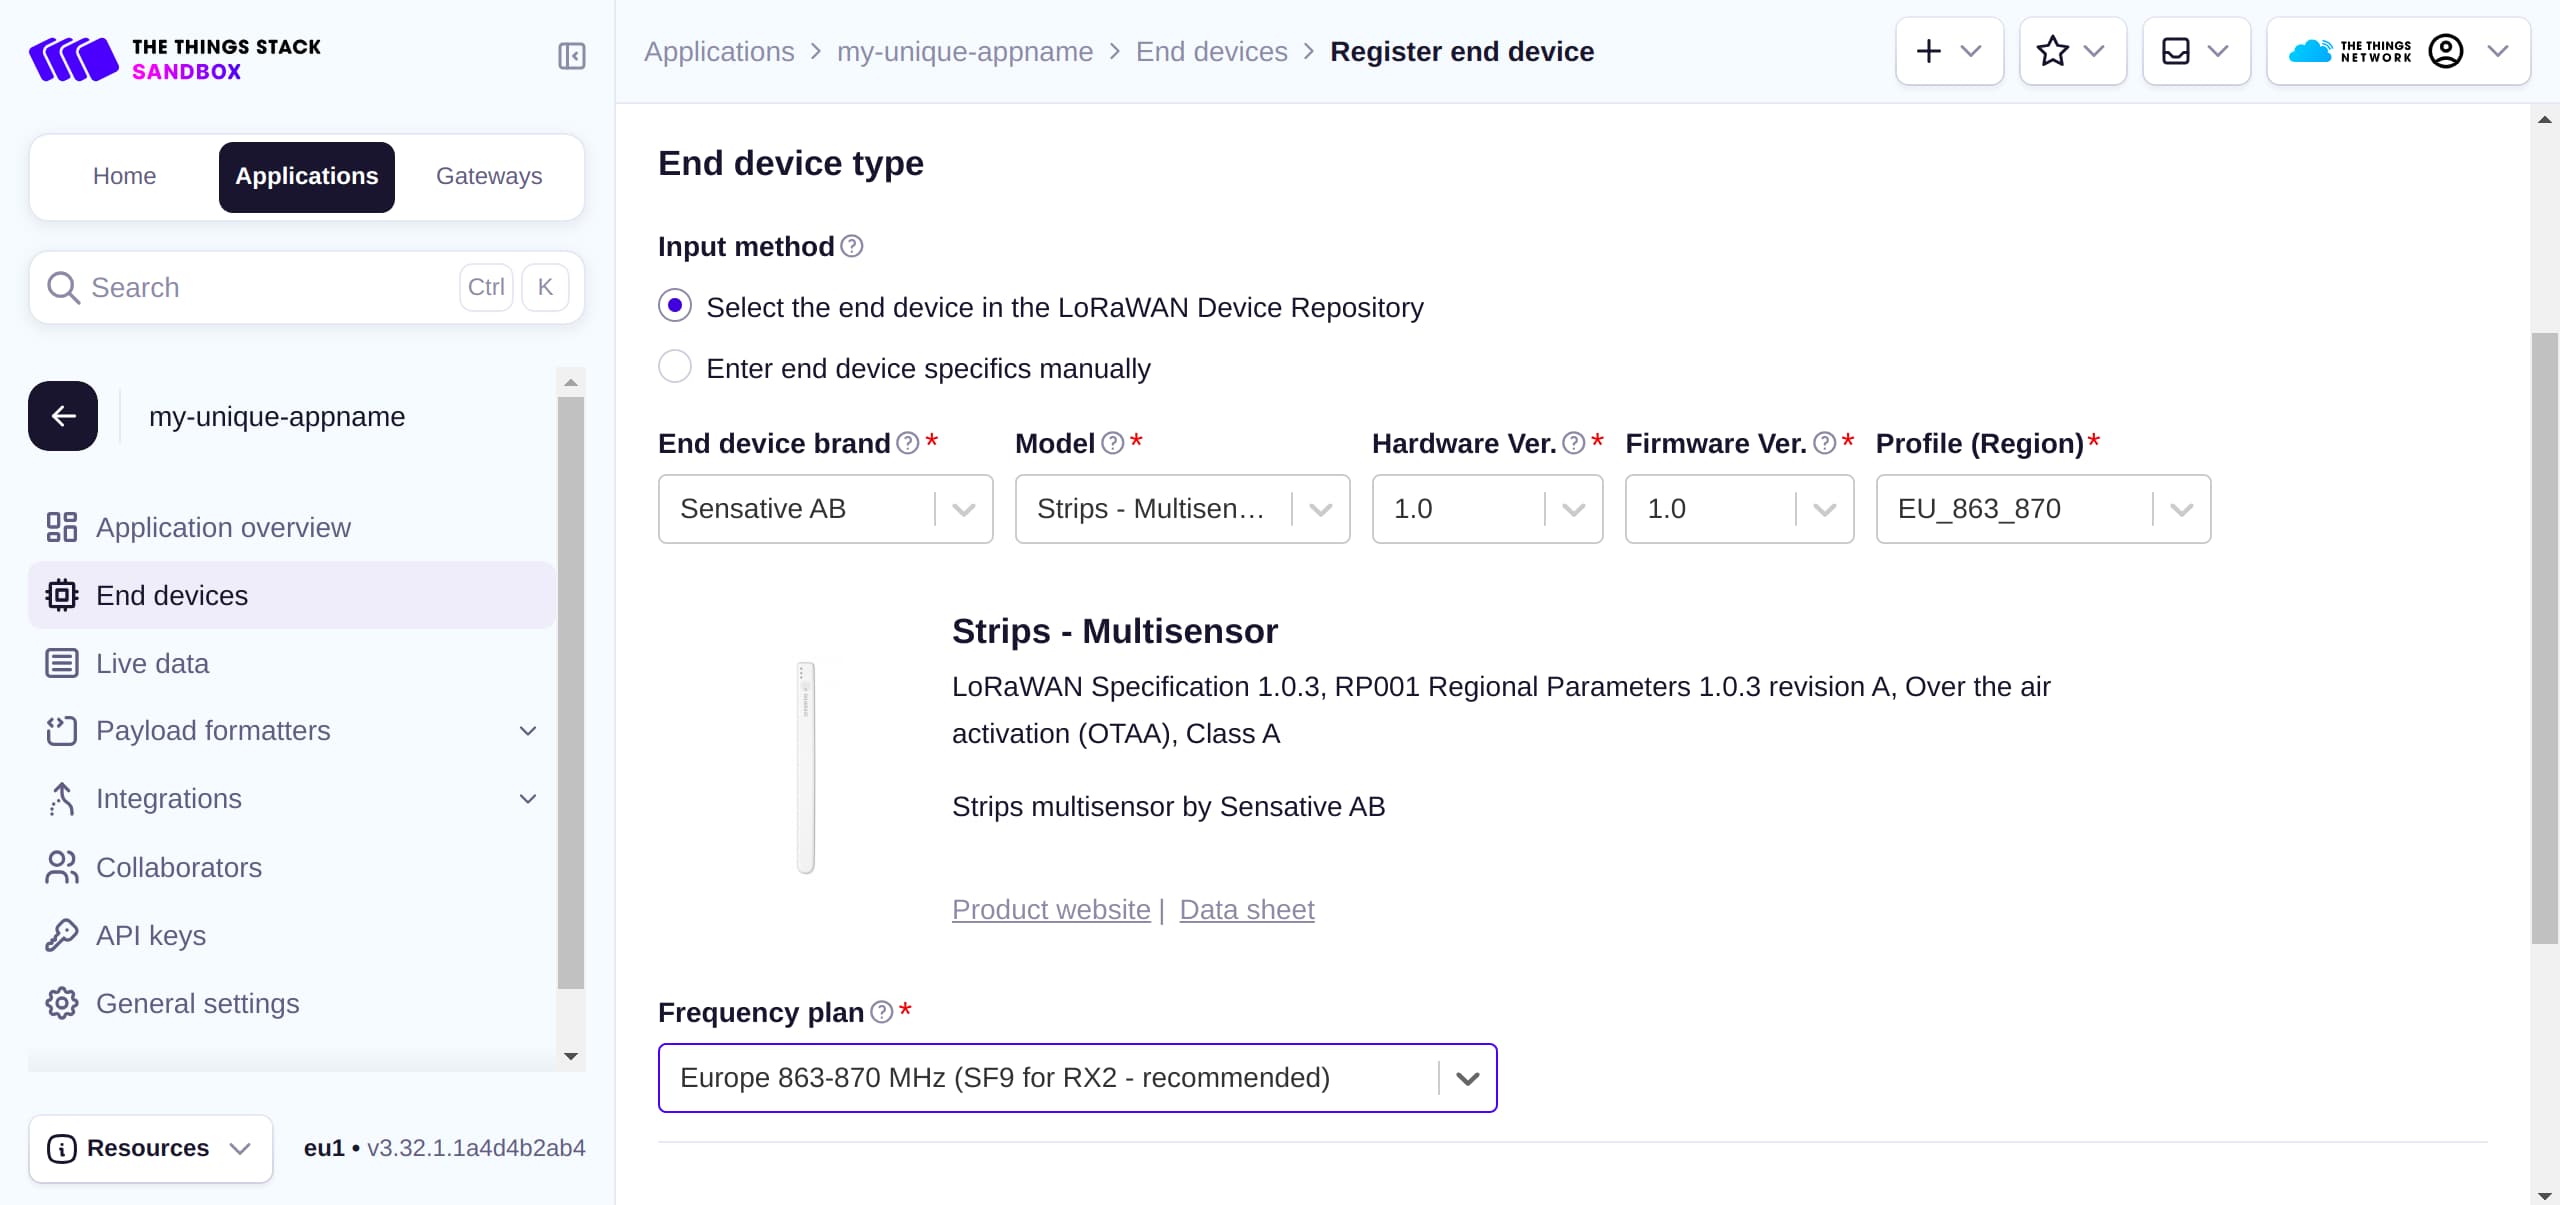
- Register your device:
- Search for your device’s manufacturer (for Sensative sensors, it’s Sensative AB).
- Select the correct sensor model (e.g., Strips).
- Choose the appropriate Profile (Frequency) Region. For Sensative sensors, it’s
EU 868.
- Obtain device credentials:
You’ll need the following three identifiers:
APP_EUI(also calledJOIN_EUI)DEV_EUIAPP_KEY
These are usually printed on the box or a card inside your device packaging.
If you can’t find them or they seem invalid, contact the manufacturer. -
Enter the credentials: Paste the
APP_EUI,DEV_EUI, andAPP_KEYinto their respective fields in the TTN UI and complete the device registration. -
Prepare your sensor: If possible, reboot or reset the device so it initiates a join request to the TTN network.
- Check live data:
- Open the Live Data tab in TTN and look for join requests or uplinks.
- If no data appears, try restarting your device and manually sending data. Also, check the logs in your LoRa gateway.
- If payloads appear but aren’t decoded, navigate to the device page -> Payload formatters. Select “Use device repository formatters” from the dropdown.
- If decoding still fails, click View formatter code, copy it, and paste it into the Custom JavaScript Formatter section for manual tweaking.
- If all else fails, search your manufacturer’s documentation or forums for the correct payload formatter code.
Create a TTN API Key
To be able to configure data forwarding from TTN to the Kaa Platform, first of all, you need to create an API key with the appropriate permissions.
Follow these steps:
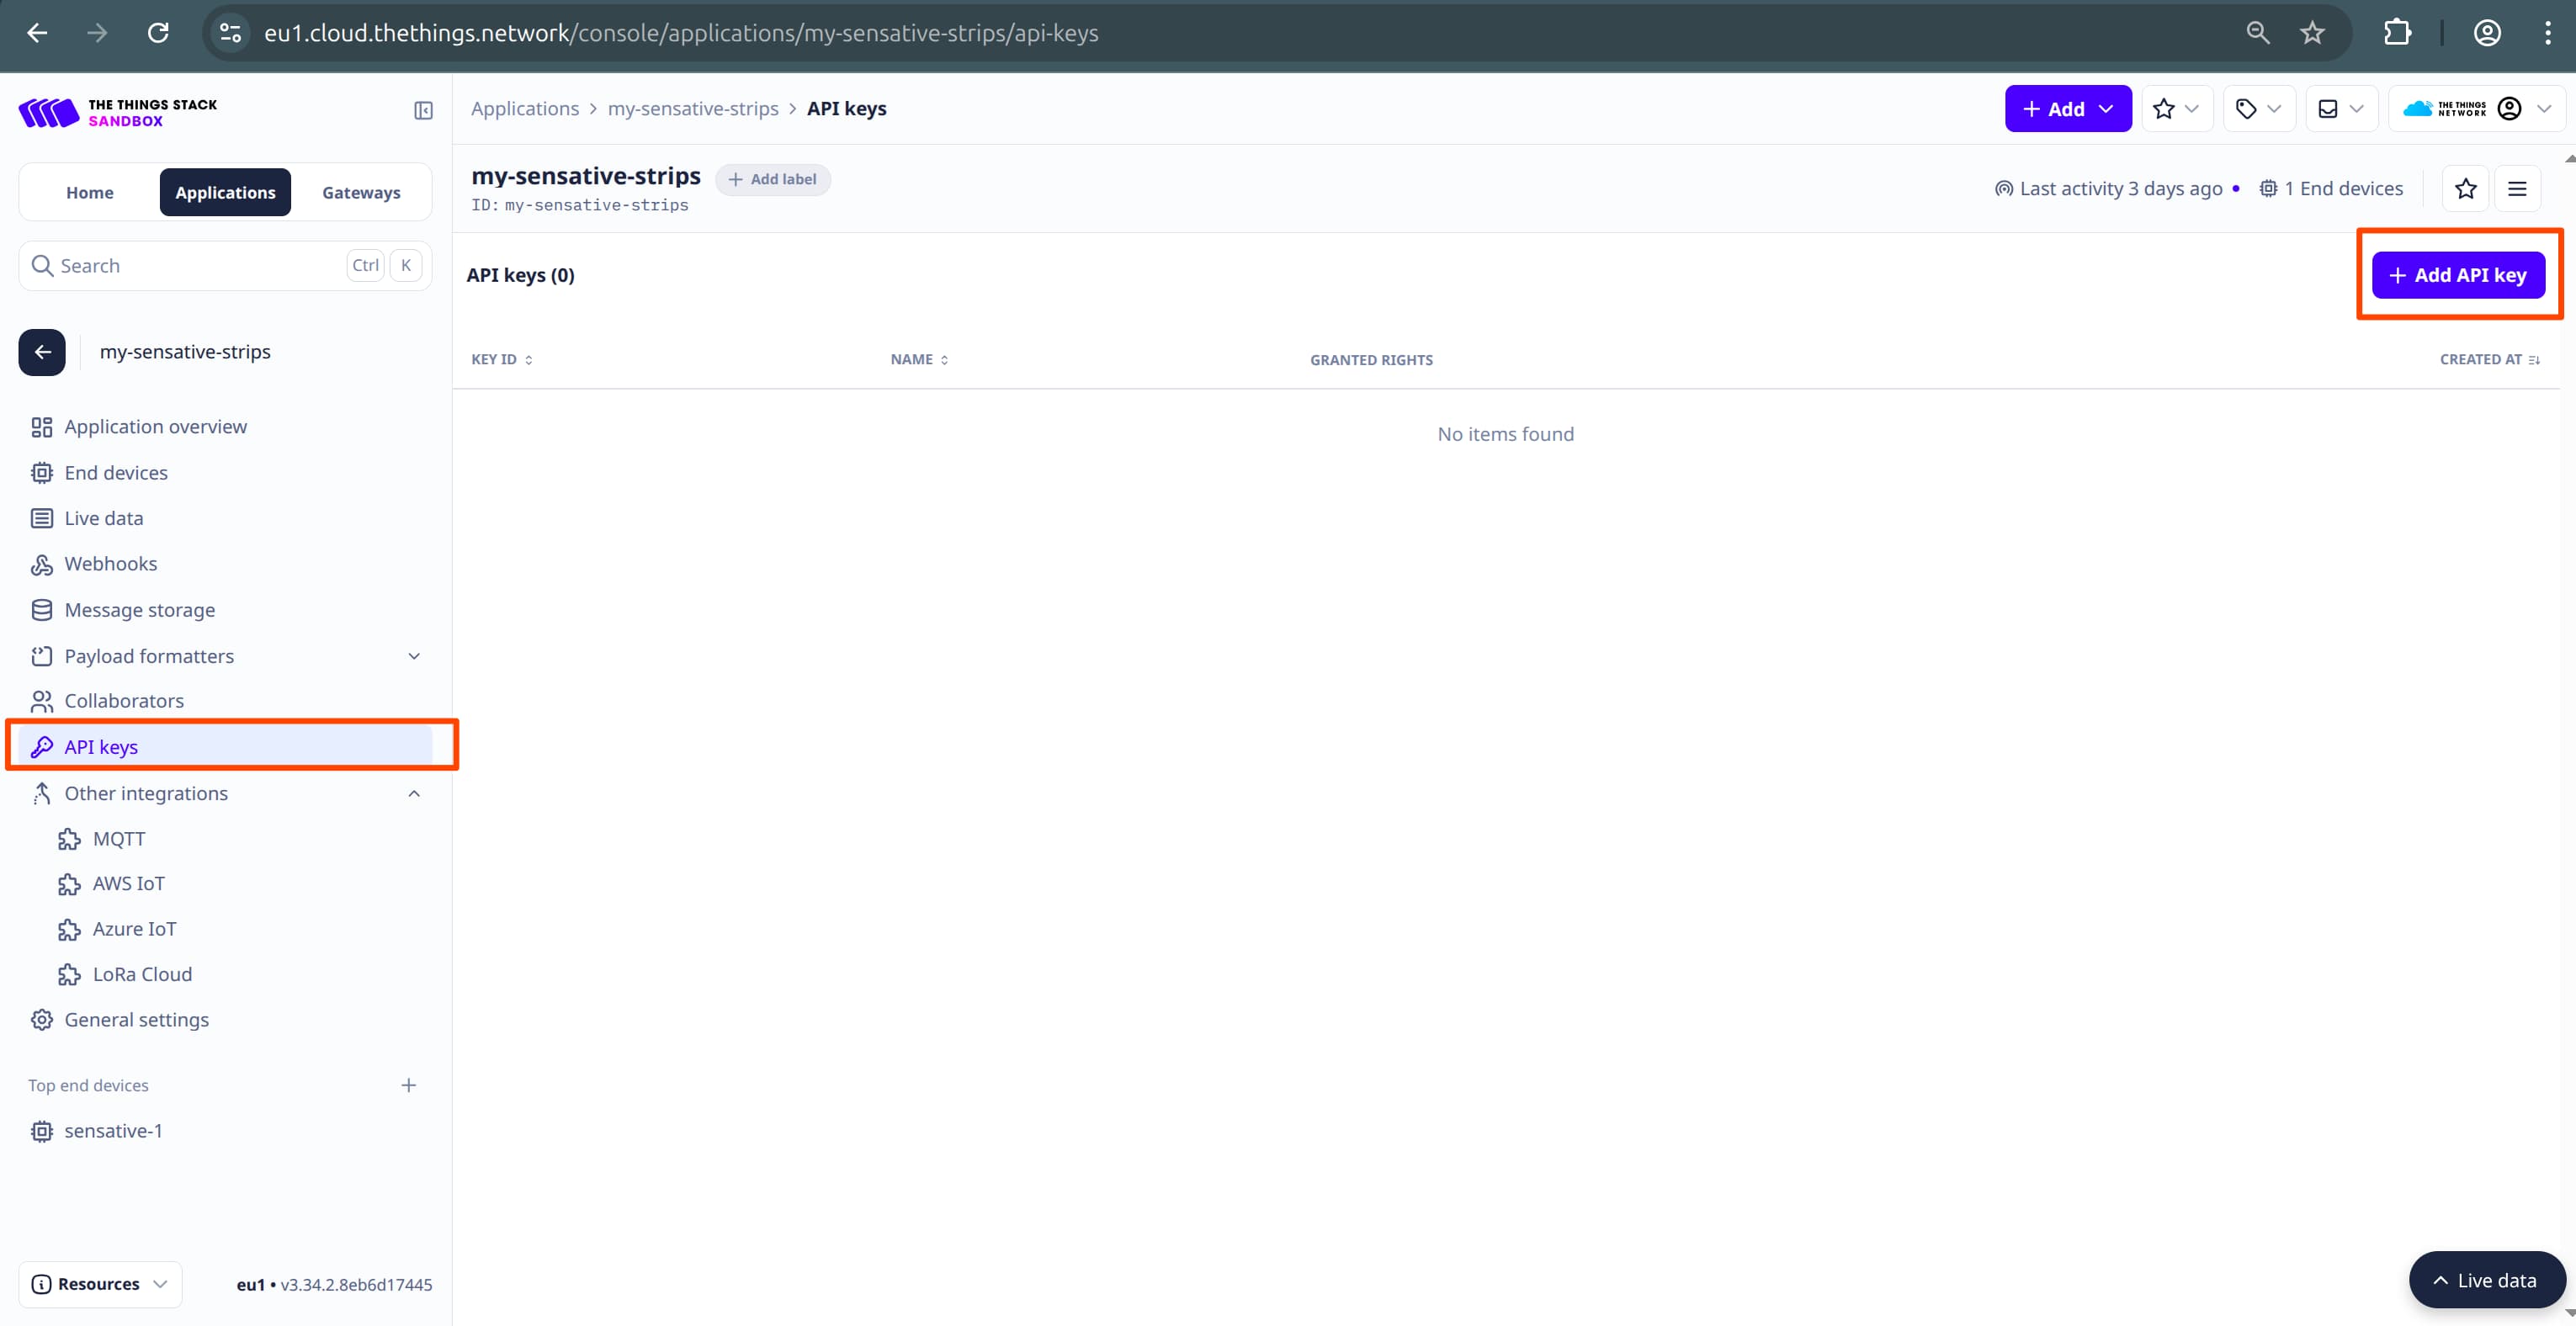
- In the TTN Console, go to API keys -> Add API key.
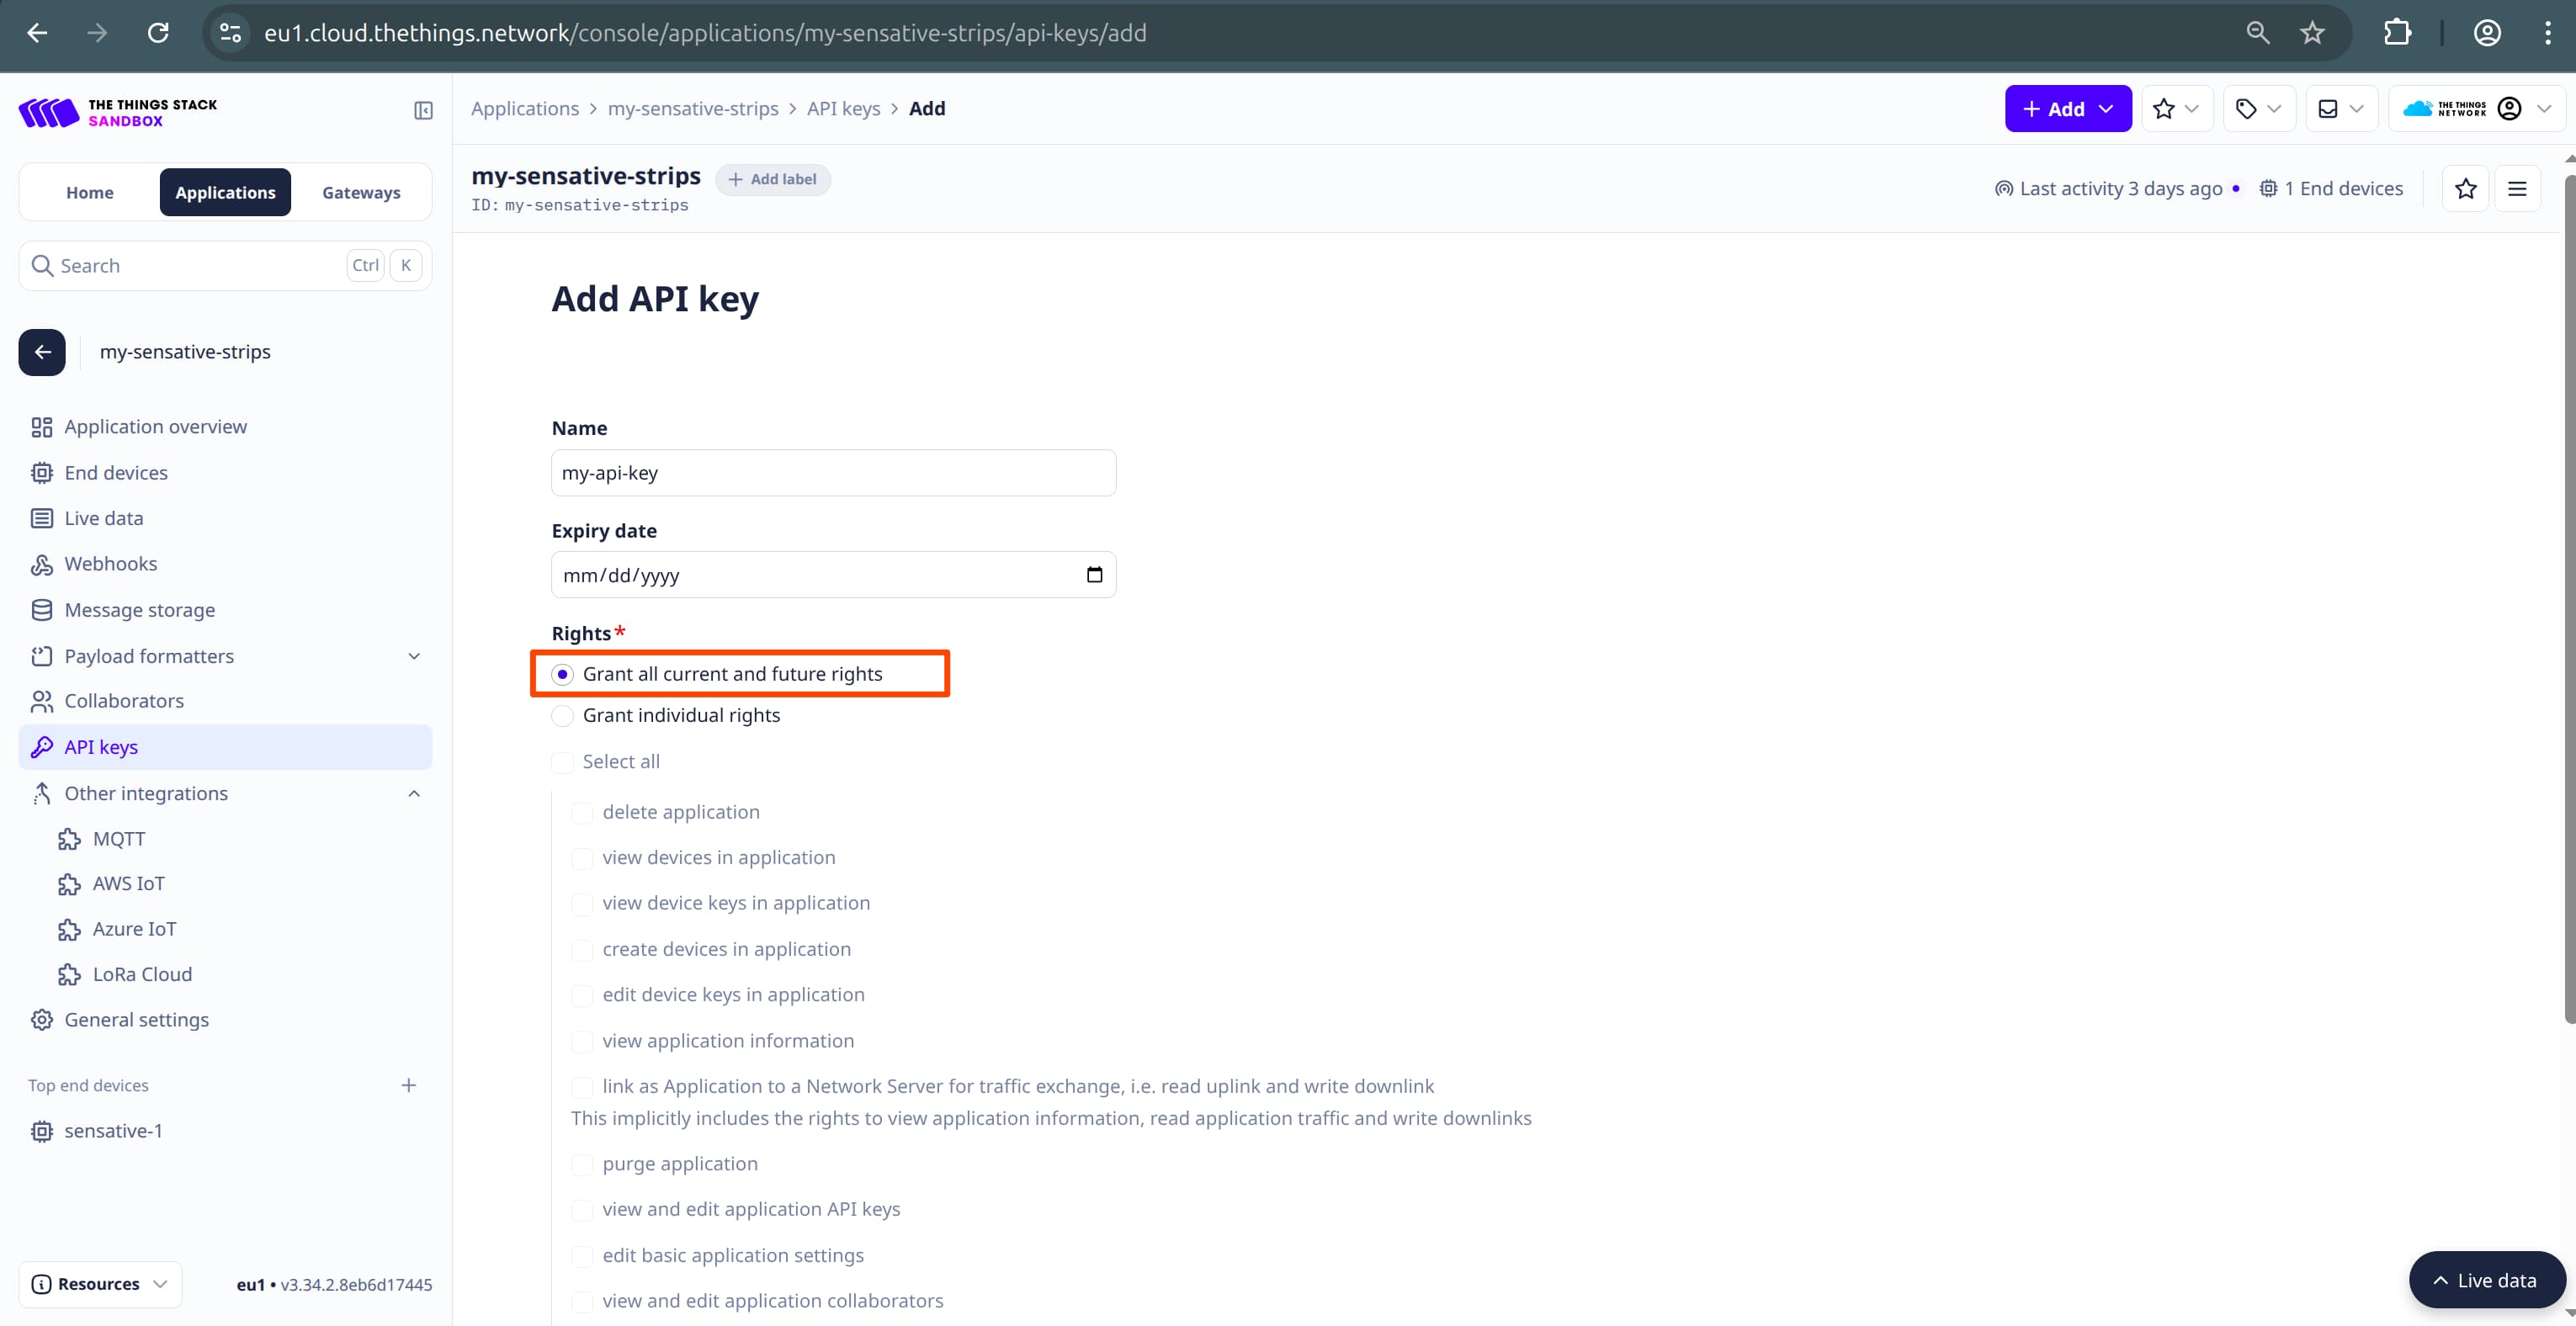
- Grant the key all available permissions to allow Kaa full access to fetch data from TTN.
Note: Minimal required permissions are: view devices in application, view application information, link Application to a Network Server for traffic exchange.
- Click Create, then copy the API key. It will not be shown again after this step.
Integrating TTN Device with Kaa
Follow these steps:
-
Create a New Application
In the Kaa UI, navigate to the Applications tab and click Create application.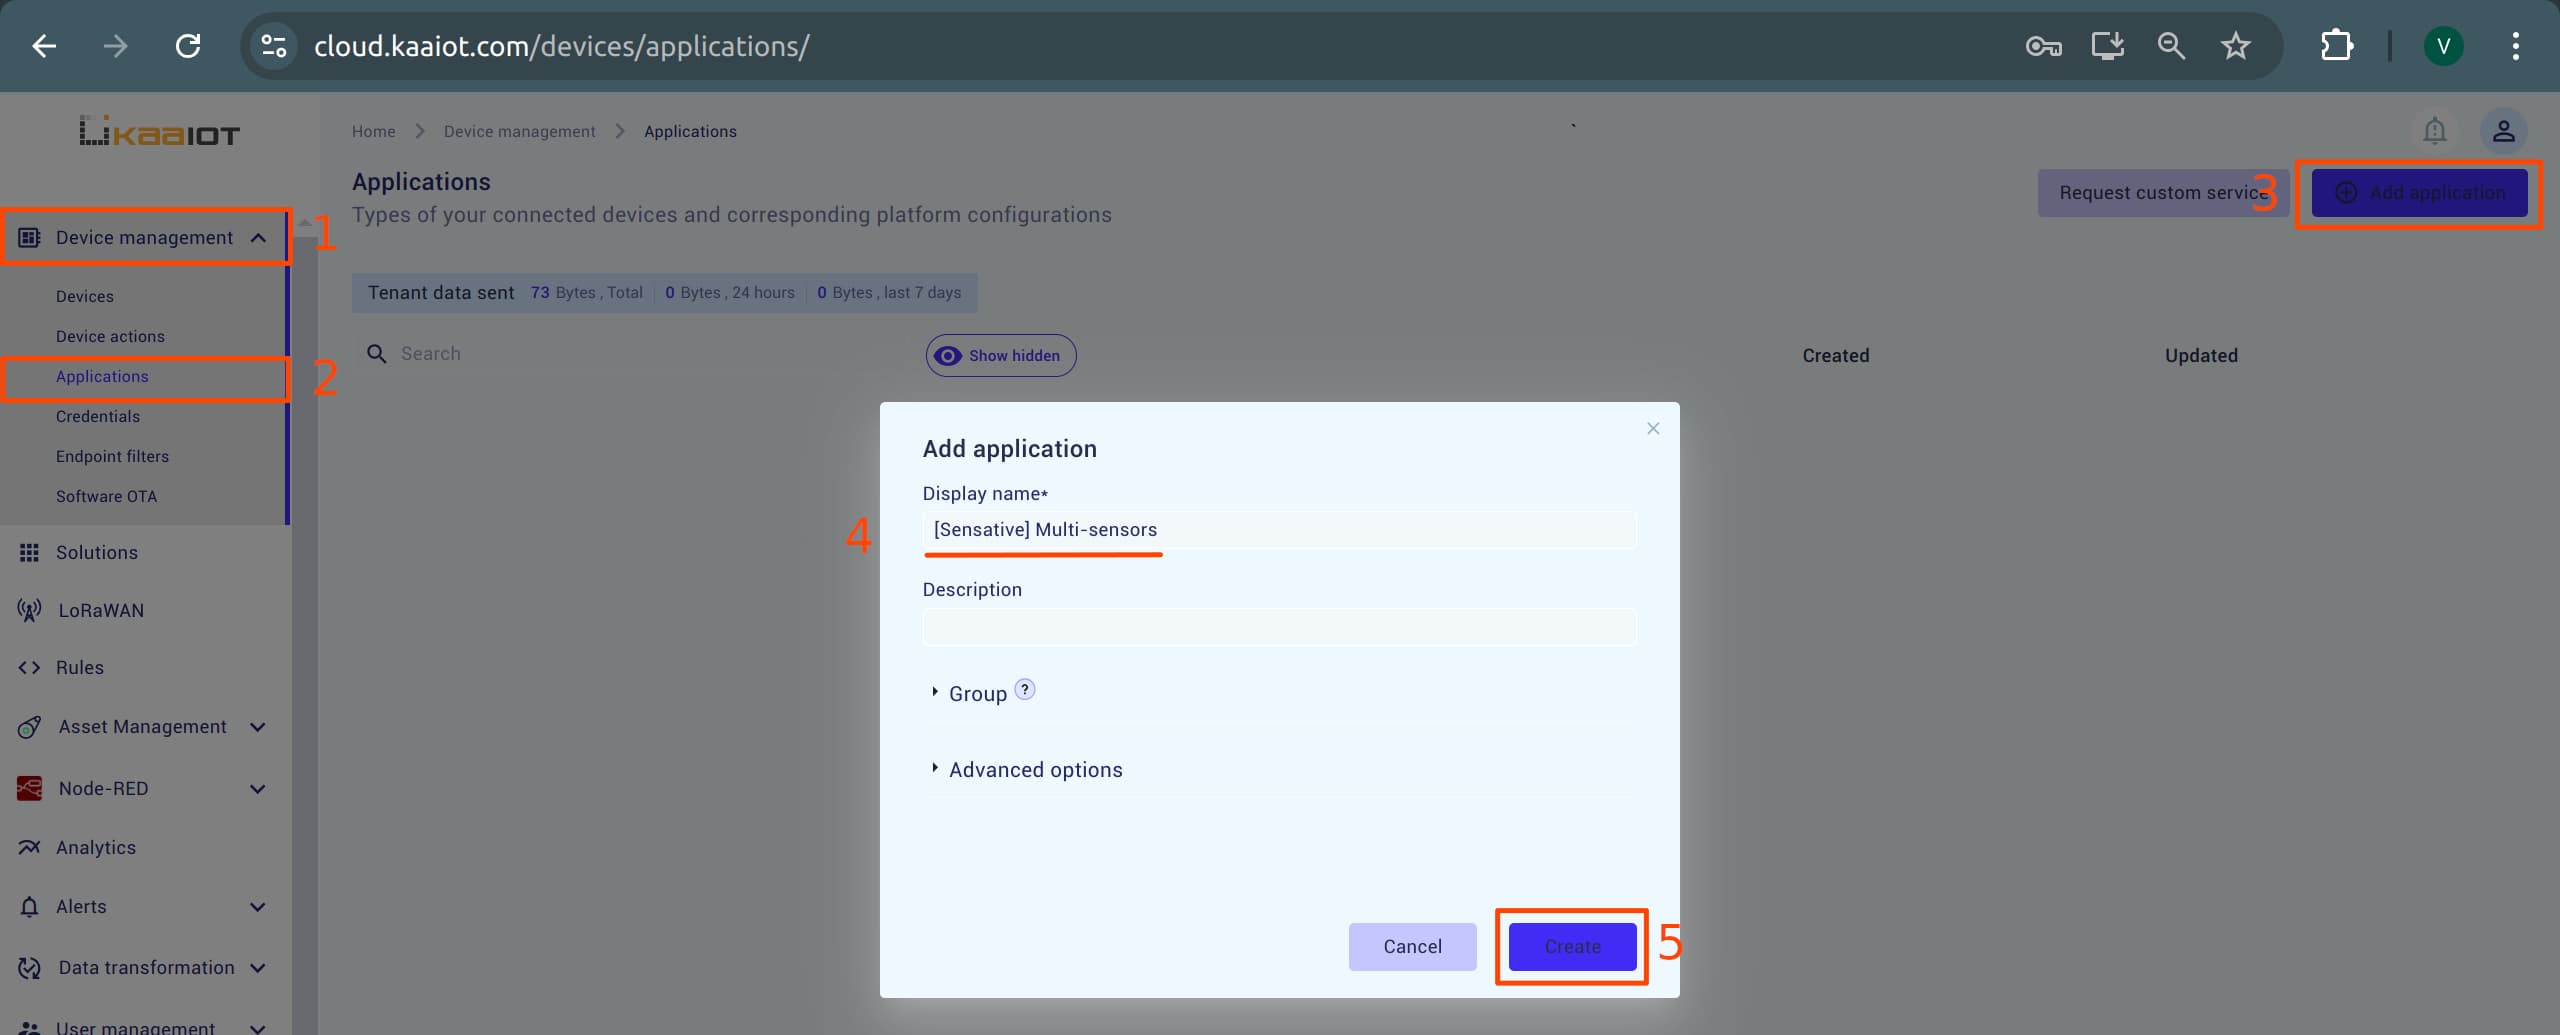
-
Add a LoRaWAN Application Integration
Go to the LoRaWAN -> Device integrations and click Add integration.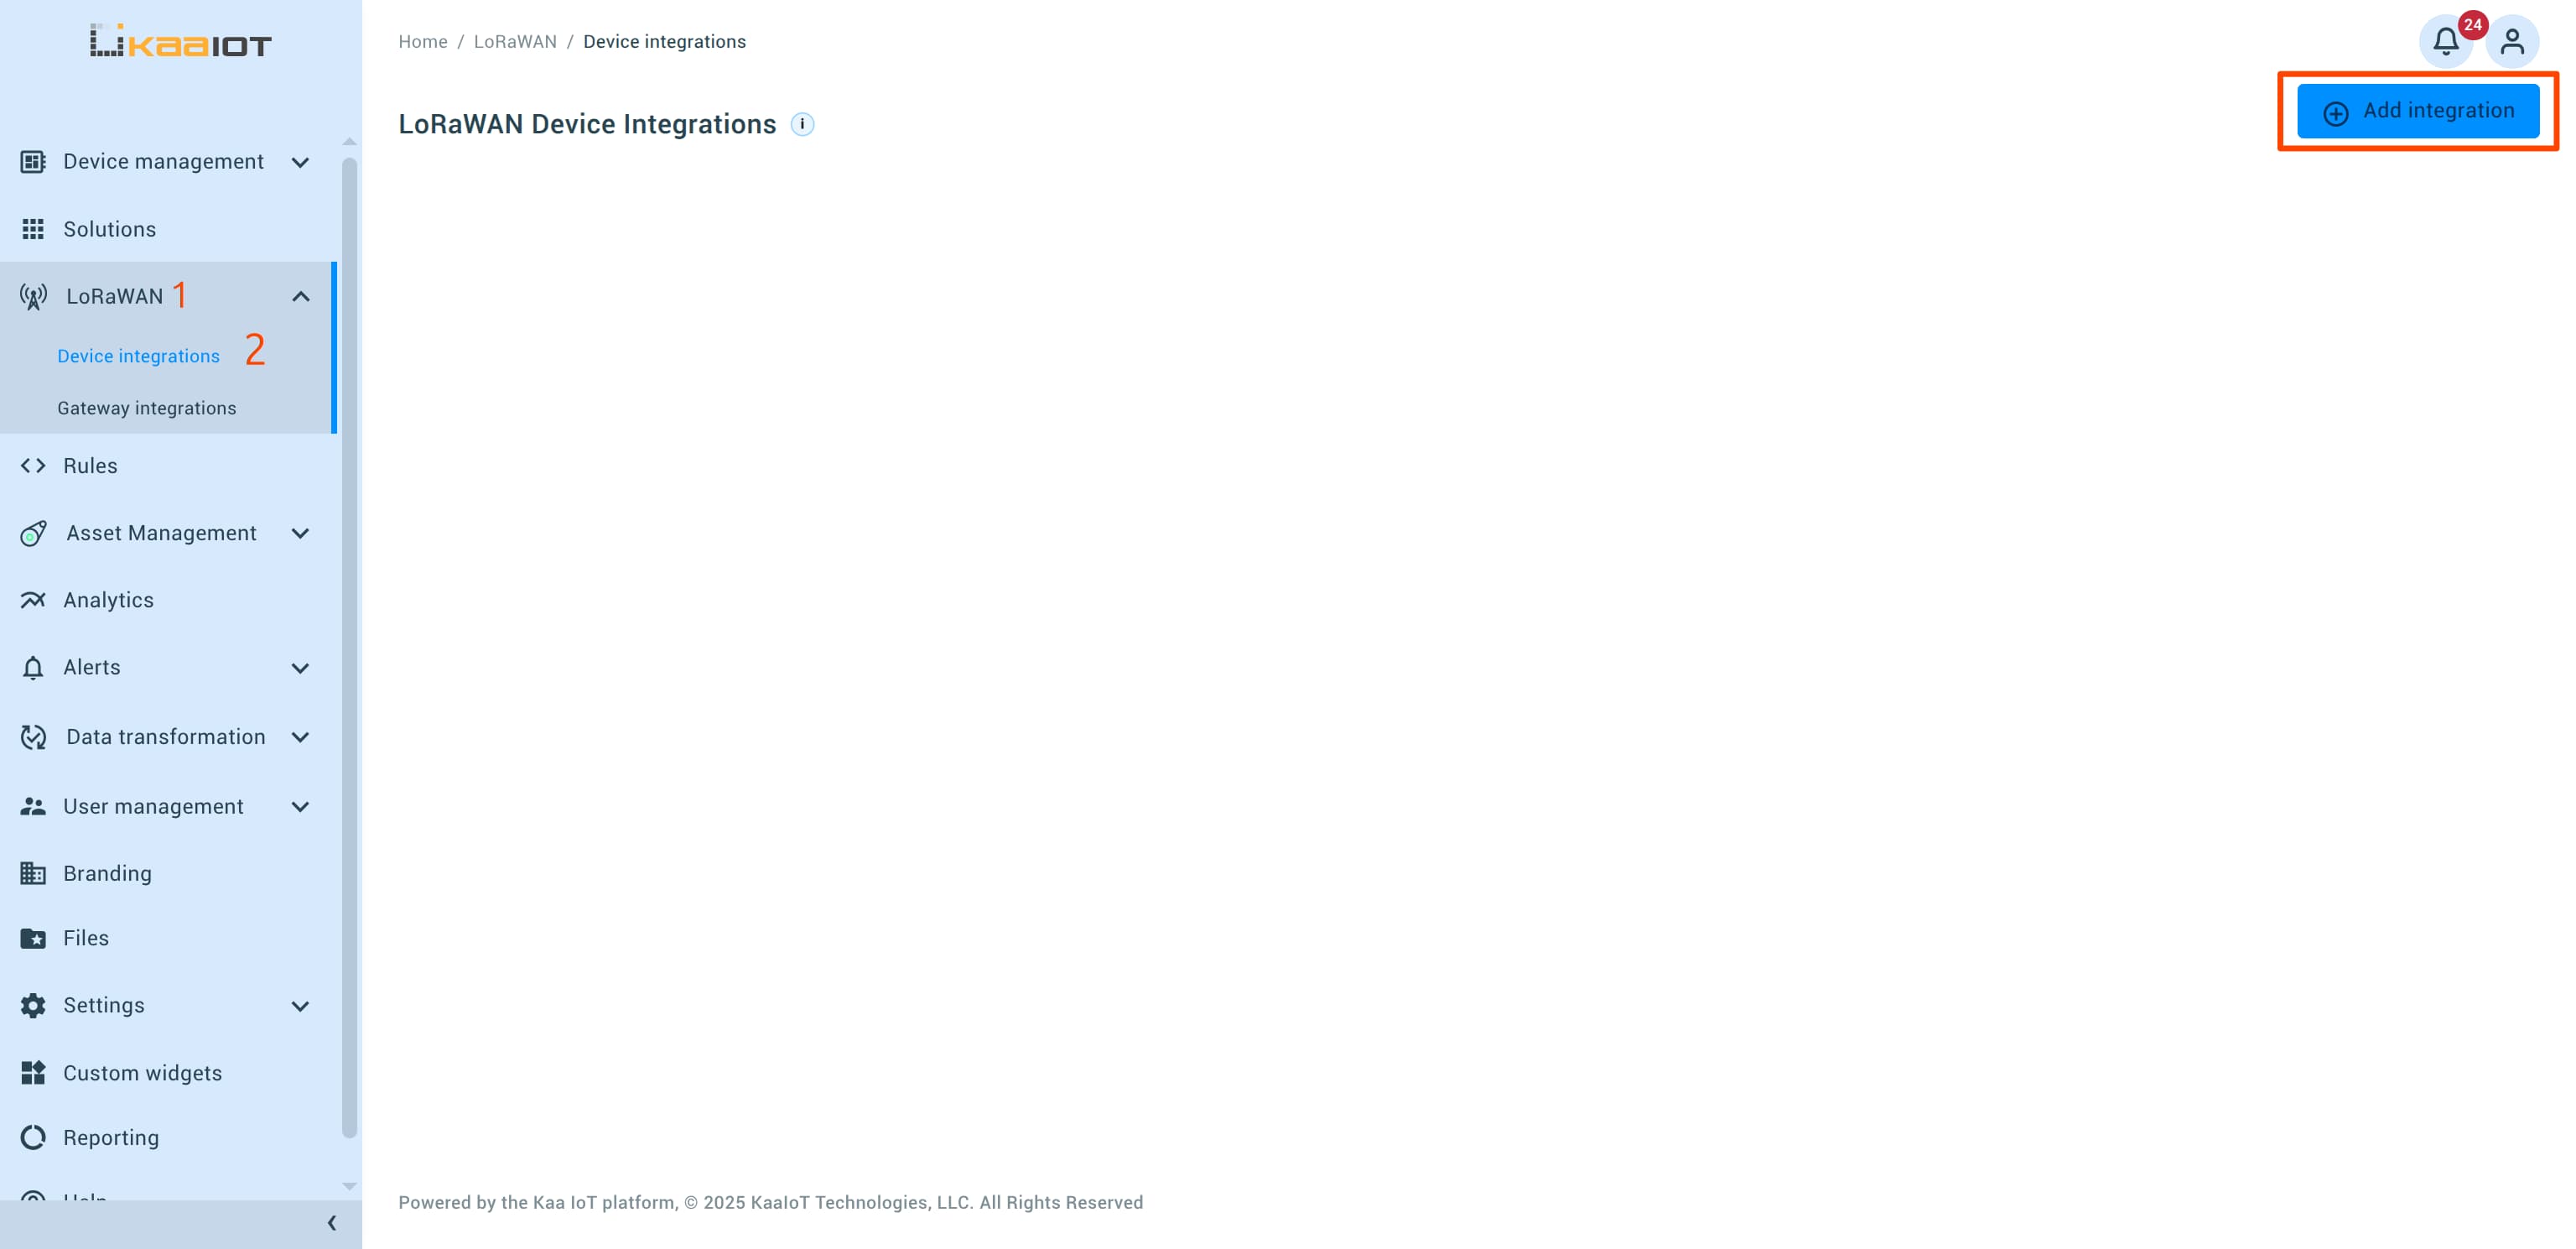
-
Register the Application Integration
In the popup dialog, enter the required application integration details.
Follow the instructions shown in the screenshot.
For TTN API Key, paste the key you created earlier.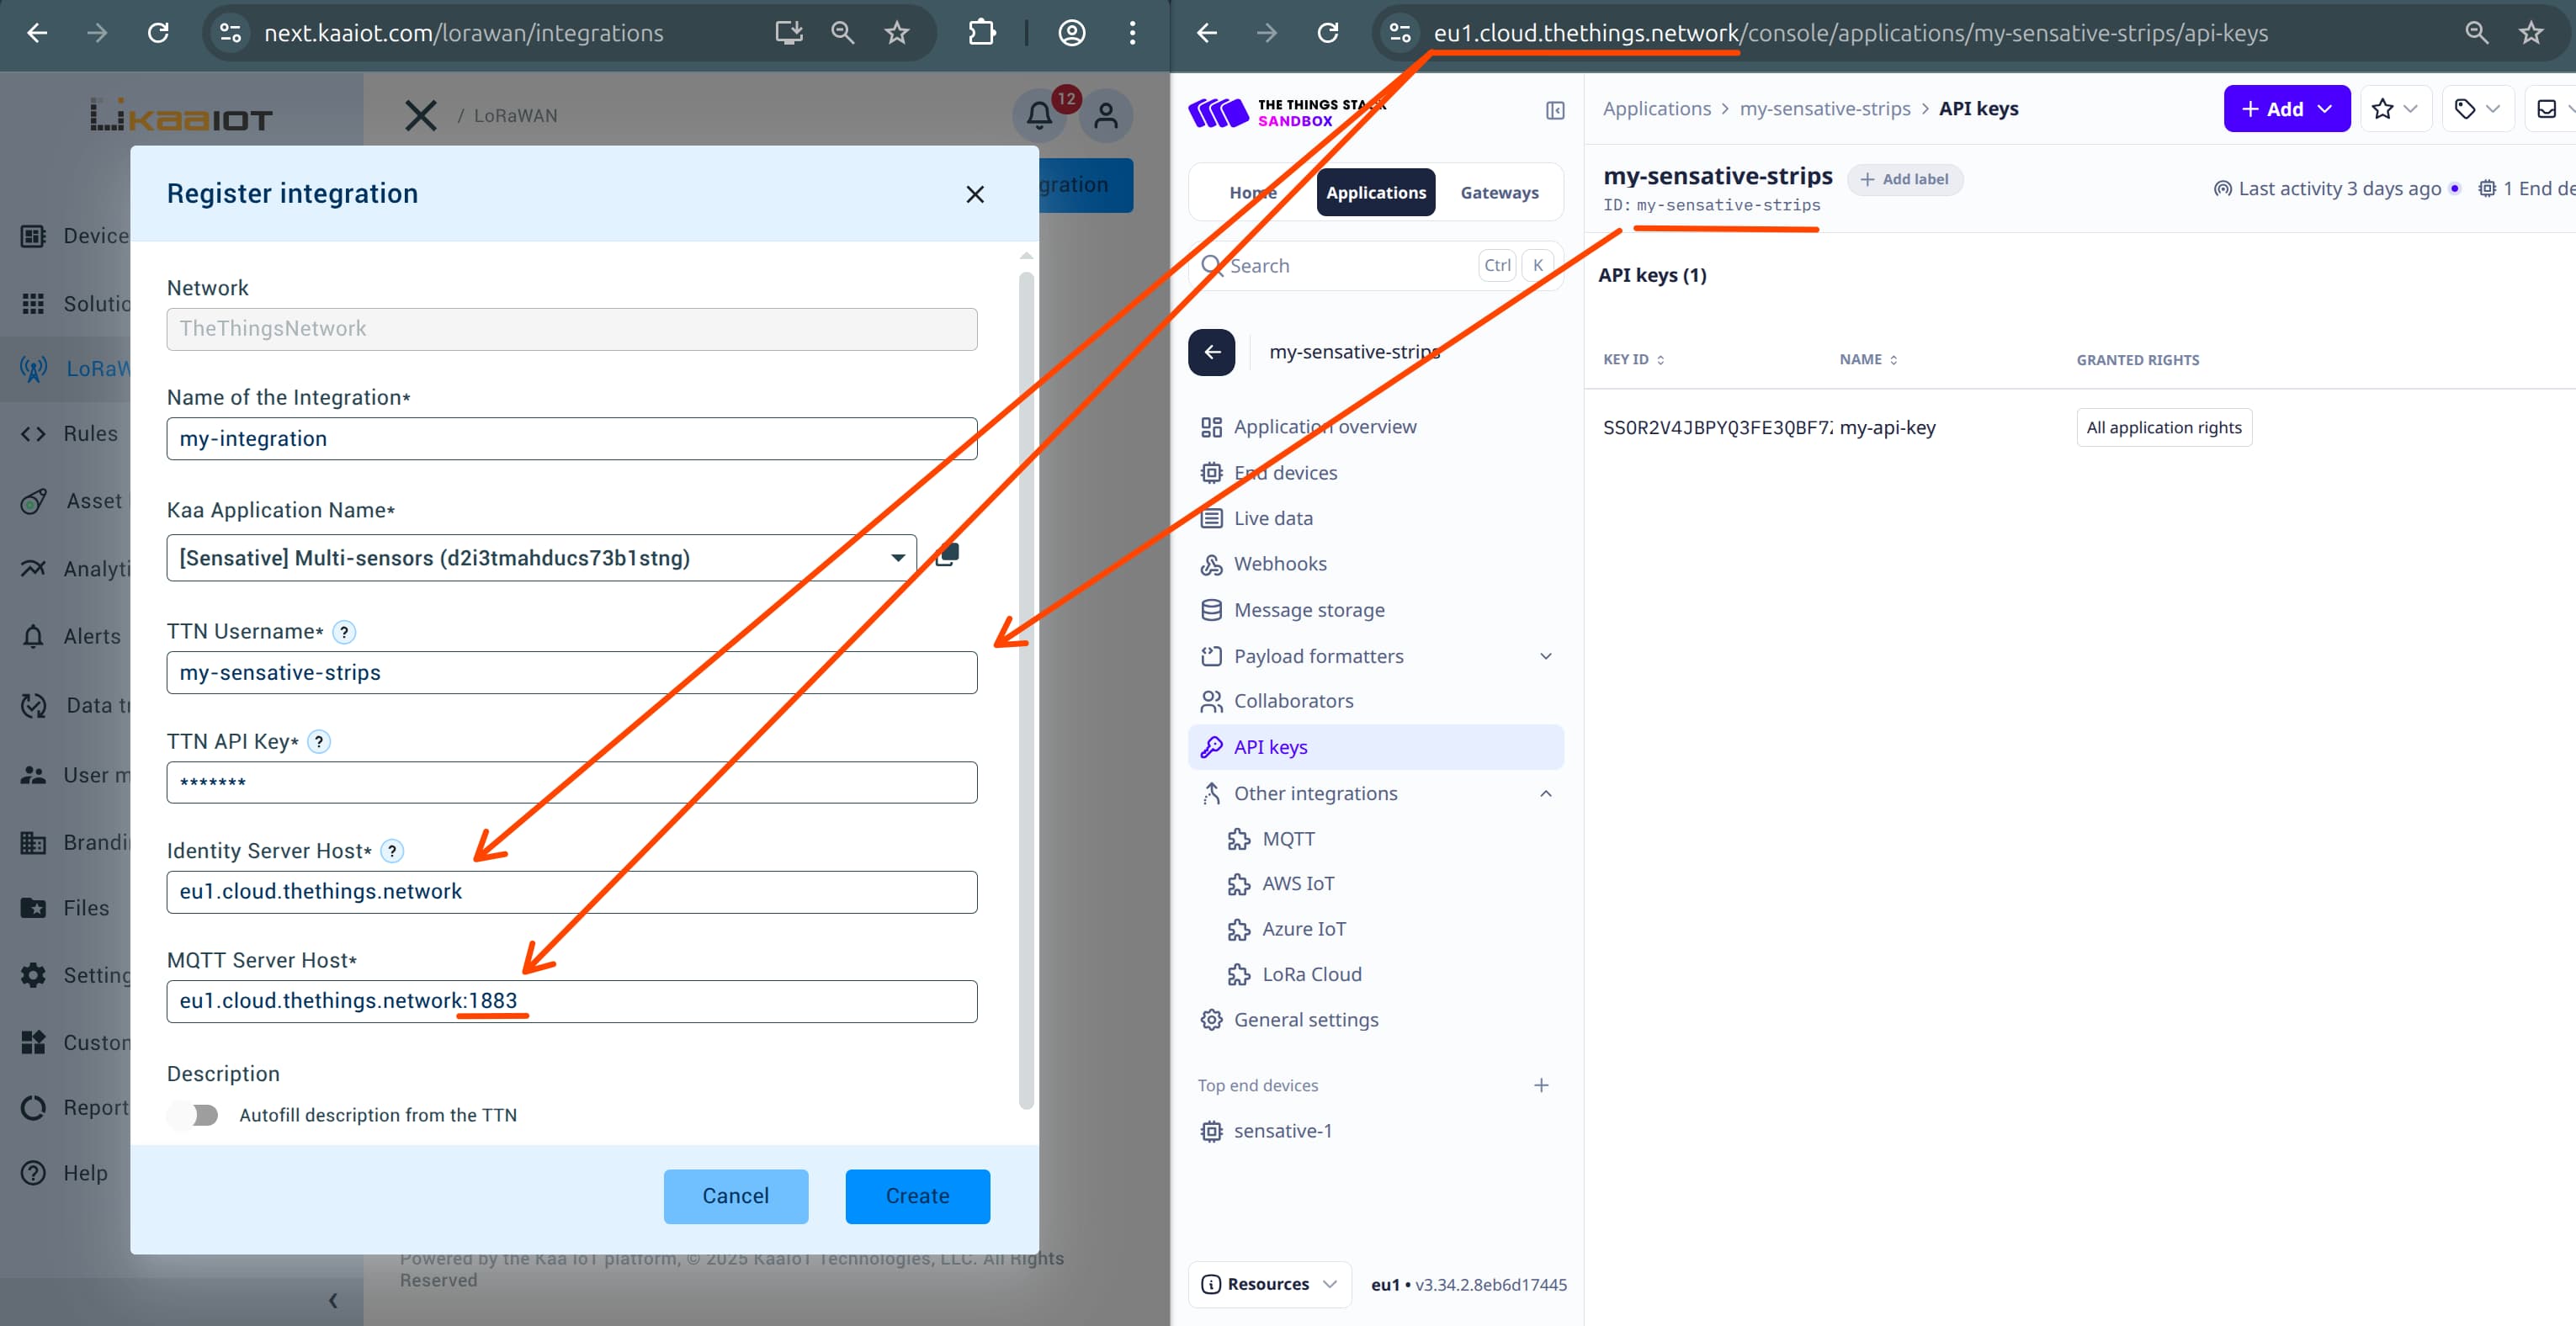
-
Complete the Integration
If all credentials are correct, the application integration should be created successfully. - Add Your Device
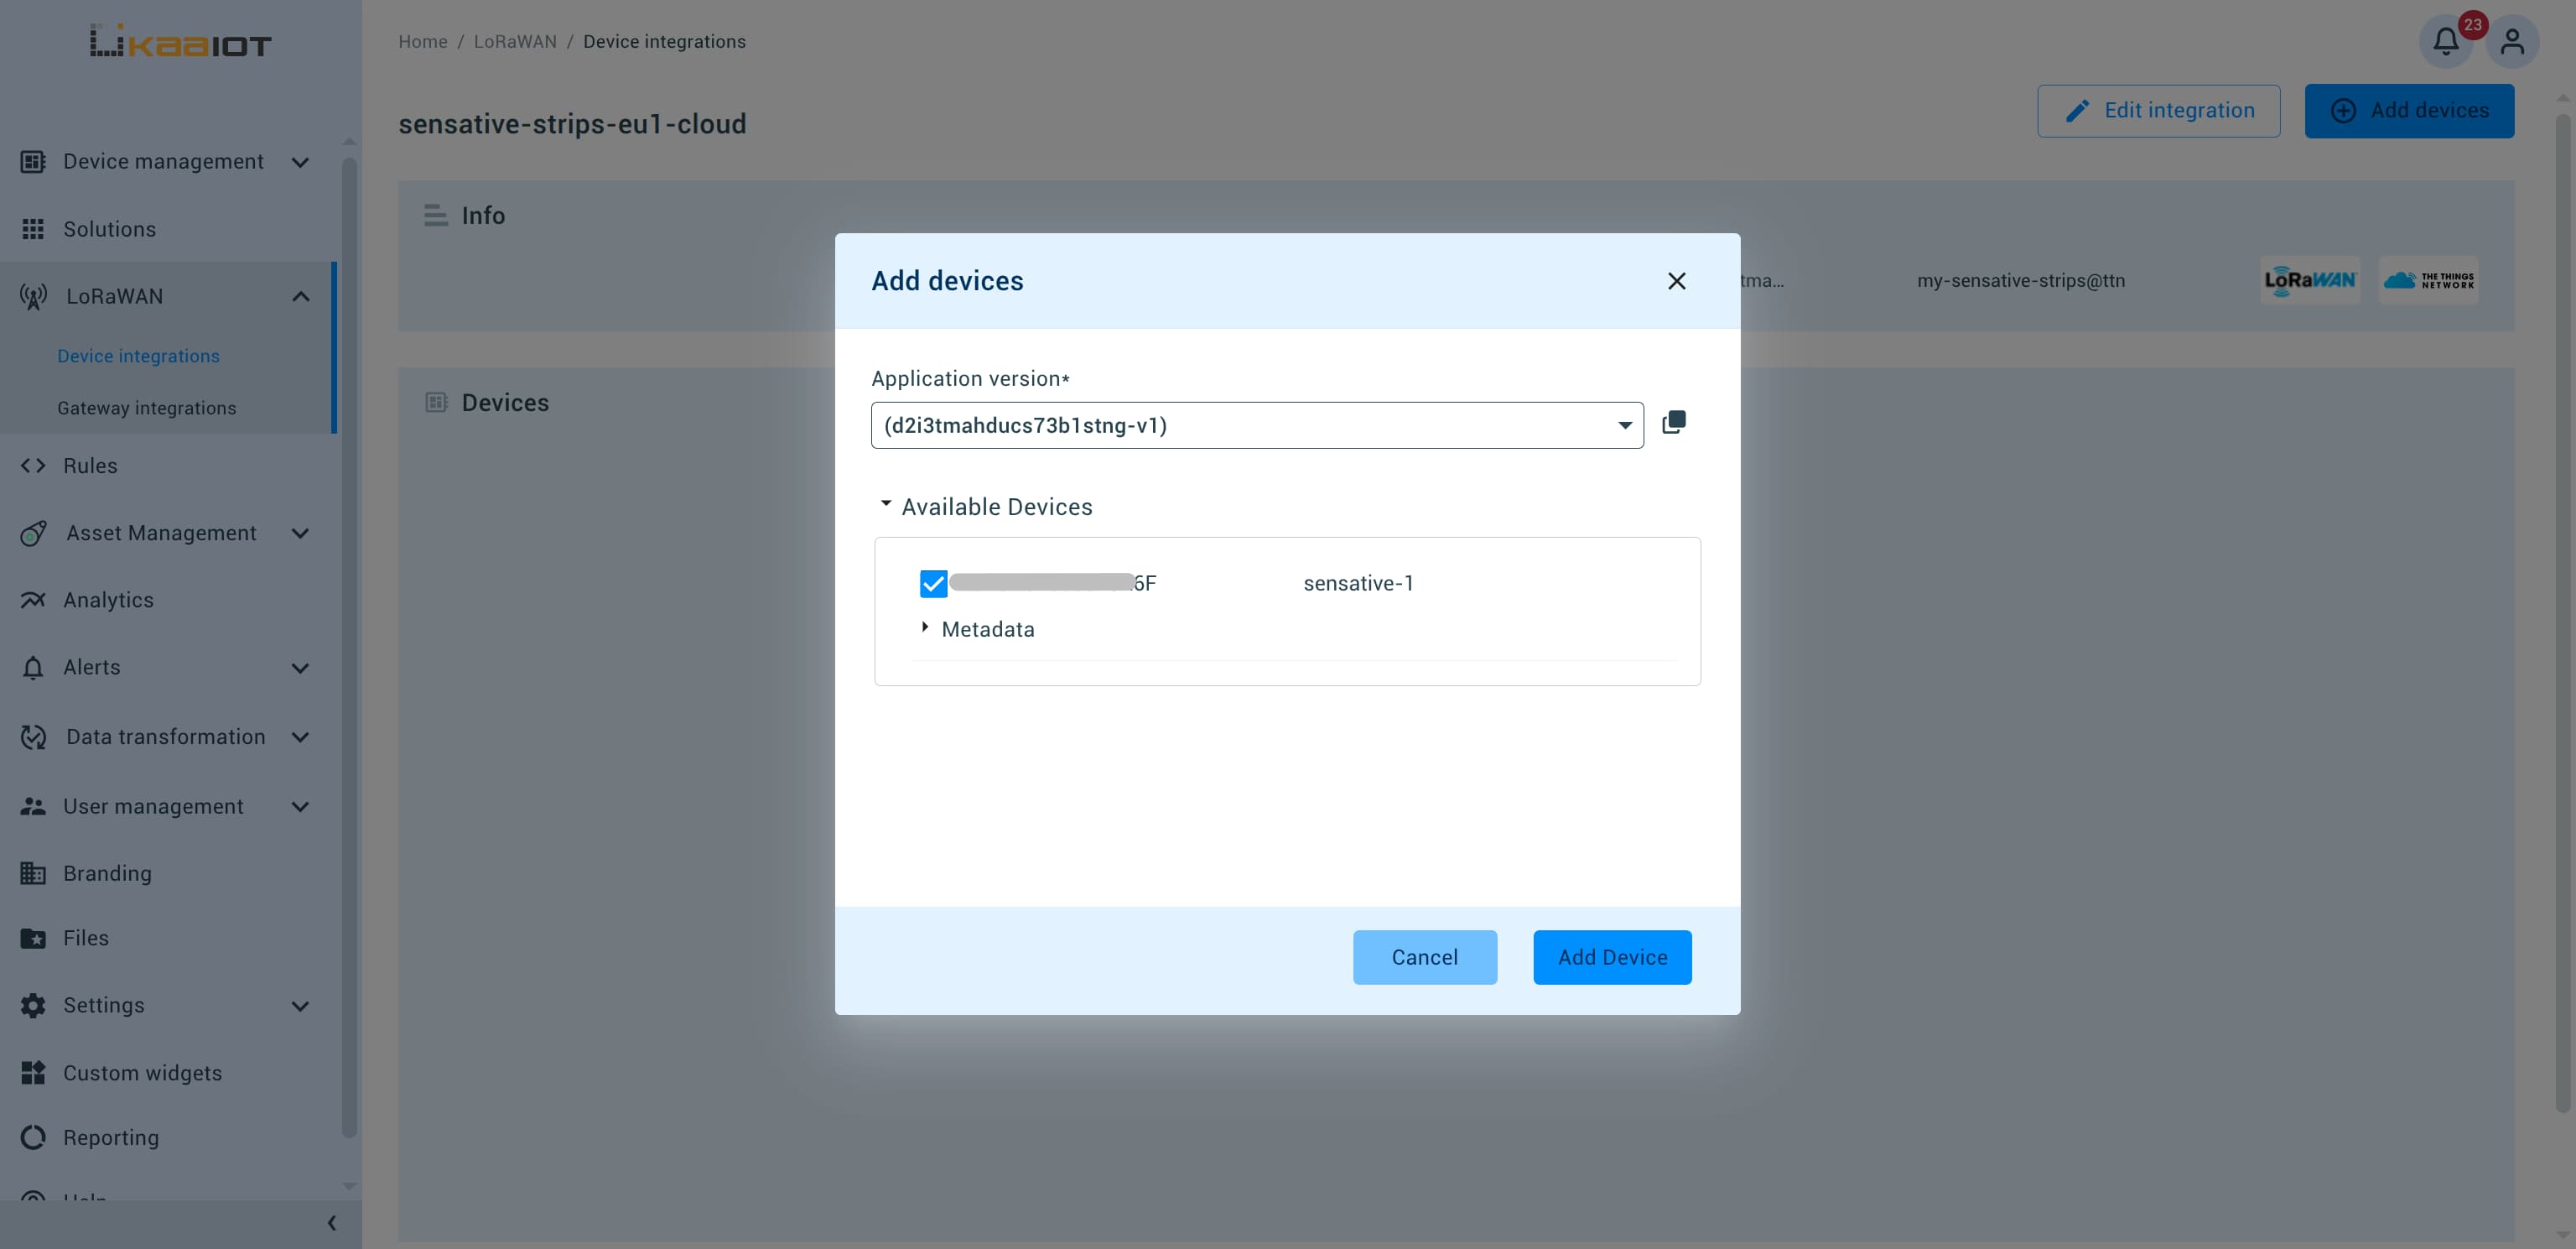
- Click on the newly created application integration.
- Click Add a new device.
- In the popup menu, select the default application version and the device you’ve connected.
You can identify it by theDEV_EUIyou entered during TTN registration.
-
View Your Device
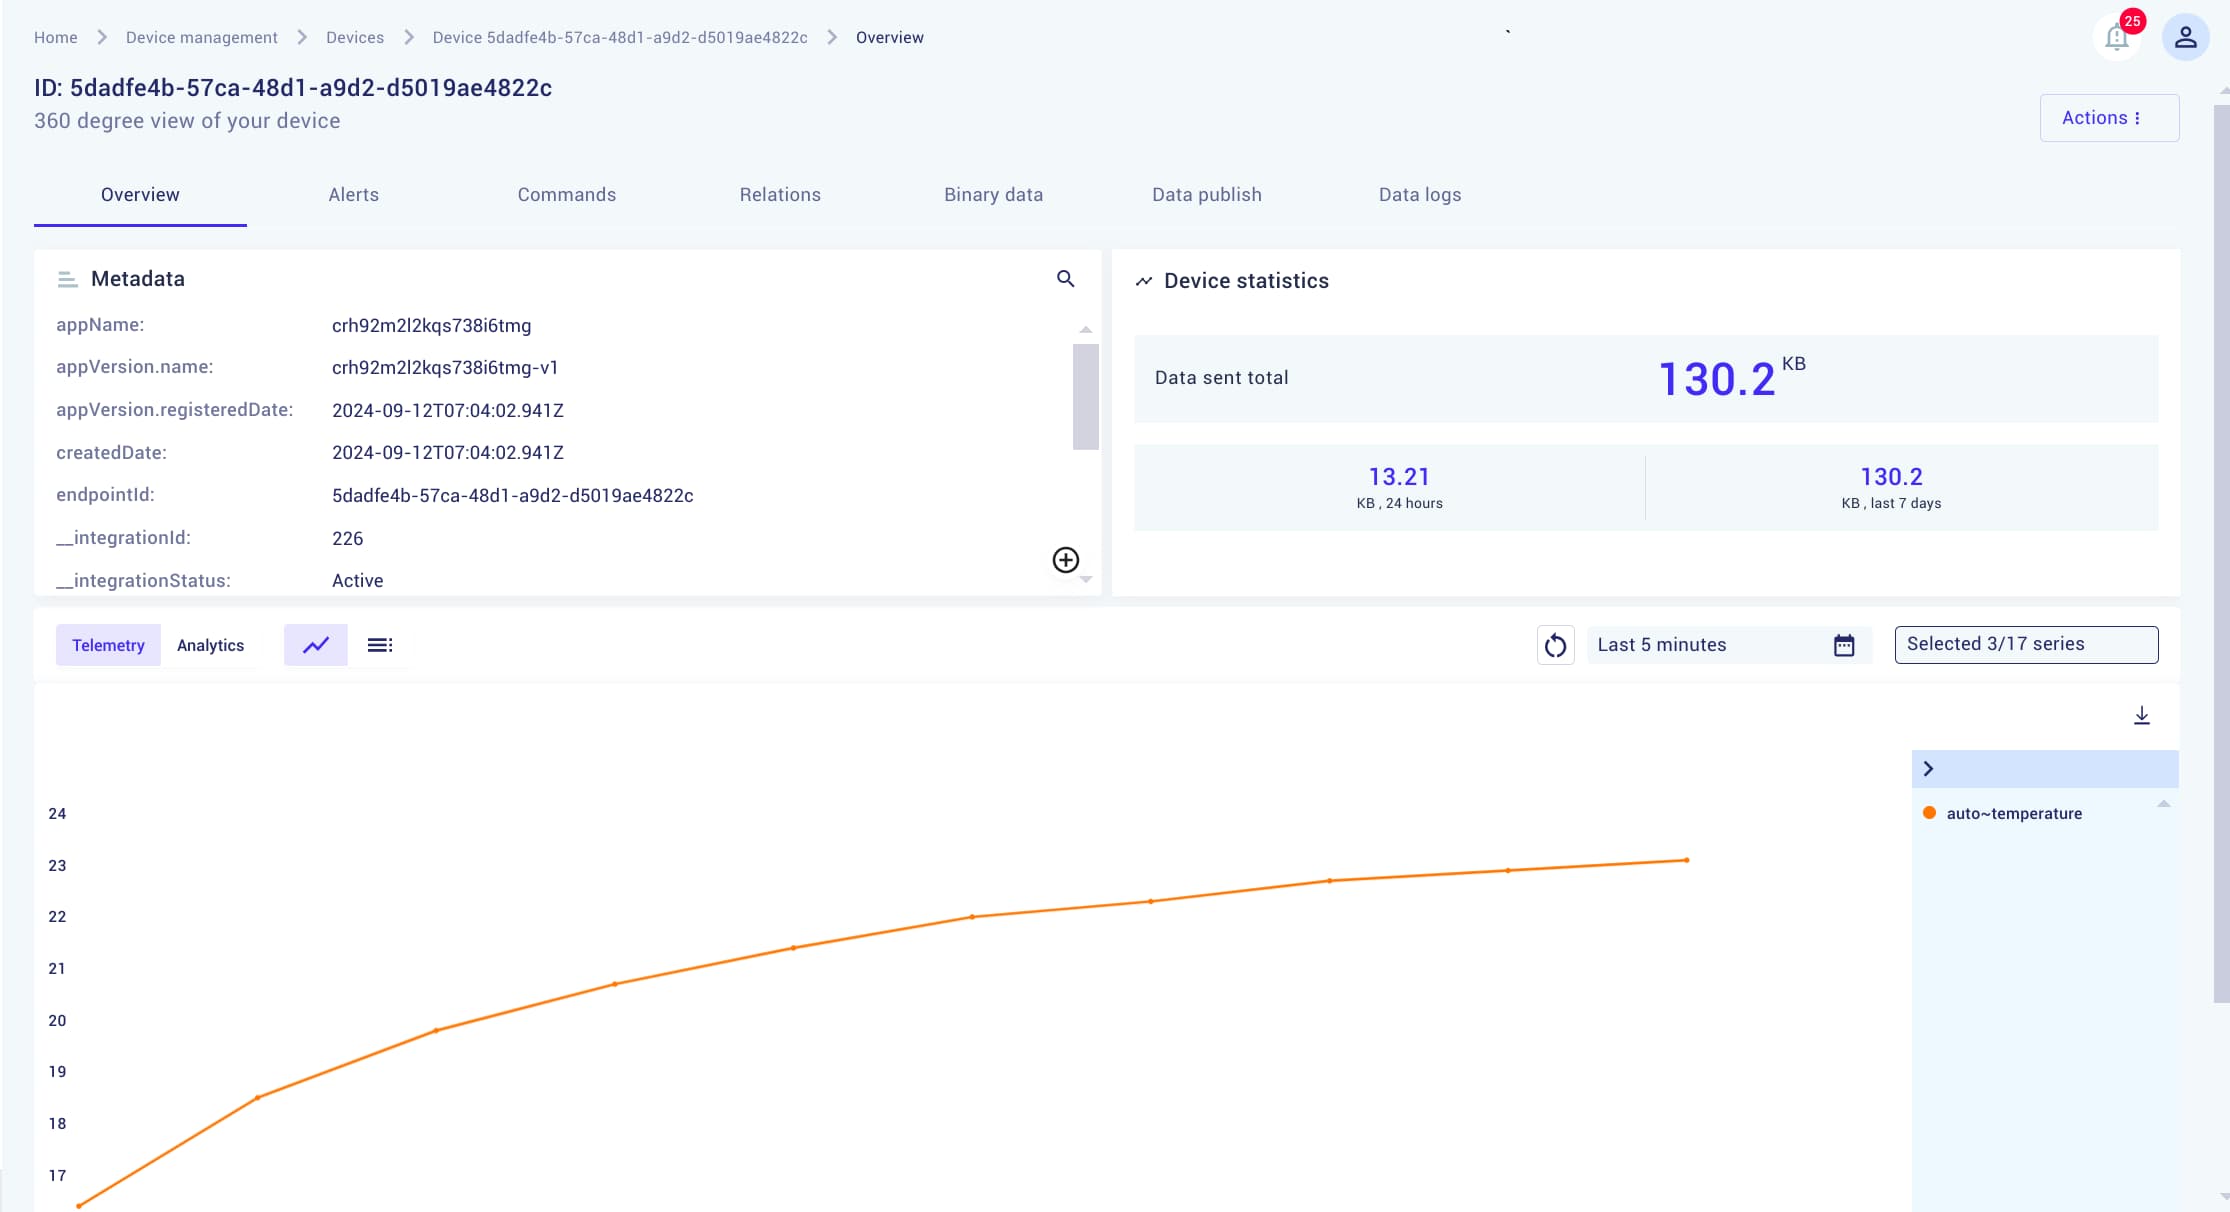
Open the Devices tab to view your registered device, monitor payloads, and access real-time graphs.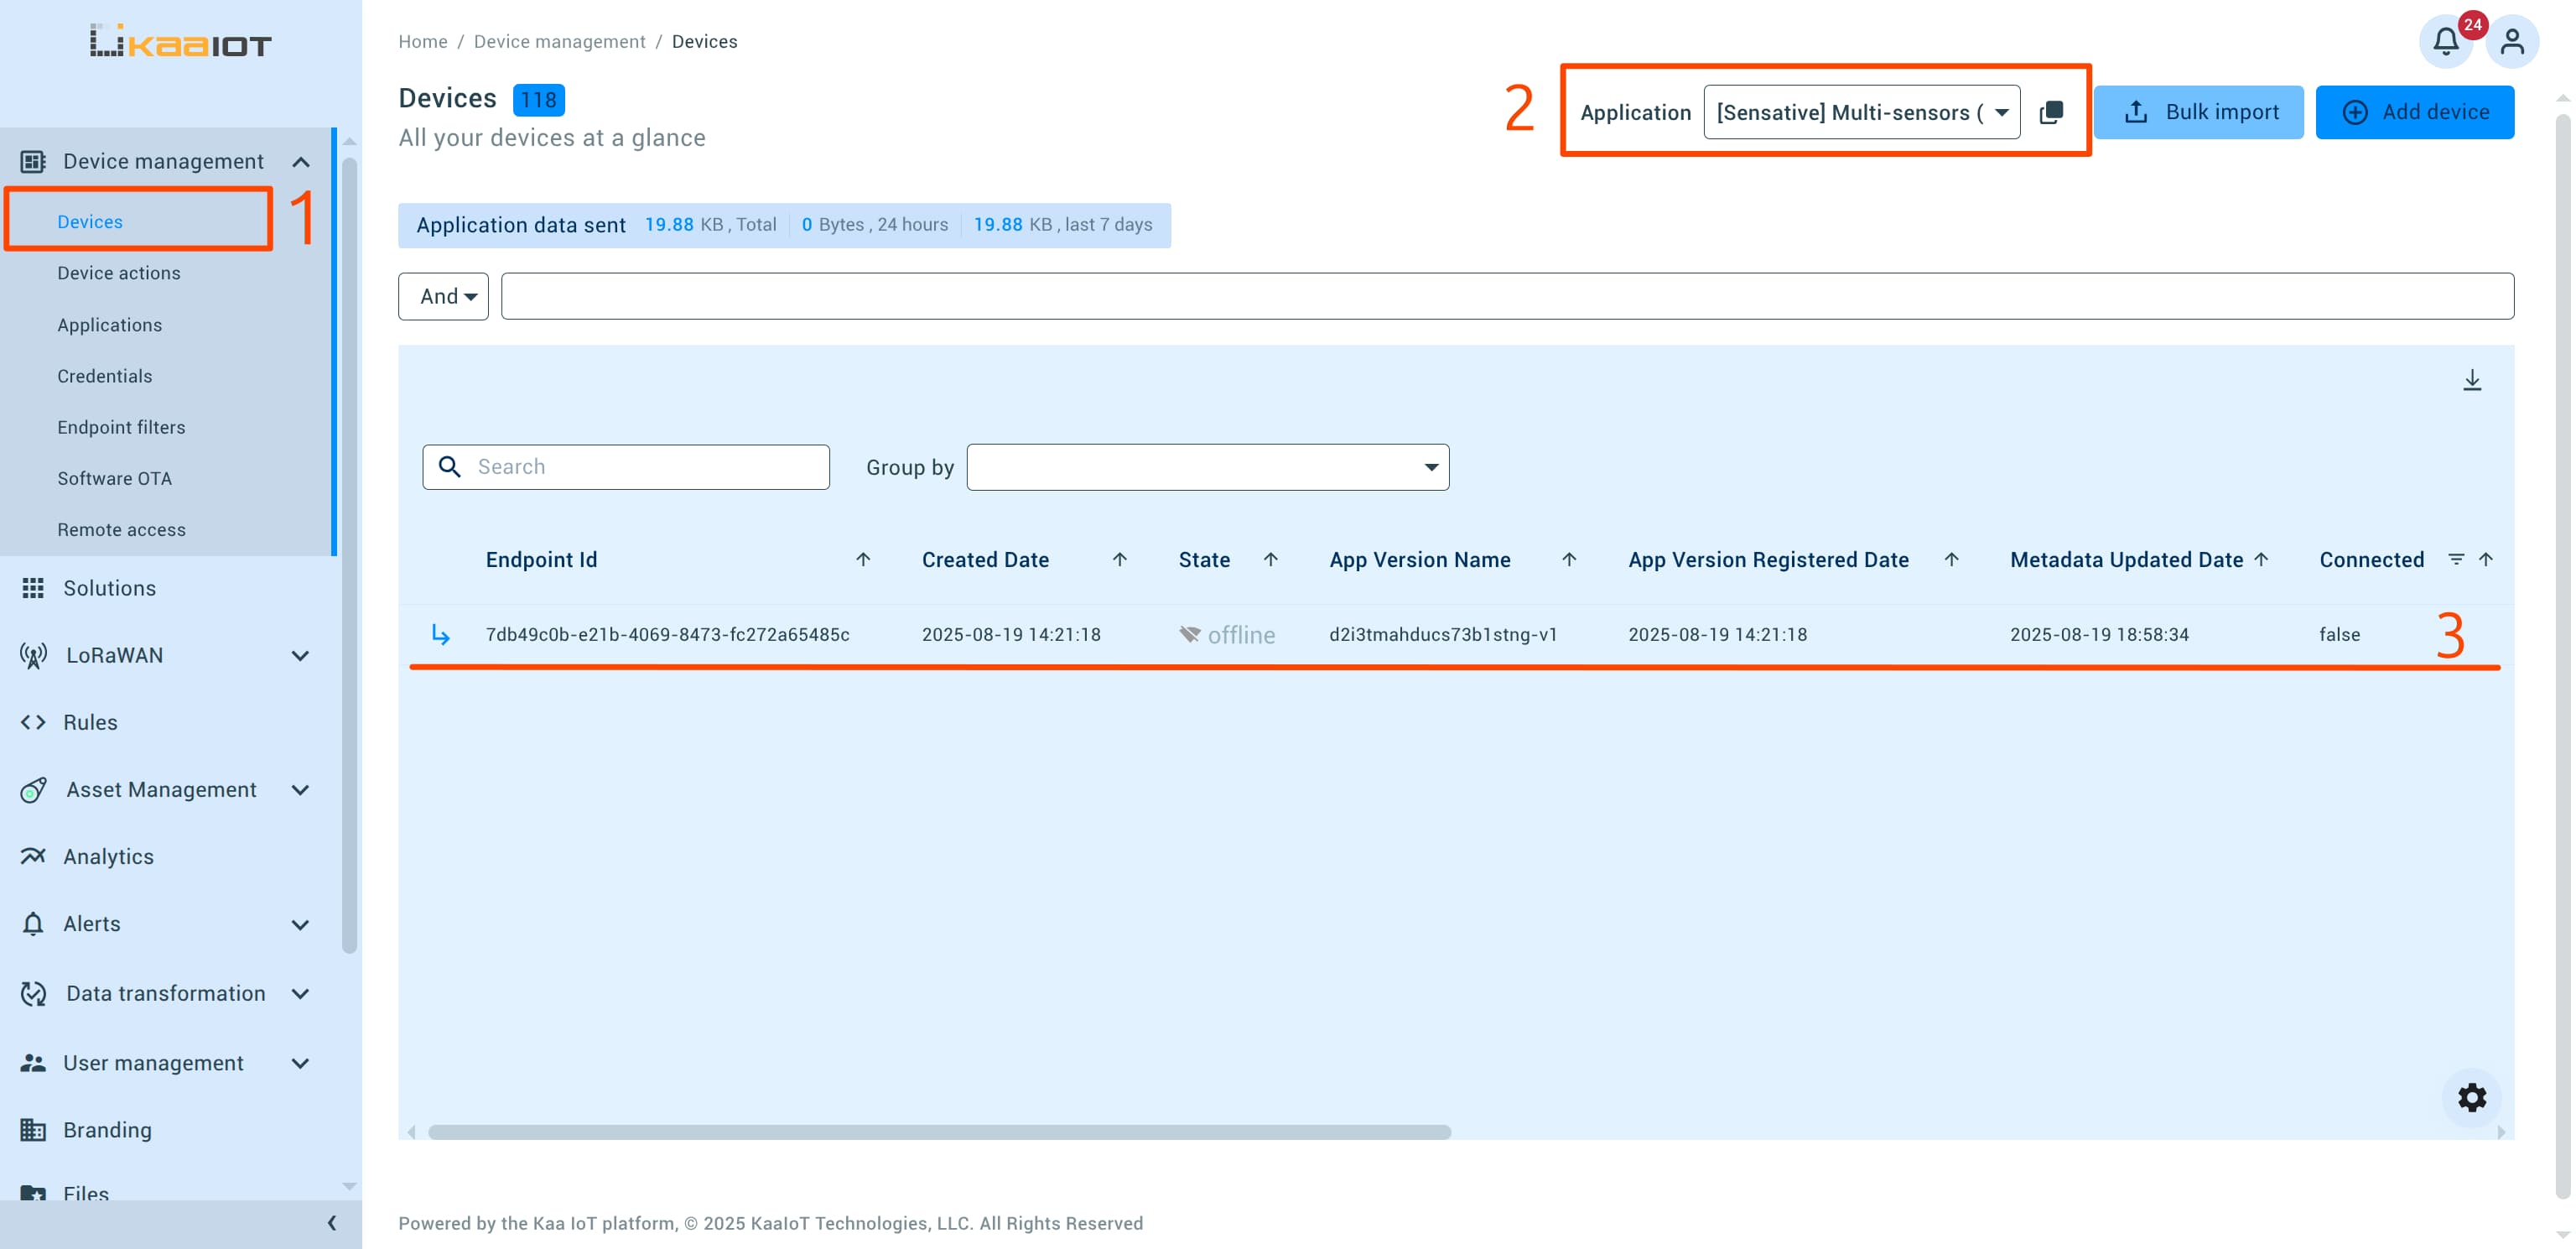
This completes the integration of your TTN device with the Kaa Platform.
Fix the Payload (Optional)
Often, data is nested several levels deep within objects.
Since different devices send varying payload formats, Kaa provides tools to handle this complexity.
We can use the Rule Engine to parse and transform the payload into a more manageable format.
Note: While you can modify payload formatting on the TTN side, it’s often better to keep the original formatter code intact and perform transformations within Kaa.
To keep things simple, we’ll create a rule that parses incoming data for every device in the application whenever data is received. Follow these steps:
-
Navigate to the Rules tab on the sidebar and create a new rule.
-
Create an Endpoint data sample updated trigger.
This trigger will activate the rule whenever any device in the Kaa application receives new data. Leave the endpoint field empty to apply the rule to all devices.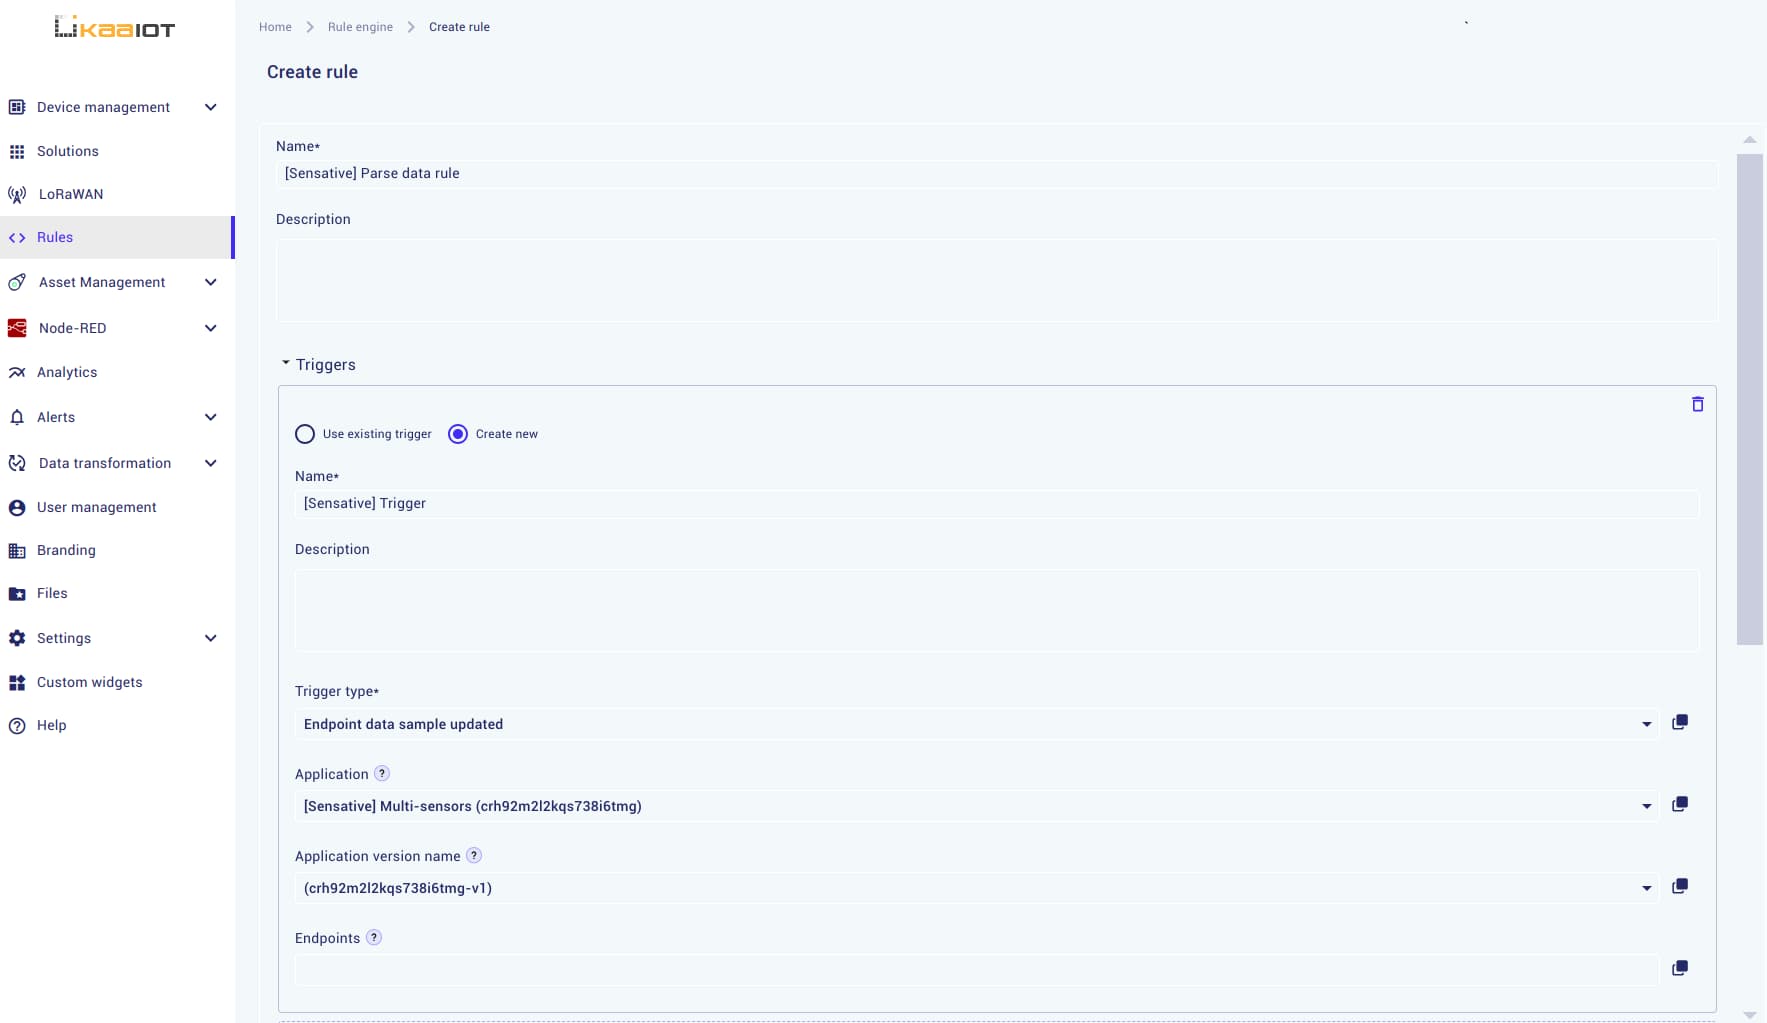
-
Create a condition: Since we don’t need a specific condition to parse data, set the condition to
return true.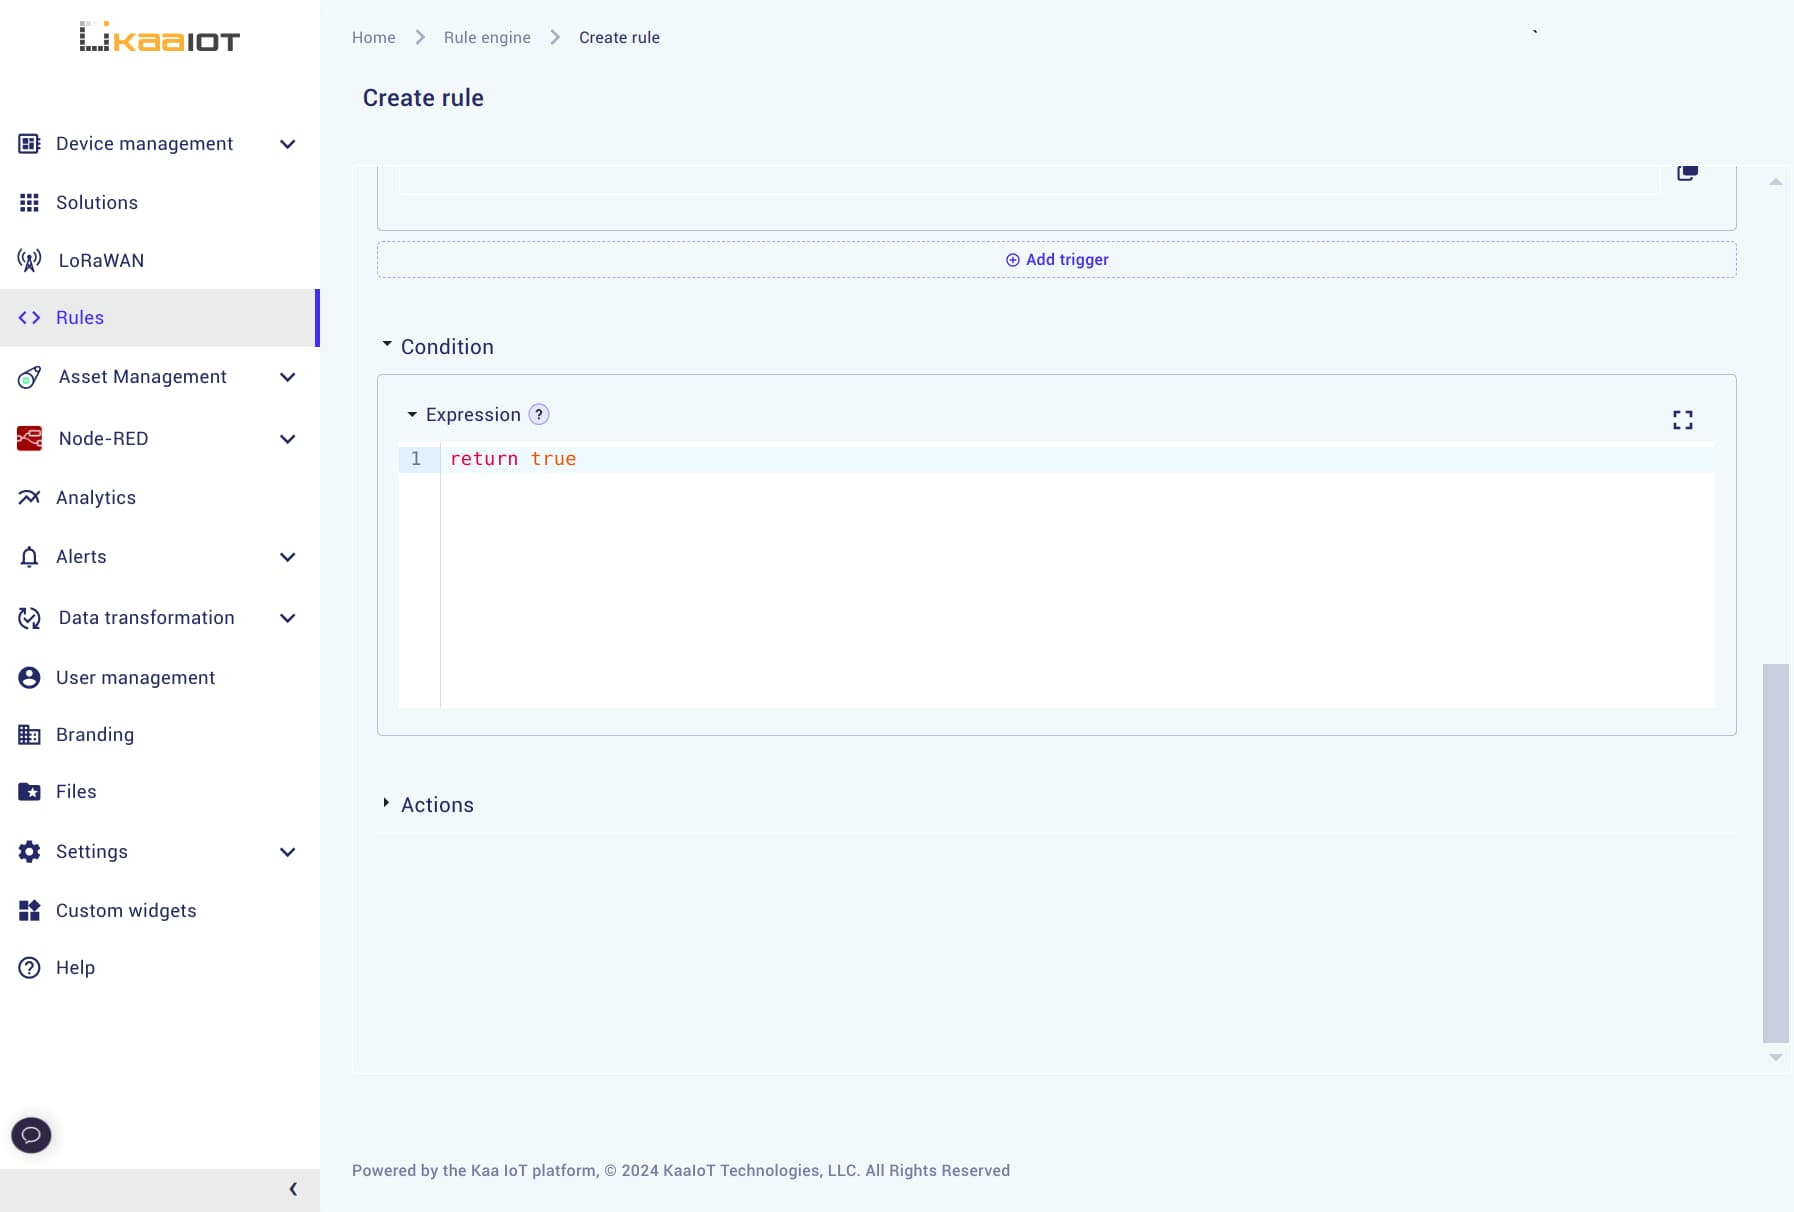
-
Create an action: Finally, define the action that will parse the data. This action will unpack nested values one level deep. Use the following code:
 // Transform the data
 const transformObject = obj => {
   const result = {};
   for (const key in obj) {
       result[key] = obj[key]?.value || obj[key]
   }
   return result;
 };

 // Extract the data samples object
 const dataSamplesArray = ctx.trigger.endpointDataSamplesReceived.dataSamples;
 const dataSamples = dataSamplesArray[1];

 // Apply transformation
 const transformedData = [transformObject(dataSamples)];
 return transformedData;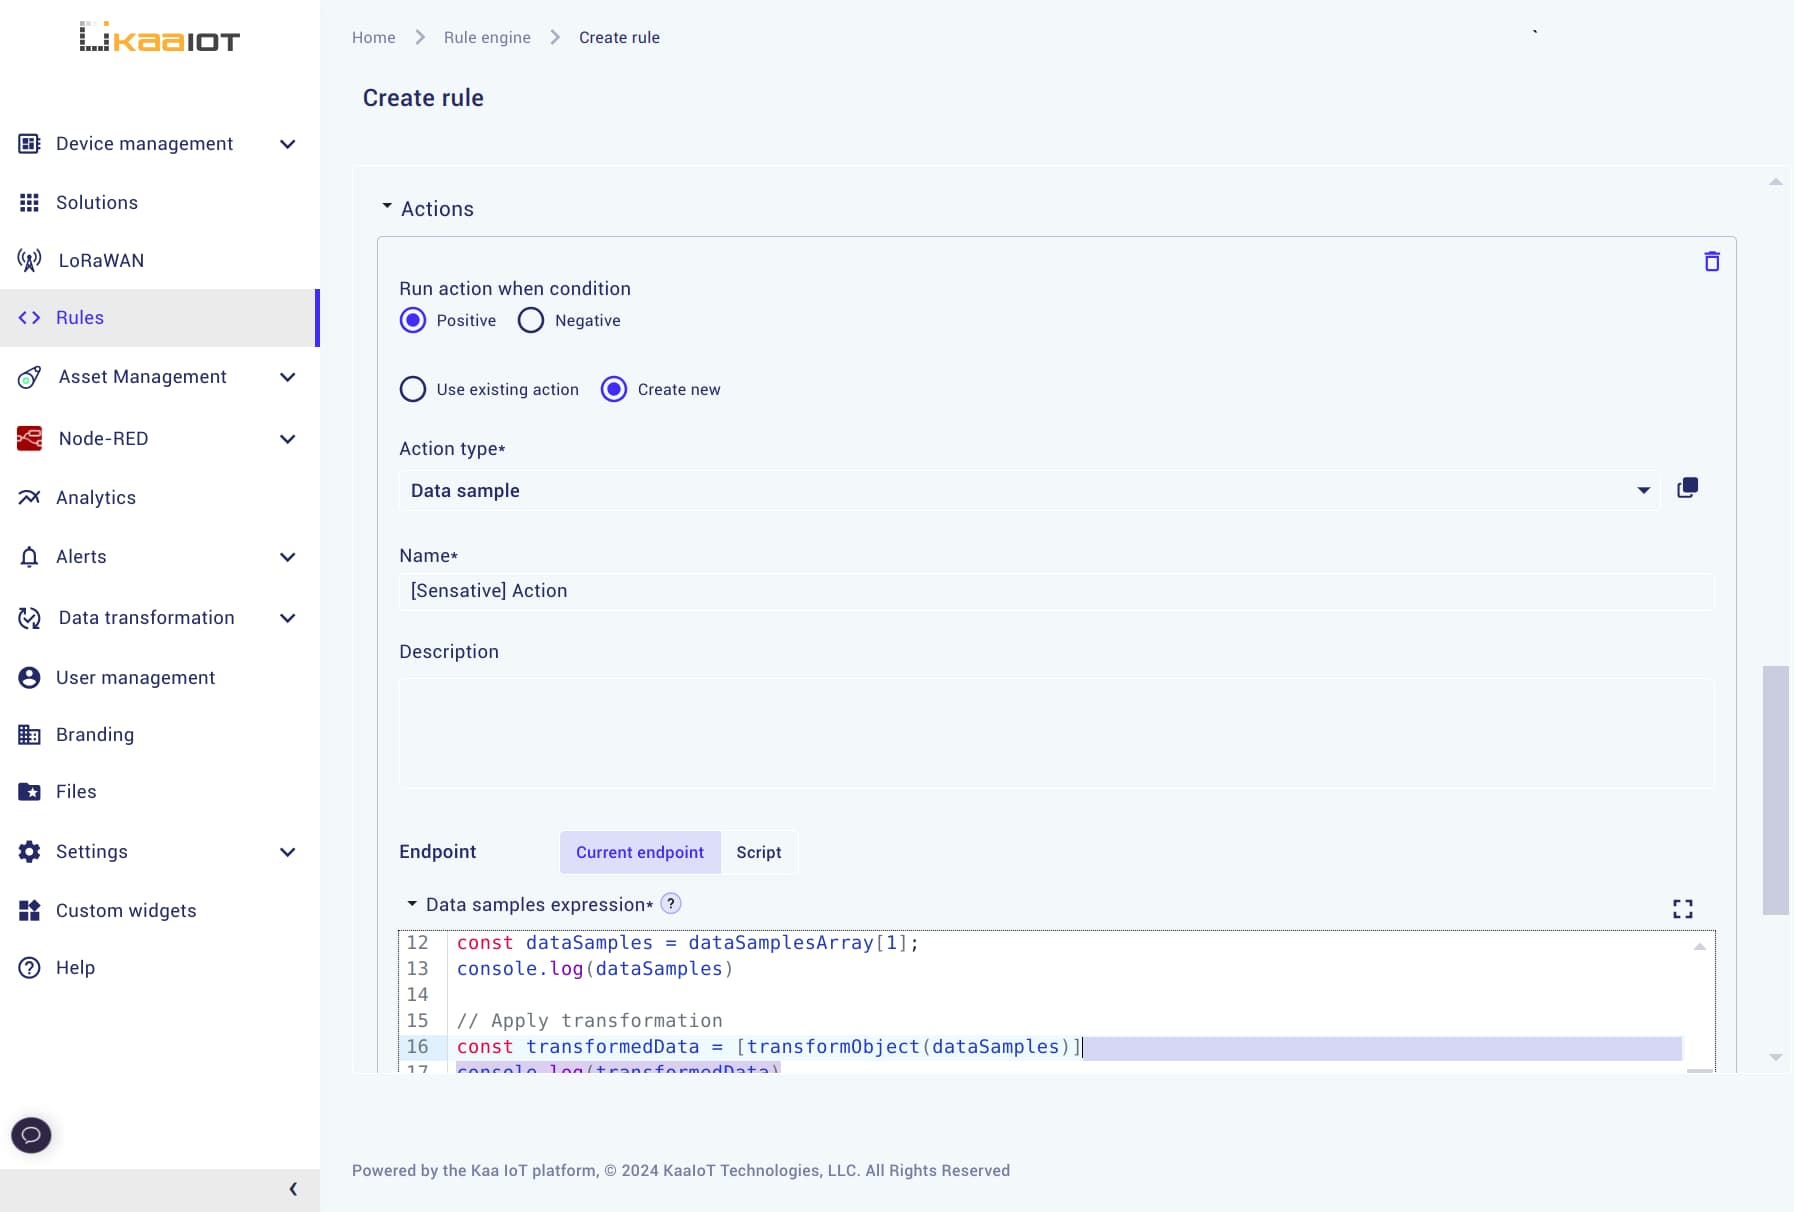
-
Final step: Create the rule, then return to your device page to verify that additional values are now displayed.
