Vega Widget: Engineer-Guided Kaa IoT Tutorial for Advanced Dashboards
Welcome to the ultimate guide to revolutionizing your dashboards using the powerful capabilities of Kaa Cloud's Vega widgets! We'll delve into the seamless integration of Vega grammar into KaaIoT dashboards, unleashing the full power of Vega combined with devices, alerts, and analytics datasets. This guide will walk you through every step of adding a Vega widget, transforming your data from raw numbers into stunning visual stories.
In this tutorial, our seasoned engineer will be your guide, leading you through a comprehensive, step-by-step journey to unlock the true potential of the Vega widgets. Get ready to elevate your data visualization game and unleash unparalleled insights from your datasets.
No data visualization expertise? No worries! Our seasoned engineer will be your personal guide, demystifying Vega grammar and empowering you to build compelling dashboards that bring your data to life.
Ready to take your data visualization game to the next level? Let's dive in!
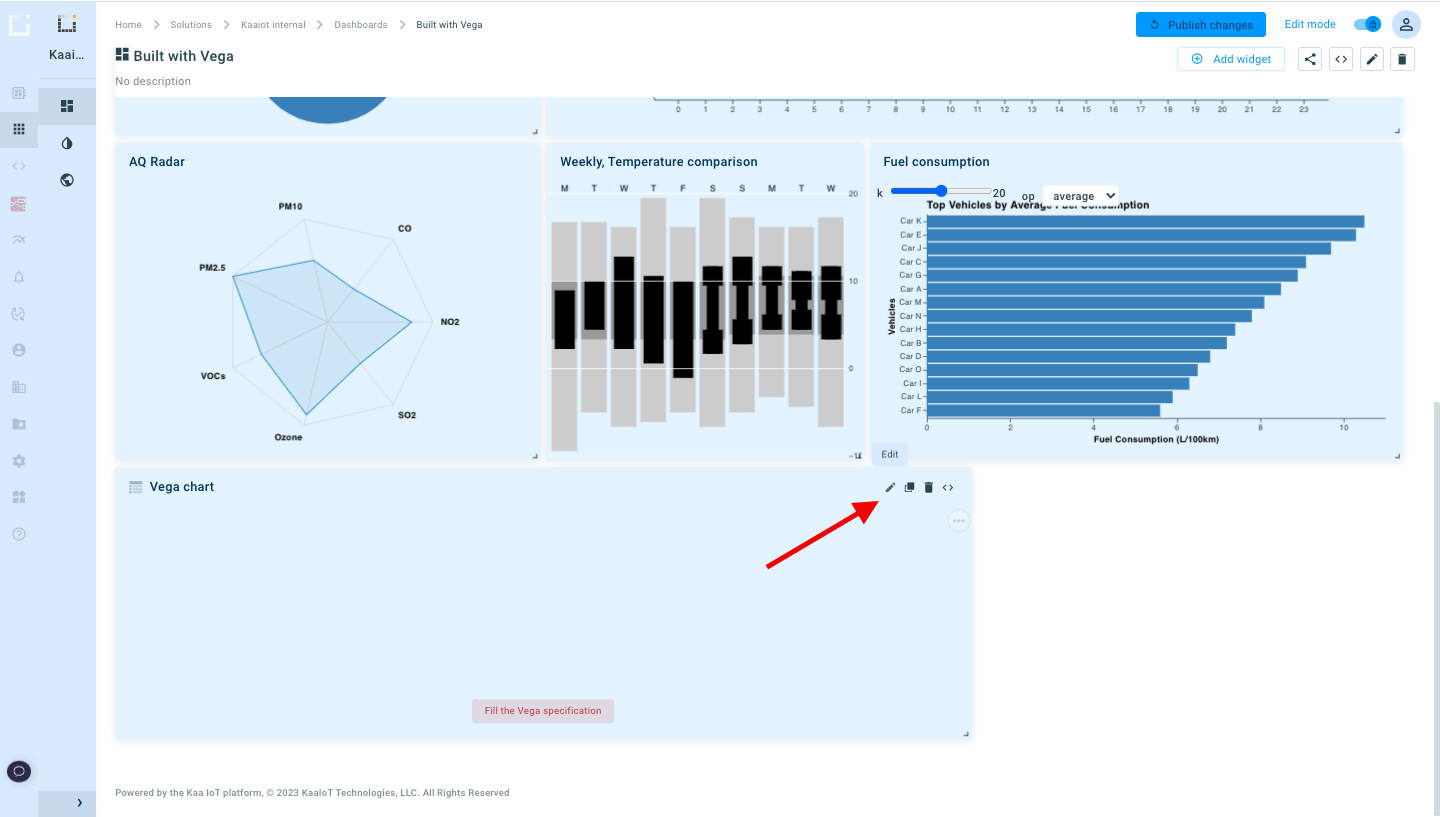
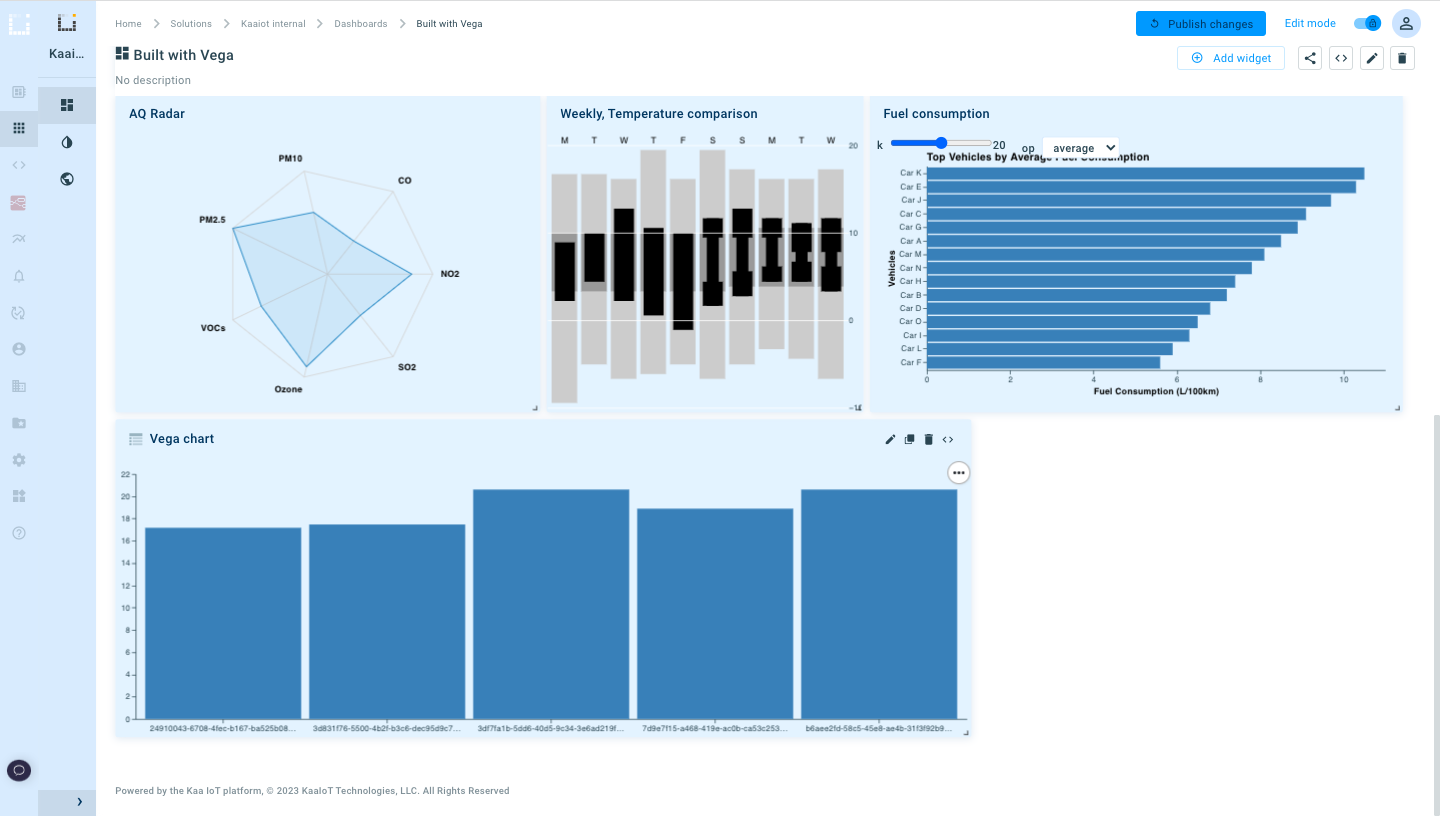
Adding Vega widget to Kaa Cloud dashboard
Let’s assume that we need a Bar Chart widget for visualizing the temperature from our devices in the Smart building solution. If you need guidance on creating an application or understanding the concepts of the Kaa IoT platform, detailed information can be found in the Connecting your first device tutorial.
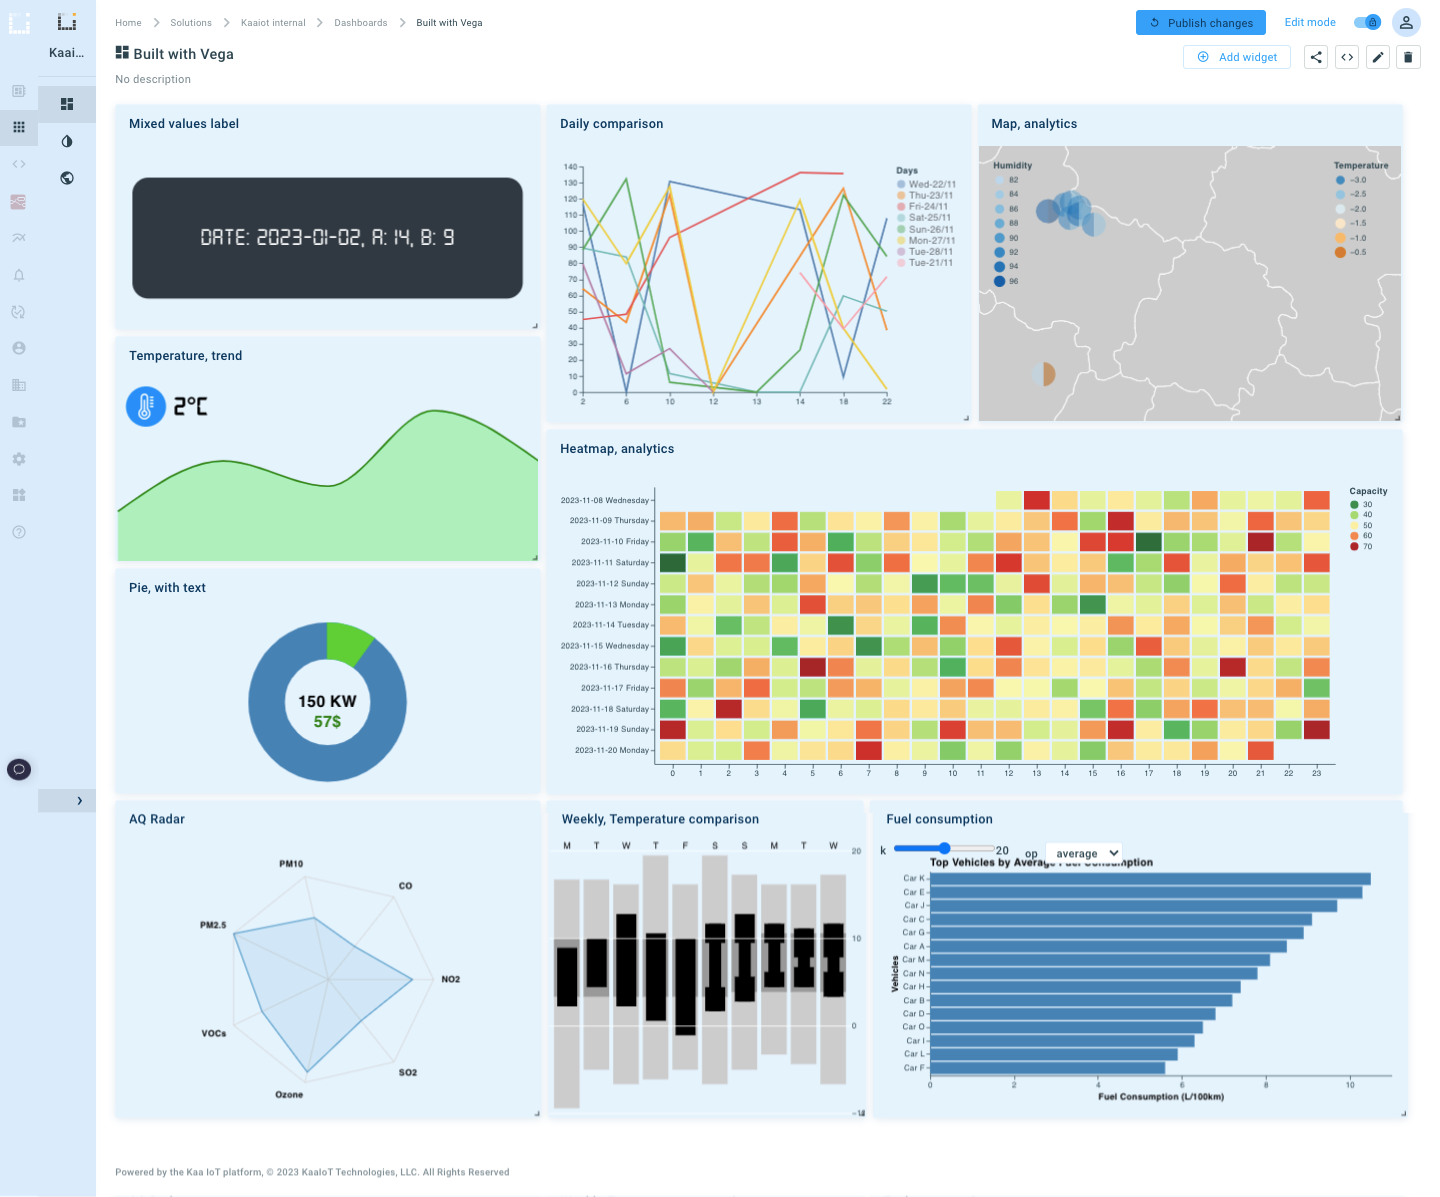
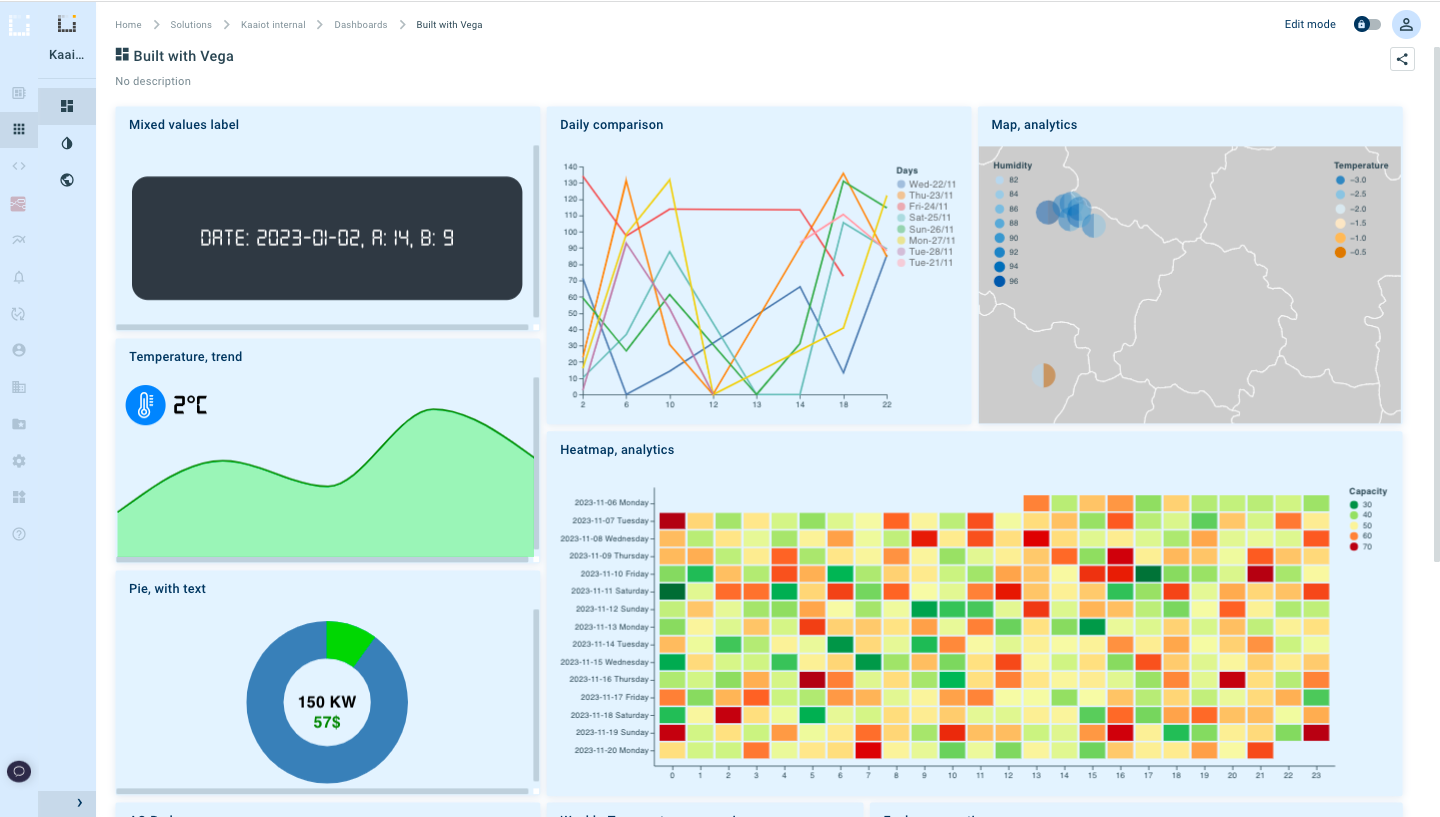
First of all, log in to the Kaa Cloud and go to your Dashboard.
Turn on the Edit mode and click “Add widget”.
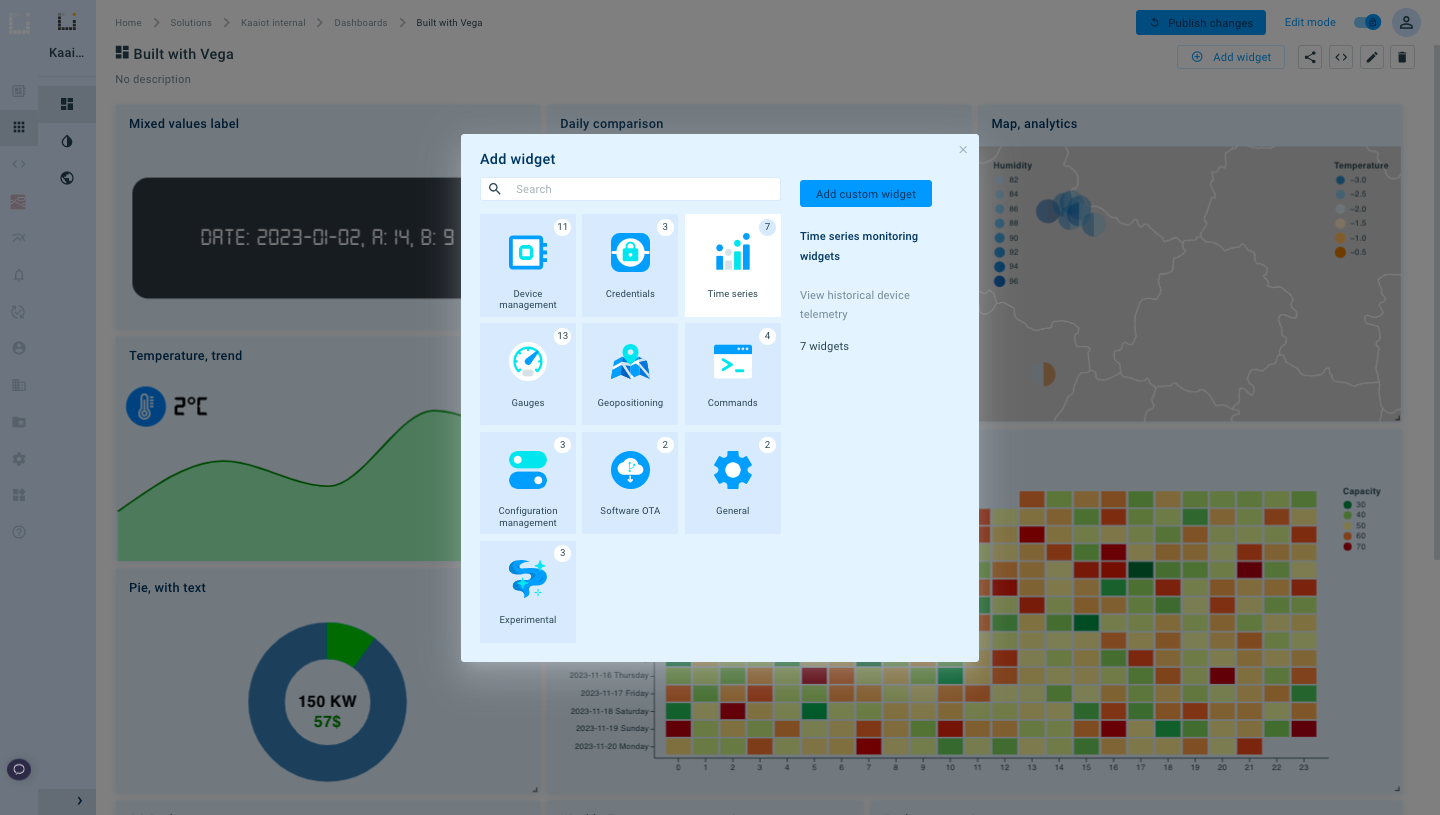
Let’s select the Vega Chart.
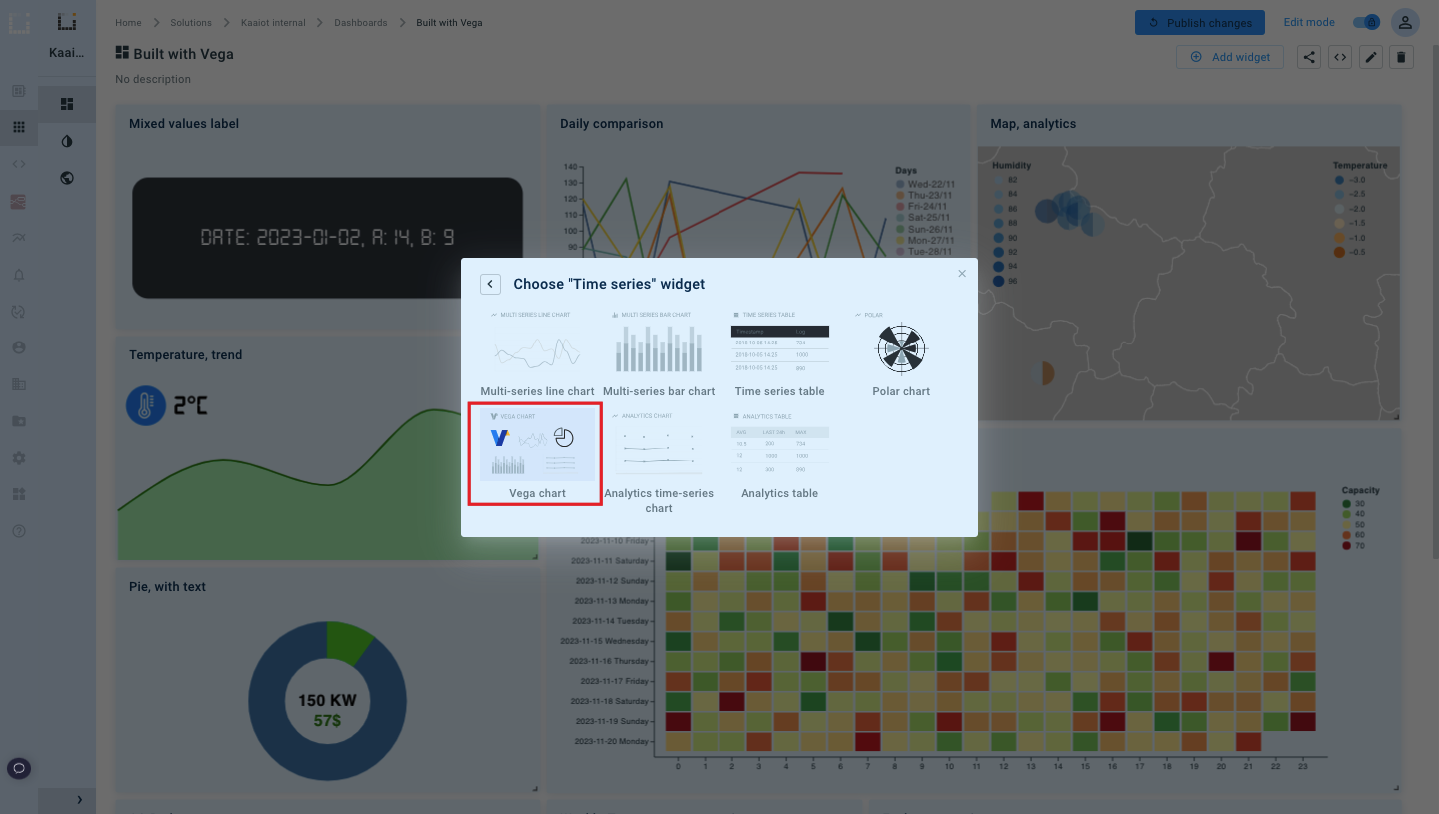
And we can see that our Vega Chart widget was created successfully.
It’s empty now, but don’t worry, it is pretty easy to use existing examples of the Vega chart and configure some visualization. Click the Edit button, and let’s move on.
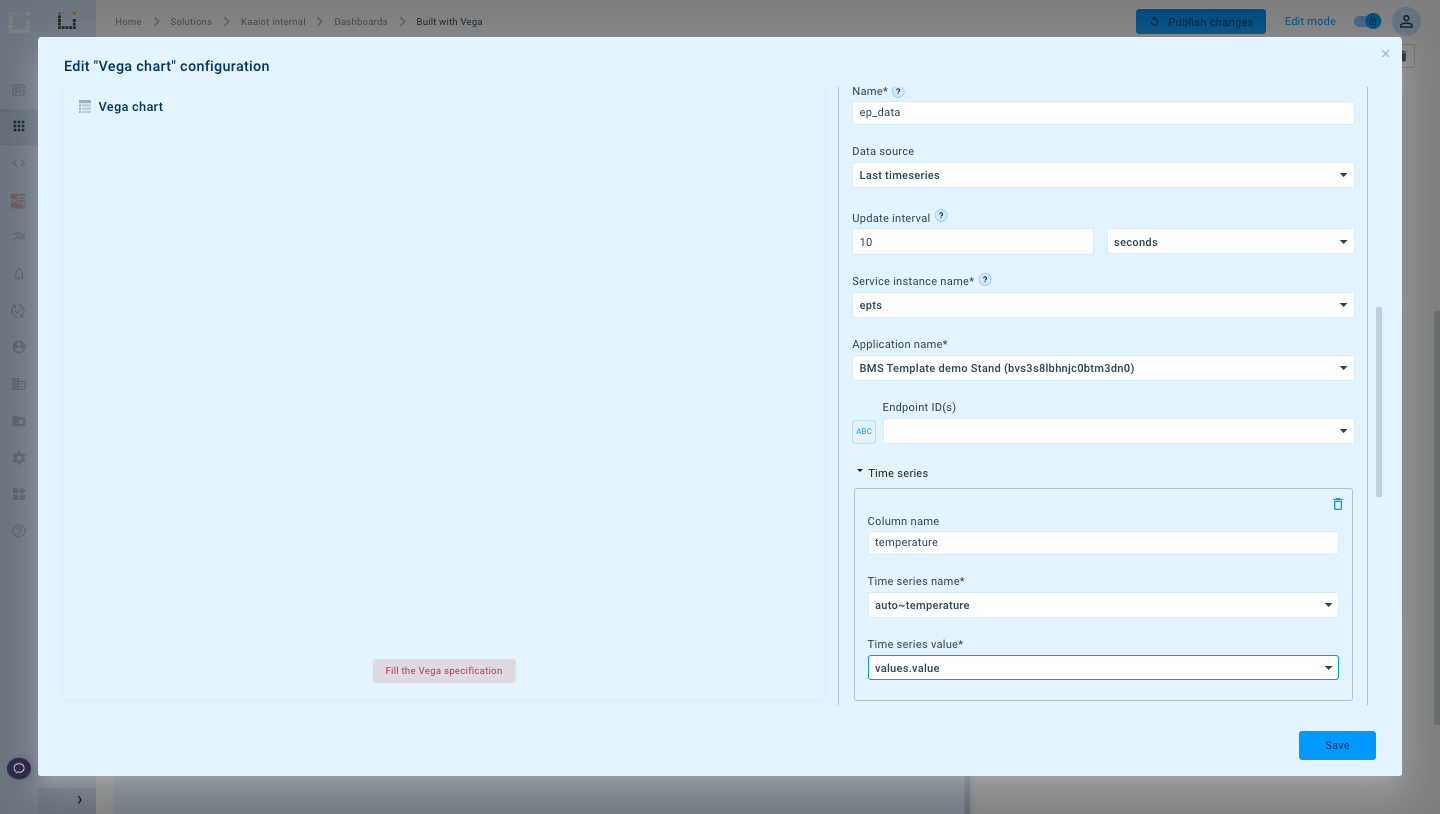
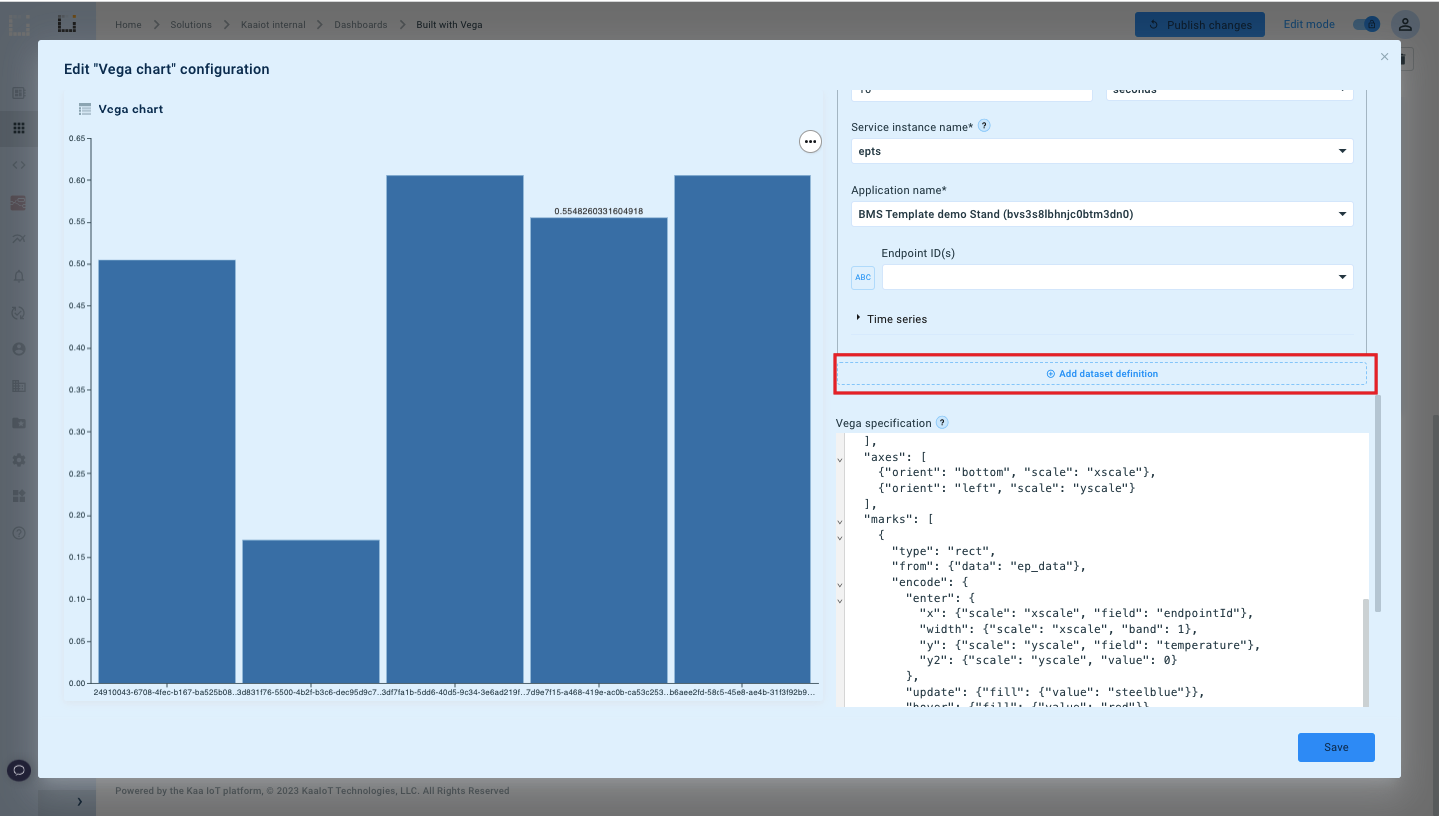
First of all, let’s decide what data will be shown. In our case, we will show the temperature from our devices. We provide several data sources to get the data which includes endpoints metadata, last time series data, analytics data, and alerts.
Let’s add a Dataset.
- Enter Name
- Select Data source (in our example, we selected the Last timeseries data source, this will return all our endpoints within the application with the last time series values)
- Select your Application
- Specify the Time series:
- Column name
- Map it to the name in the Time series name field
- Map it to the value in the Time series value field
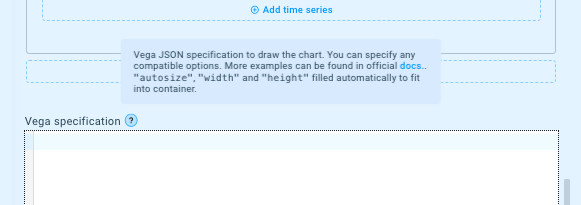
The next step is to fill in the Vega specification. Hovering on a tooltip, you can find the Example Gallery of Vega widgets, which include many different chart examples along with ready-to-go specifications.
Let’s select one. In our case, we will select a Bar Chart to visualize the temperature at each endpoint.
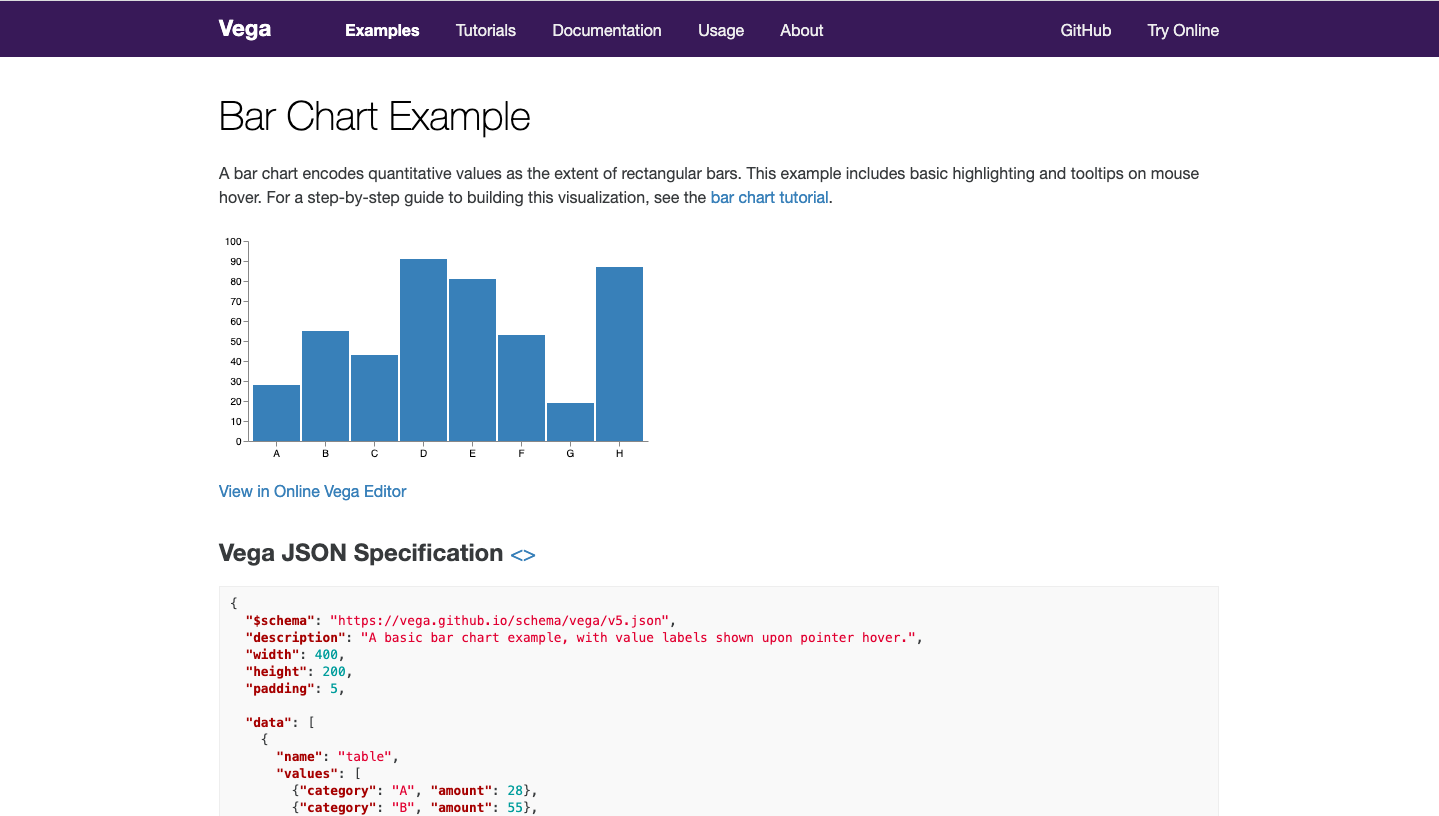
The next step is to just copy the Vega JSON Specification from the Template Gallery and paste it to the Vega specification field in Kaa Cloud.
Now we can see a Bar Chart, but is rendered as an example from the Vega Template Gallery. Let’s connect our Bar Chart to the Dataset. In our example, it’s called “ep_data”.
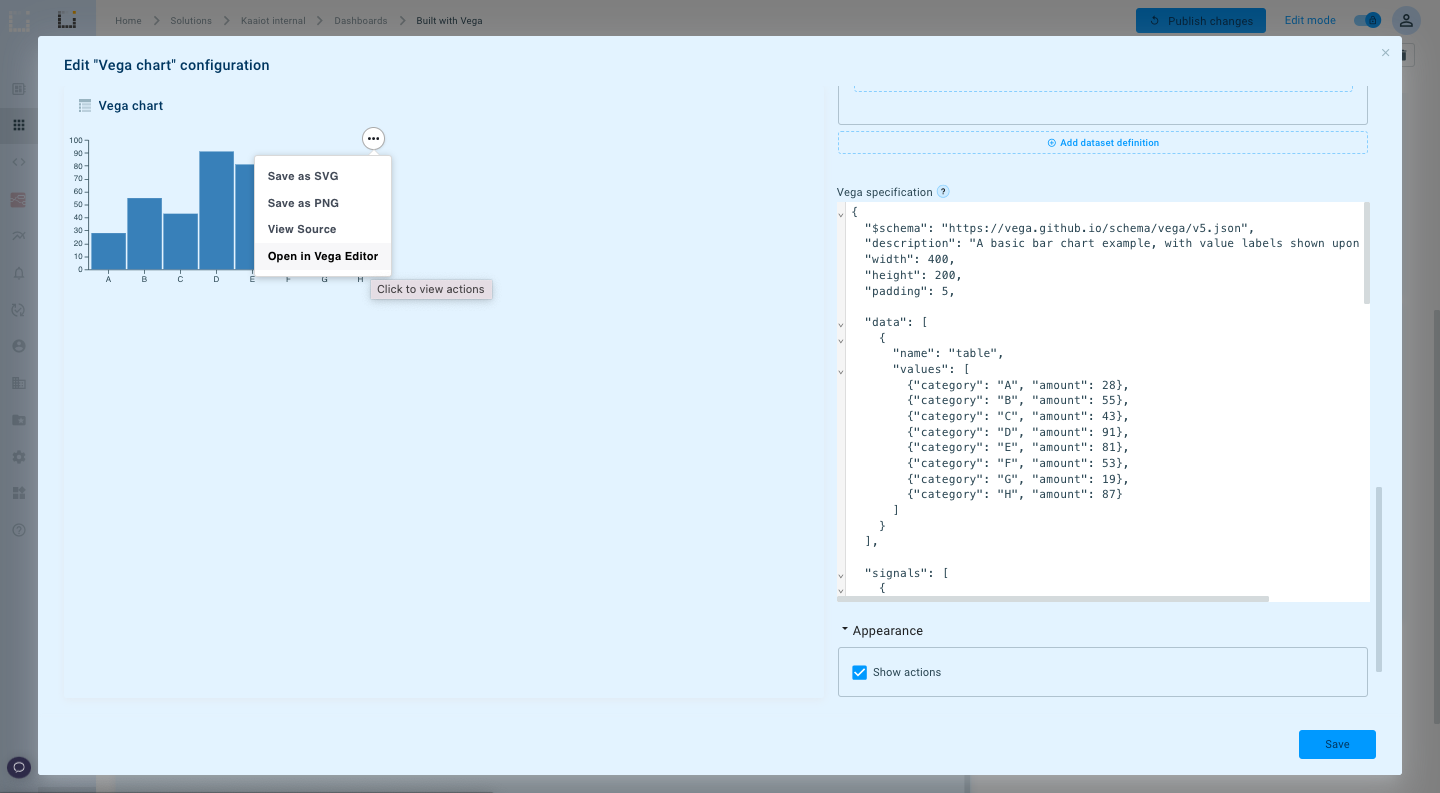
Specification updates using the online Vega editor
To quickly iterate on specification updates, we can open our specification in the online Vega editor. To do that, we need to tick on the “Show actions” checkbox under the Appearance section. Now, we can see the options icon on the top right corner of the chart example.
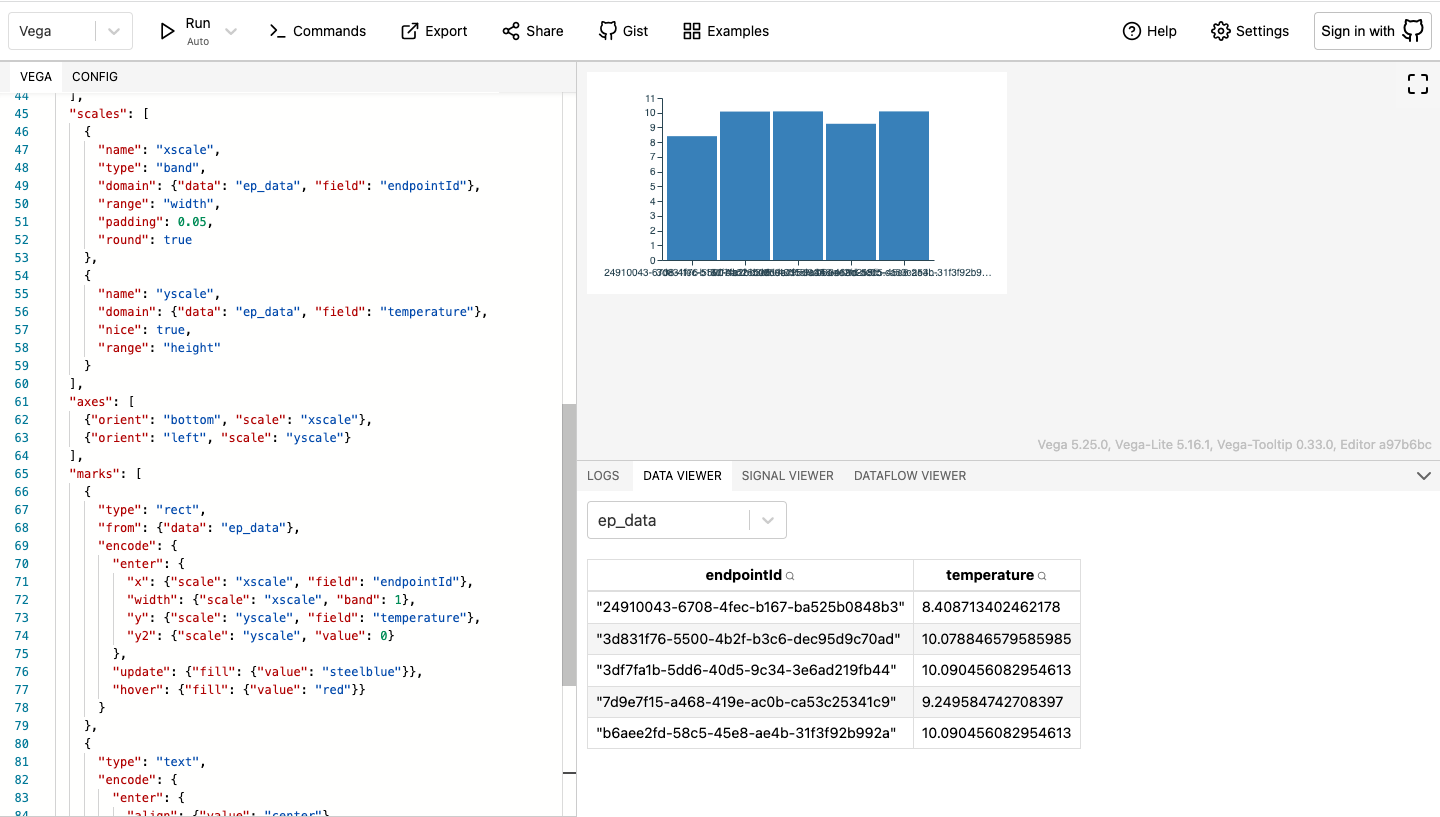
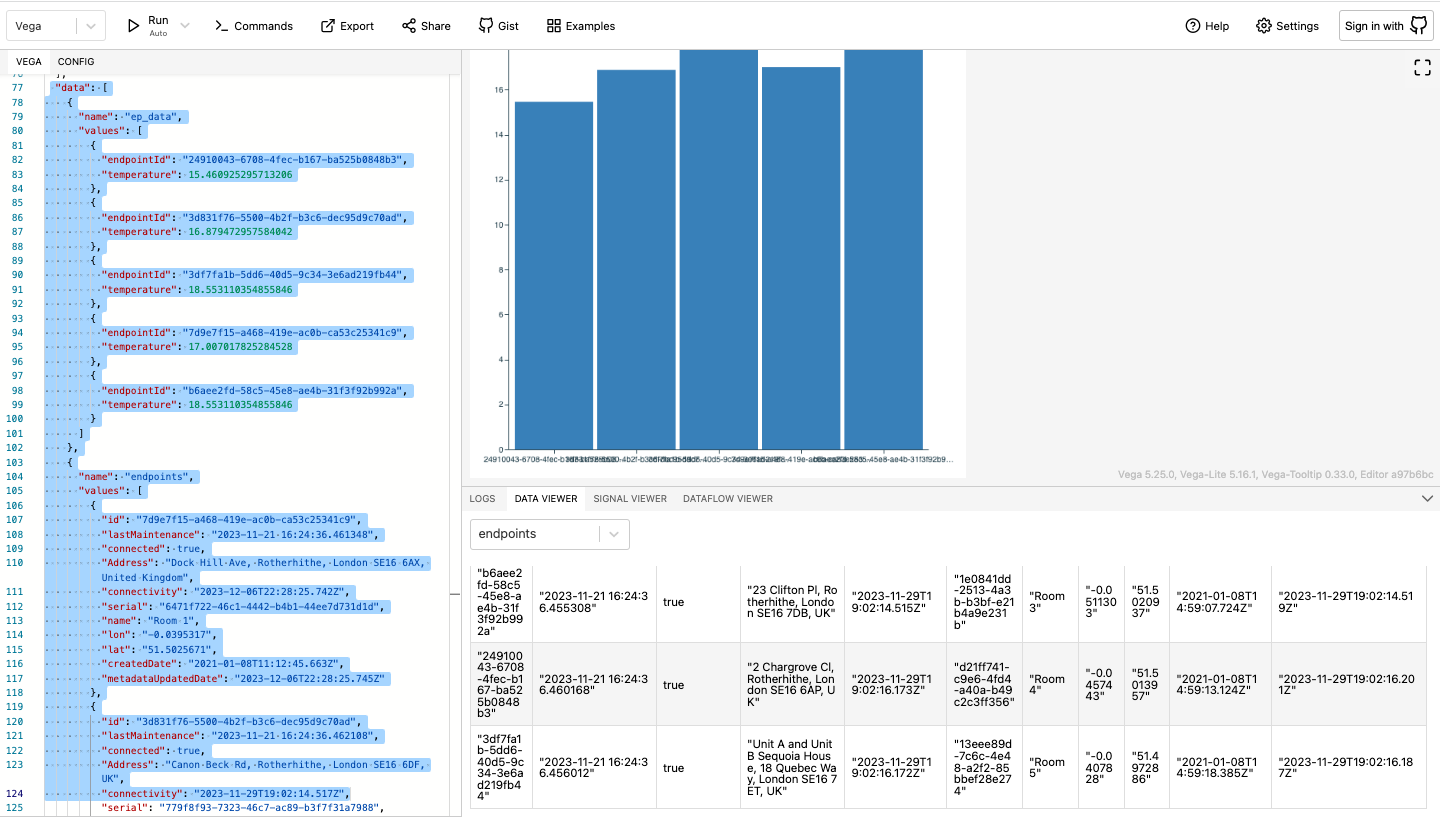
Let’s open the Vega Chart in Vega Editor, where we can see our data populated in the dataset called “ep_data”. The same name we specified in the widget configuration.
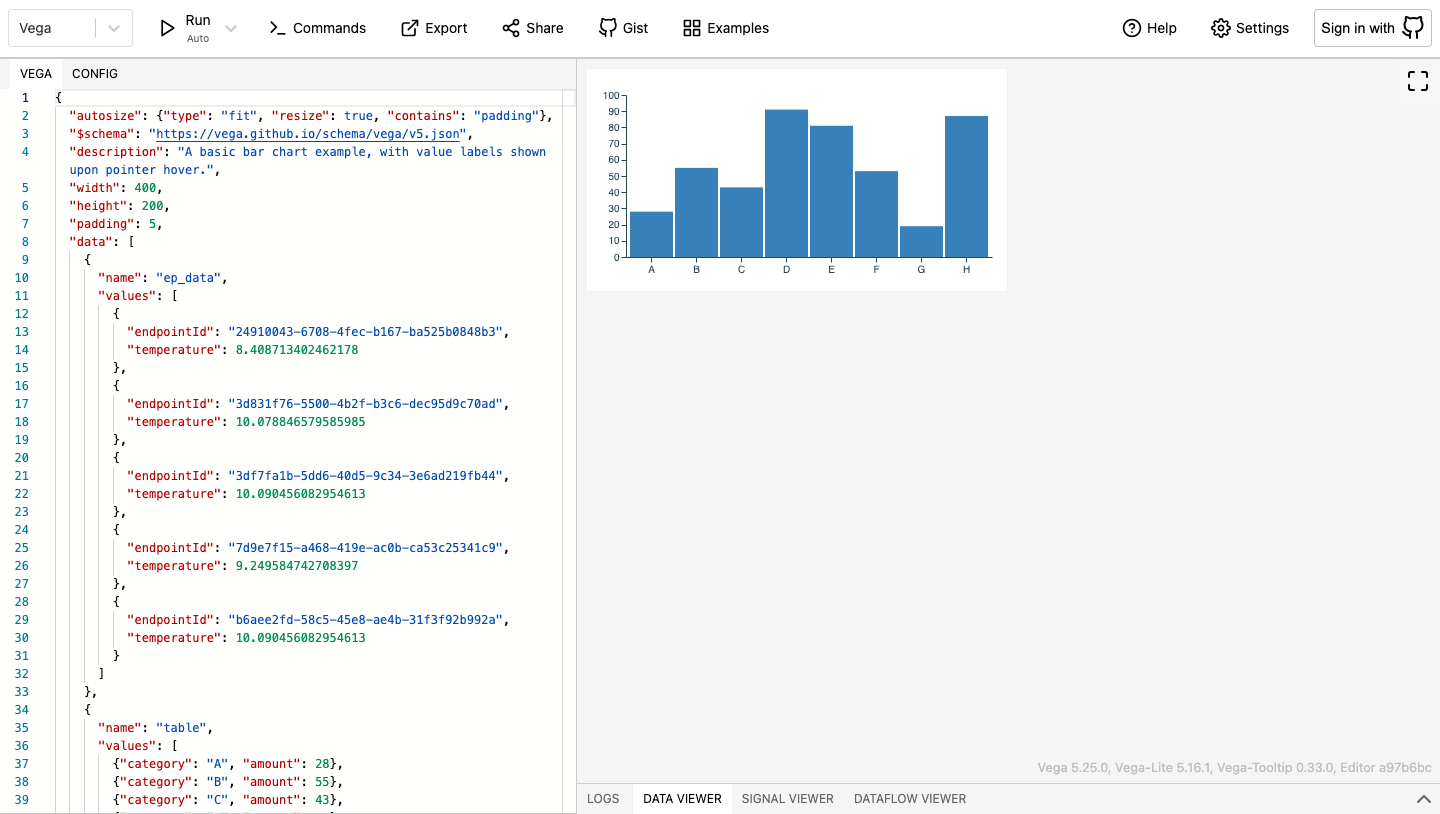
The basic example of the widget comes from the table below, we can just remove it.
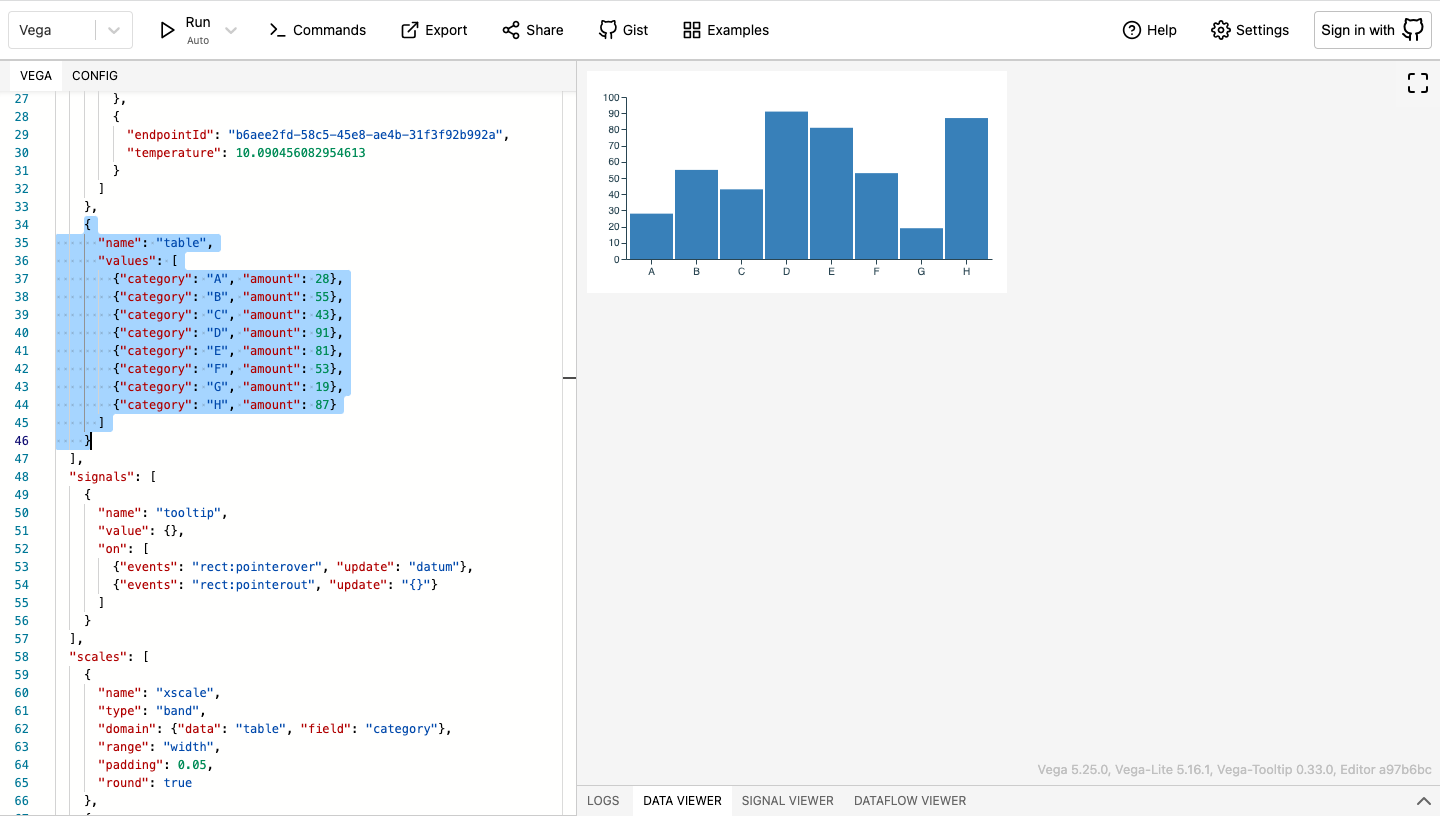
Let’s replace example values with values from our dataset.
Replace "data": "table" with "data": "ep_data" (name of our dataset)
Replace "field": "category" with "field": "endpointId". Now, in the Data Viewer, we can see our endpointIDs.
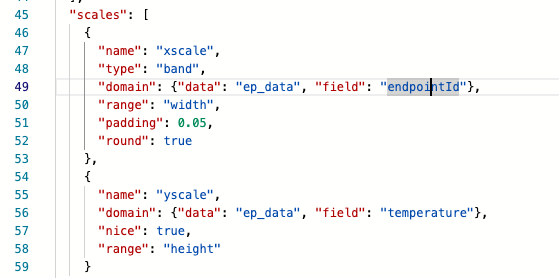
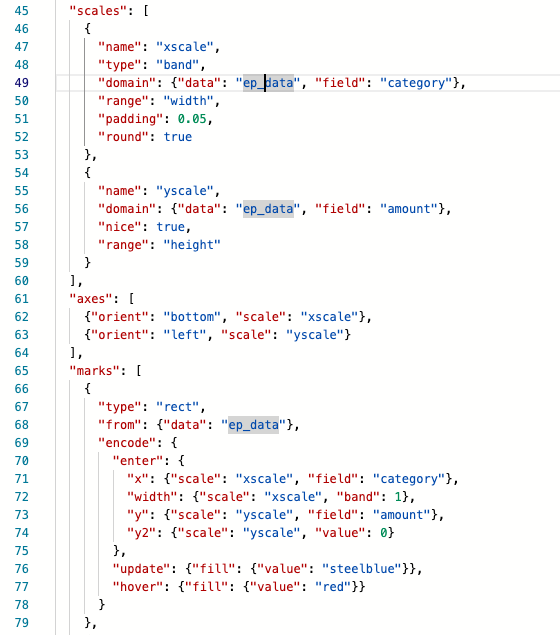
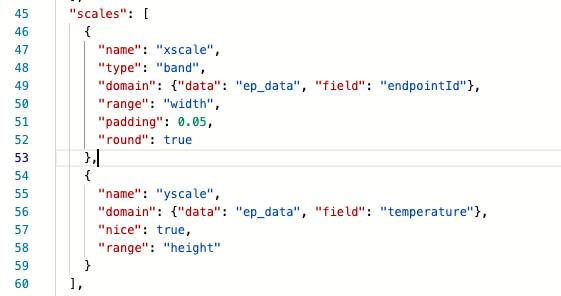
In the scales, we will use:
- for xscale: endpointId
- for yscale: temperature
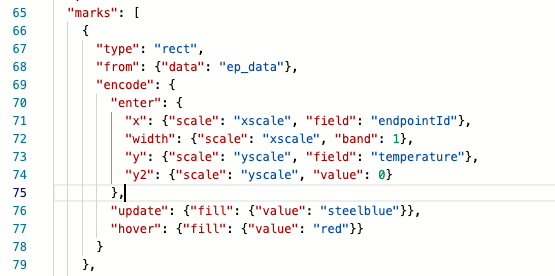
In the marks, we will use:
- for xscale: endpointId
- for yscale: temperature
Also, let’s update the tooltips to:
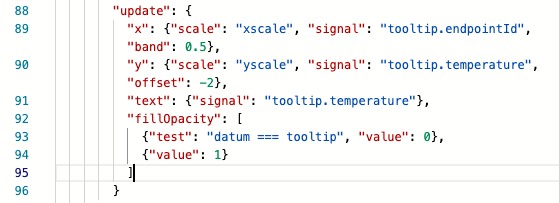
Great, now we can see that some values are already populated to our Bar Chart.
Final steps
Let’s move our configured data back to our chart on Kaa Cloud. We just copy the Vega JSON configuration from the Vega Editor and paste it to the Vega specification field in Kaa Cloud.
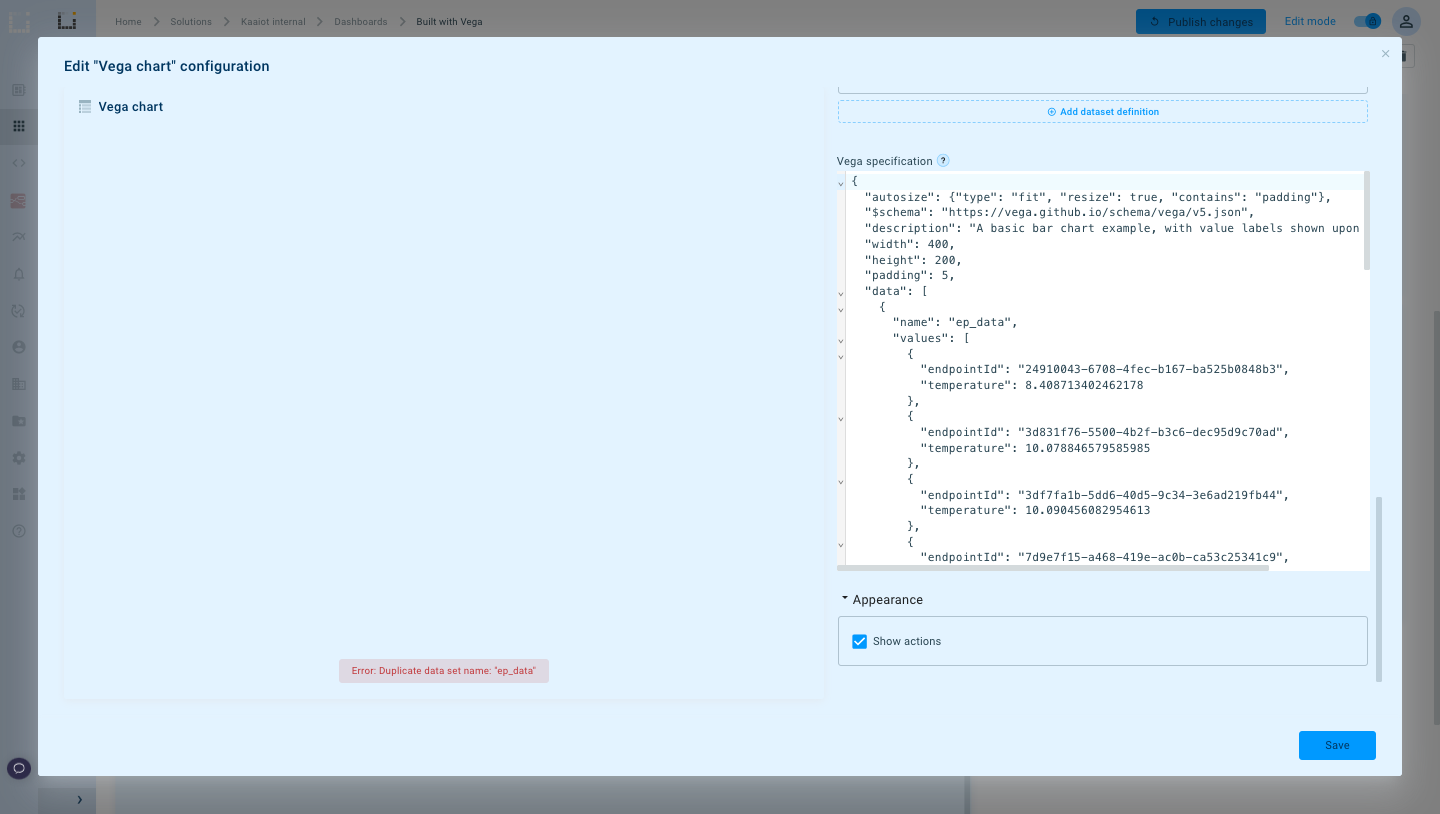
To remove the “Error: Duplicate data set name: "ep_data"” we just need to delete this dataset:
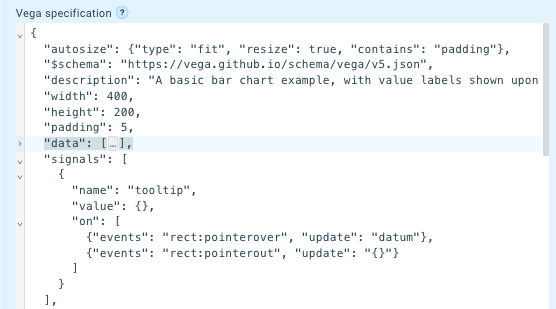
Also, we should remove width and height, because "width" and "height" are filled automatically to fit into the container.
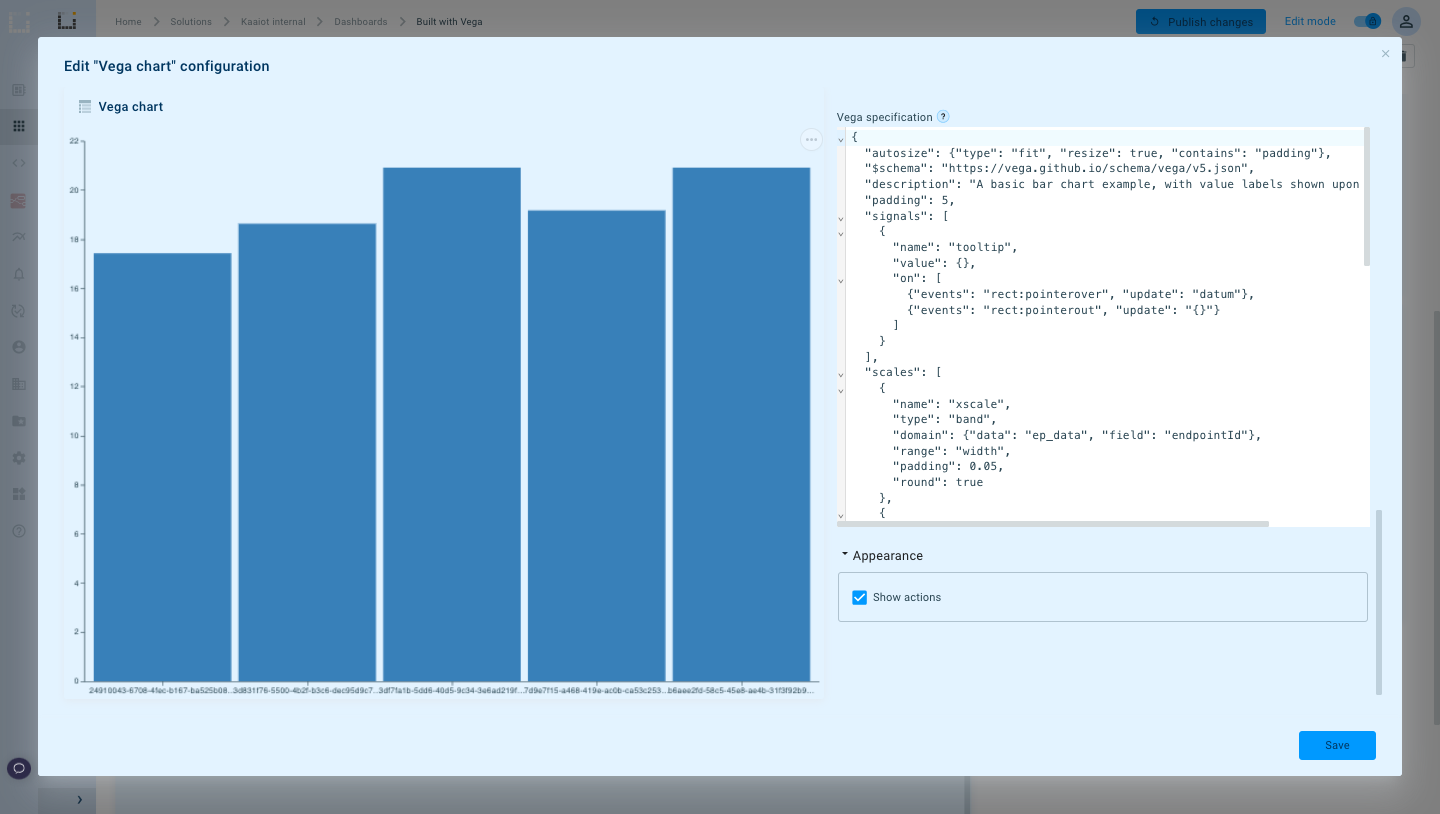
Click Save.
Congratulations! Your widget with the Vega Bar Chart has been successfully created and added to your dashboard.
Bonus: Changing endpointId to metadata.Name
But what if I want to change endpointId to endpoint name to make our widget more tidy and clear for the users?
Not a problem with Kaa Cloud widgets! One of the benefits of Vega grammar is the ability to combine datasets to achieve your visualization goals.
Let’s check it out!
We need to go back to the editing widget configuration and add one more dataset.
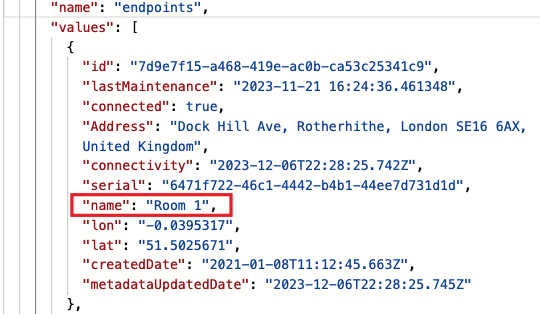
- Enter Name: endpoints
- Specify the Data source: Endpoints
- Select the Application name: the same application that we used before
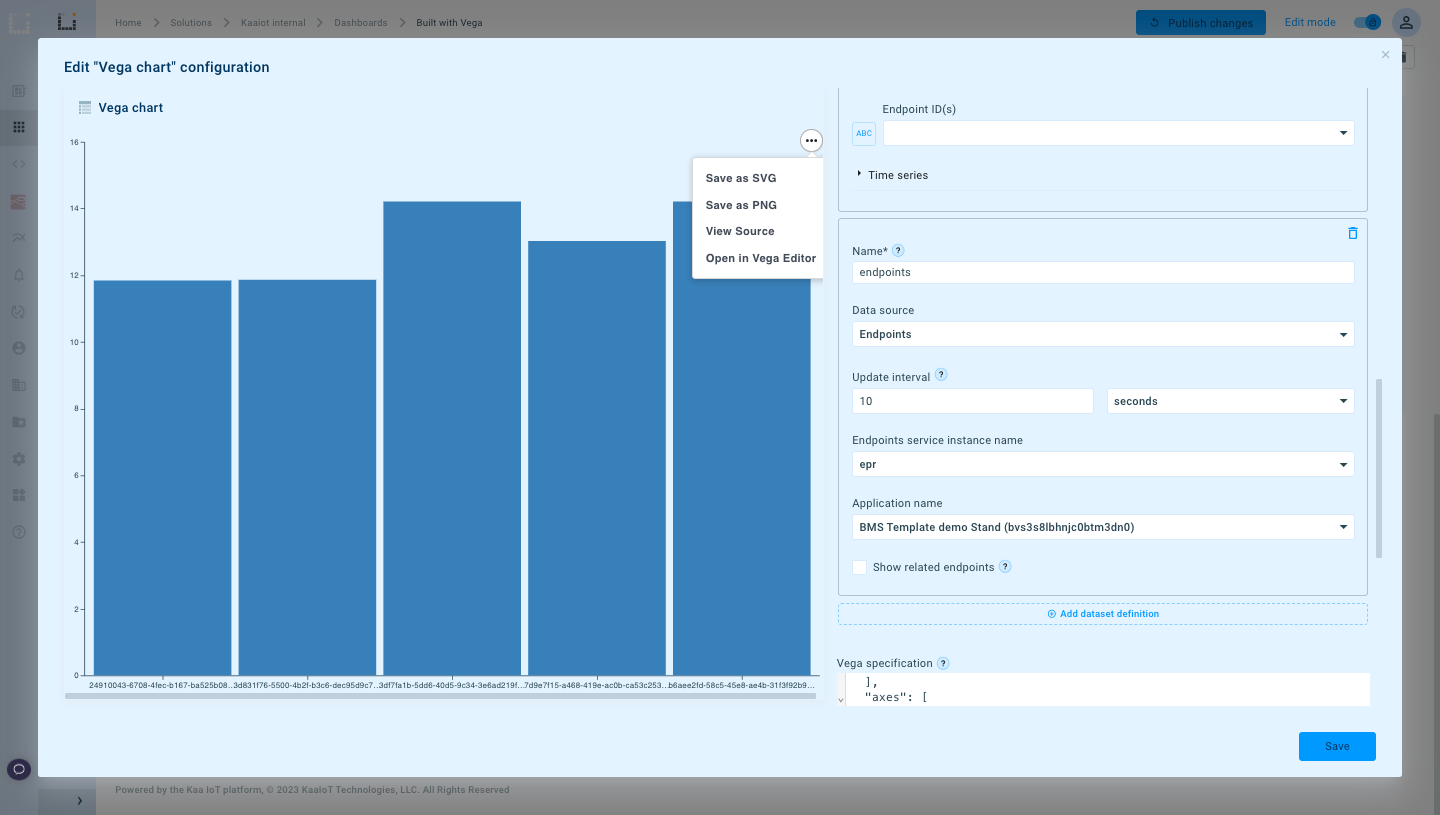
And let’s open our configuration in the Vega Editor. You won't be able to see the preview of the Bar Chart, because we removed the width and height previously. Not a problem, we set the width and height in Vega Editor, and the chart will appear again.
Now, we can also see our endpoints’ data in the Data Viewer and Vega JSON.
Great! Now we need to show the endpoint name instead of endpointId.
With the help of Vega, we can create another dataset. Let’s call it “result” and specify “ep_data” as a source. After this step, we can see “result” in Data Viewer with the same data as “ep_data”.
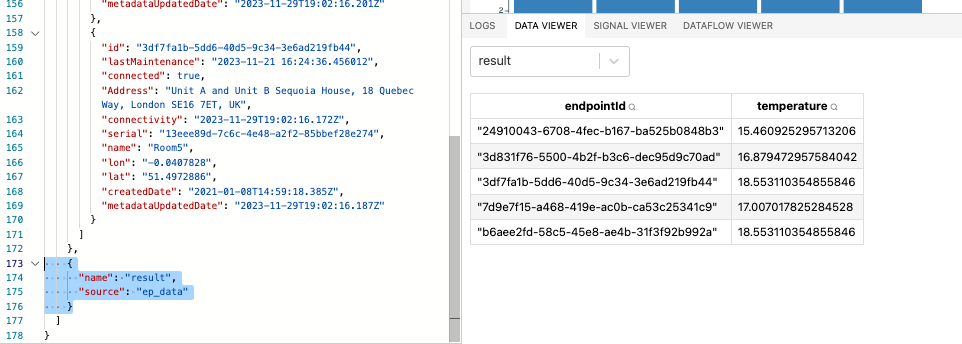
The next step is to join the datasets by endpointId and pick up the appropriate name. It can be done with the help of the Vega transform function called “lookup”, as you can see in the screenshot below.
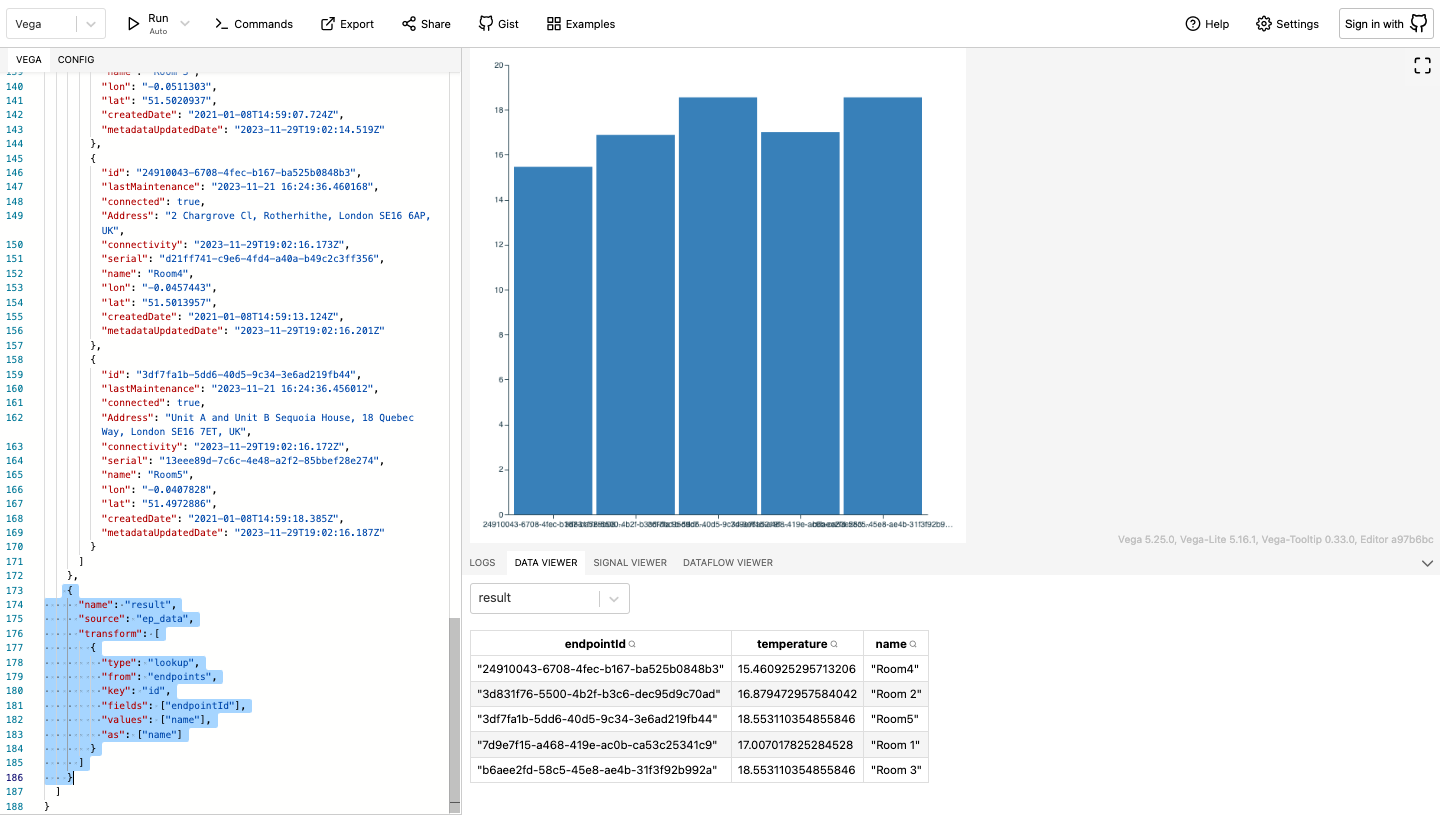
Now we can see the name of the room for each endpoint in the Data Viewer.
Let’s replace endpointId with the endpoint name on our chart. To do this, we only need to update “scales” and “marks”.
- In the scales, we will use:
- xscale: "domain": {"data": "result", "field": "name"}
- yscale: "domain": {"data": "result", "field": "temperature"}
- In the marks, we will use:
- "x": {"scale": "xscale", "field": "name"}
- "y": {"scale": "yscale", "field": "temperature"}
- "update": {
"x": {"scale": "xscale", "signal": "tooltip.name", "band": 0.5}, …
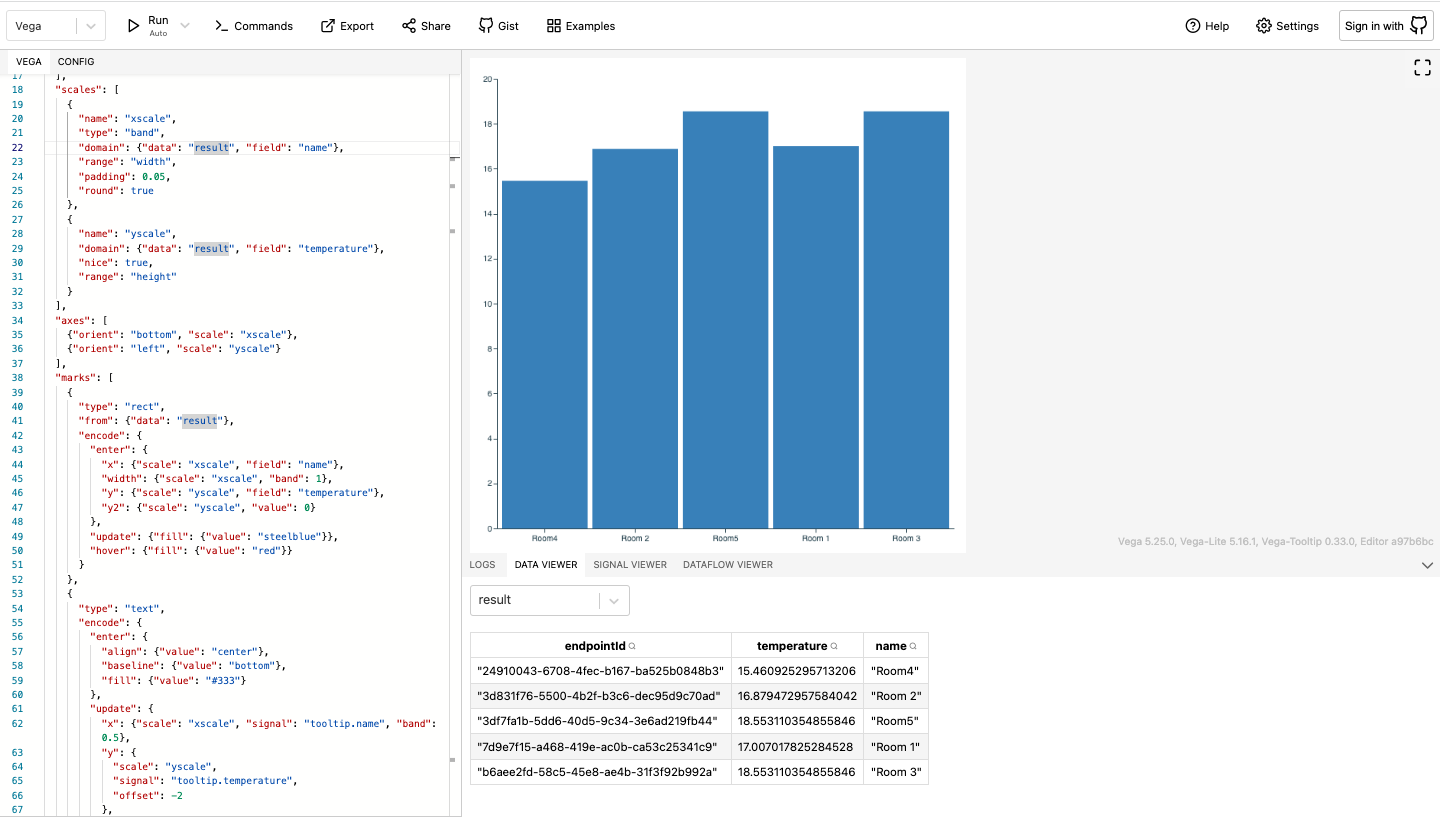
Alright, now we have the Bar Chart with the user-friendly endpoint names.
Note: In this way, the user can join any amount of datasets. Users can do aggregations, lookups, etc.
Let's go through the last quick step on the way to our widget. We need to just copy JSON from the Vega online editor and paste it into the Vega specifications field on Kaa Cloud and remove a few pieces of data there:
- "name": "ep_data"
- "name": "endpoints"
Also, don’t forget to remove the width and height and hide “Show actions”.
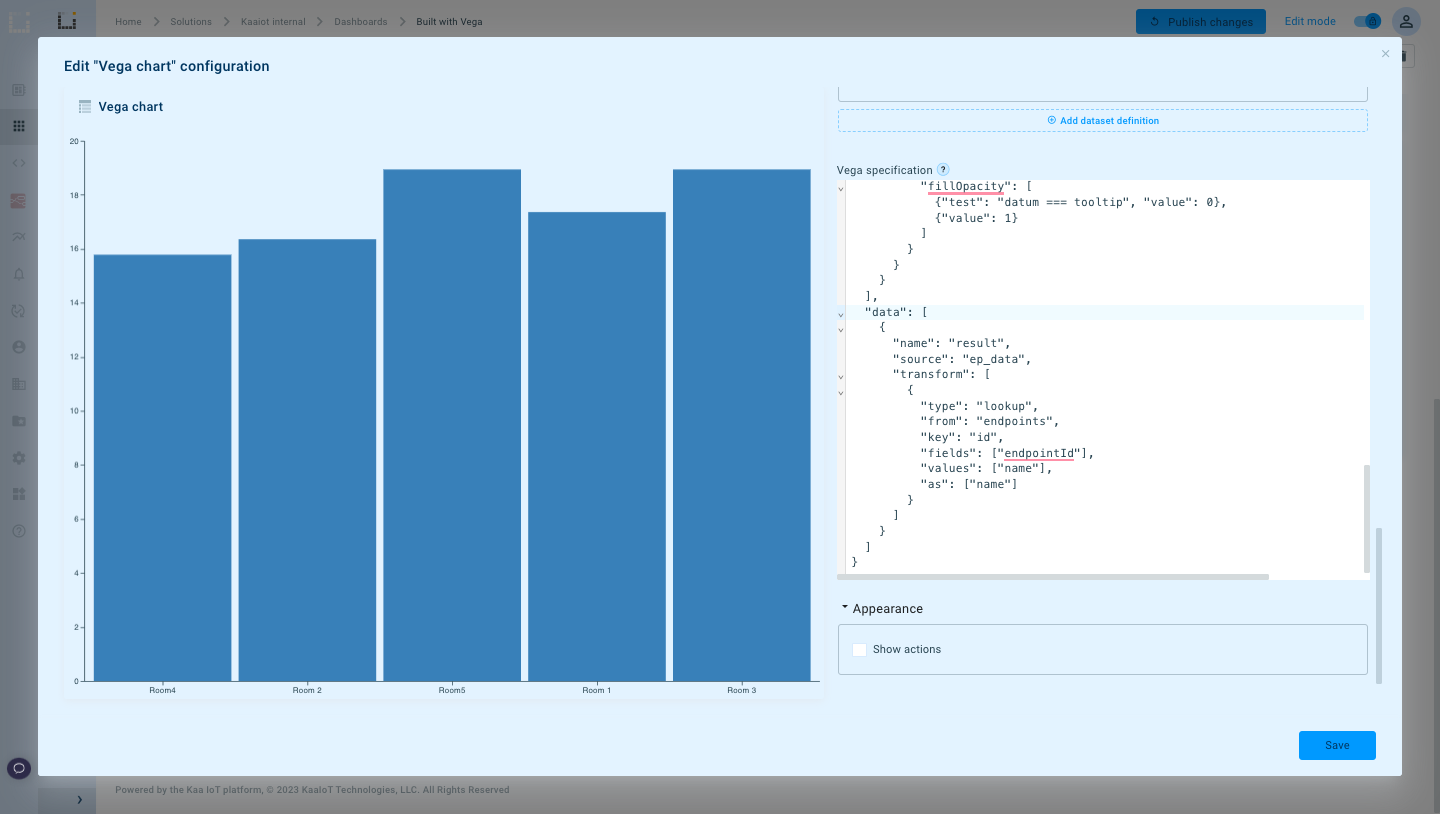
Click Save, and here we go! We have our Bar Chart that shows the temperature at the endpoints with user-friendly endpoint names.

Summing up
Congratulations! You've built a dynamic Vega widget that breathes life into your Kaa Cloud data. Now, your dashboards tell a story, revealing hidden patterns and trends that unlock actionable insights.
But this is just the beginning! The power of Vega lies in its versatility. Explore new chart types, combine datasets, and add interactivity to craft even more powerful visualizations. Stay tuned for future tutorials where we'll delve deeper into Vega's potential and equip you to tackle even the most complex data challenges.
Remember, the only limit is your imagination! So go forth, unleash your creativity, and transform your Kaa Cloud dashboards into stunning masterpieces of data visualization.
Happy charting and stay tuned, as we will post more tutorials around Vega use cases and more!
Related Stories

KaaIoT and ELSYS join forces to bring robust smart building solutions with real-time climate monitoring.
Exciting news! KaaIoT has teamed up with Roomsys to promote smart building management IoT solutions!

The KaaIoT and Sensative partnership tackles a common challenge: water & oil leaks.

Seeed offers a wide range of IoT hardware products. This article explores how KaaIoT and Seeed are joining...